|

Daaaaaaaaaamn!

Why you need to really look closely at things
during the annual inspection and not accept a "pencil whipped" annual!
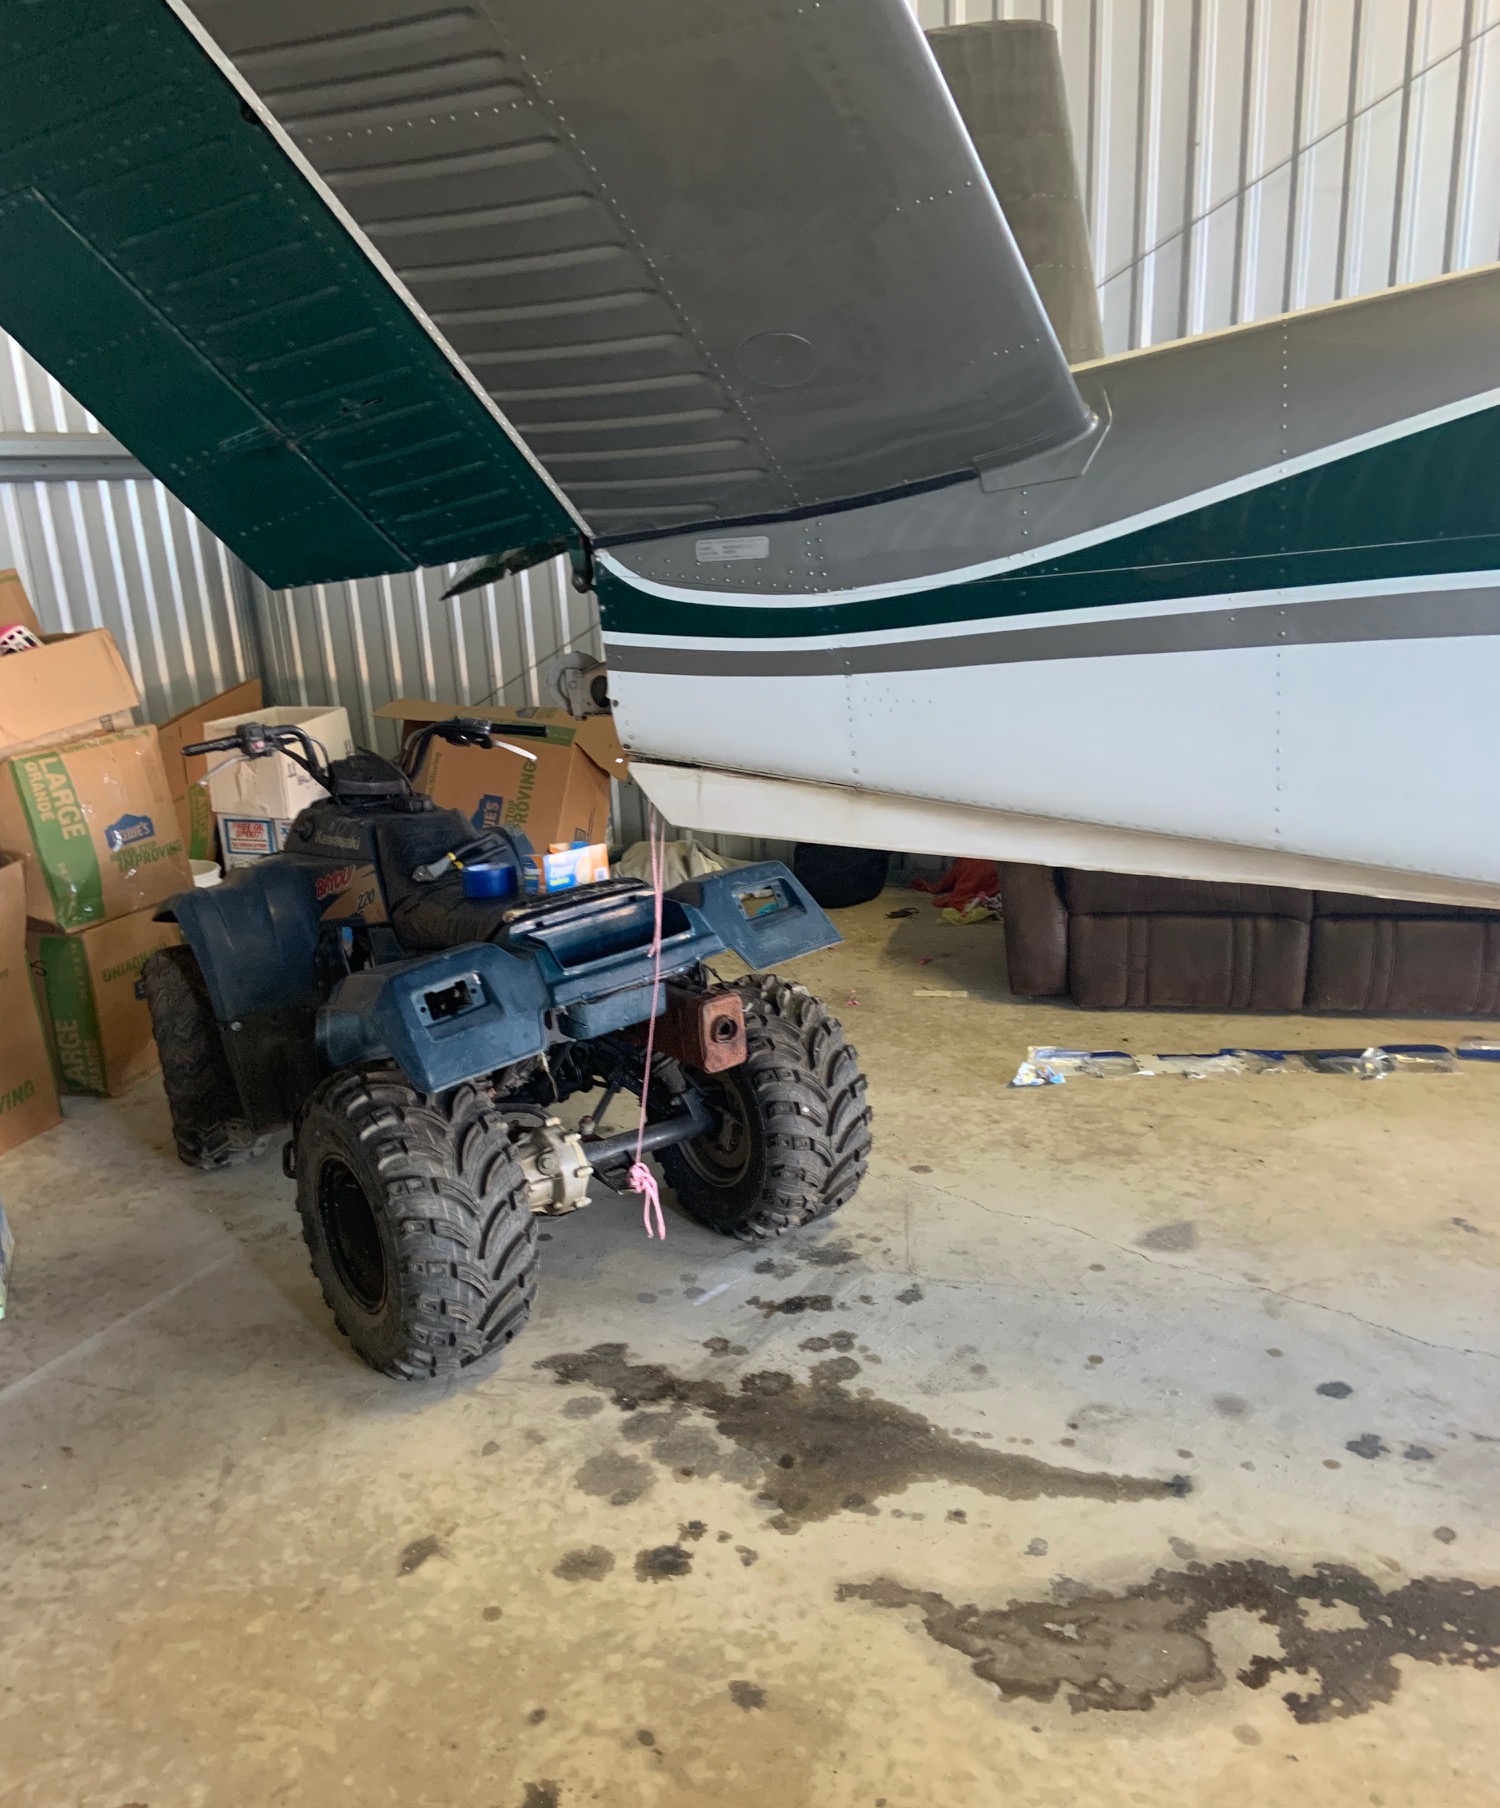
Redneck Tail Stand

This was the tail stand used by an IA for a Bonanza owner's PRE-PAID
Annual!!!!
Does it Smell Like Gas In Here
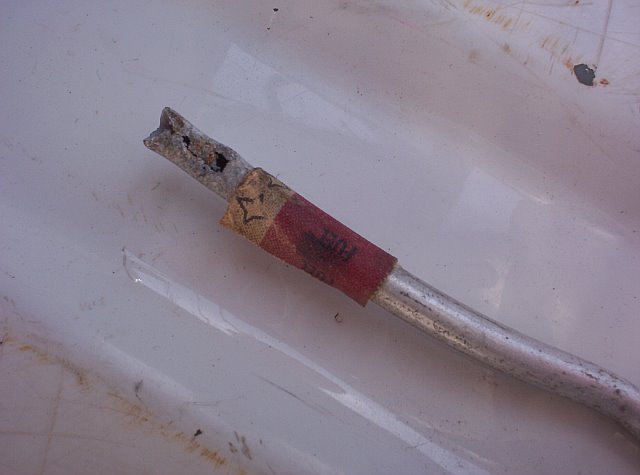
Pictured below is a fuel line found on a 1980 V35B----plane kept dying on
take off.
Pilot had been smelling fuel in the cabin for awhile.----guy ended up landing
it with the gear up-----Plane is being fixed by Glenn Biggs---guy told Glenn to
sell it--never getting in a plane again-owner is/was a airline pilot!
(Contributed by Kevin O.)
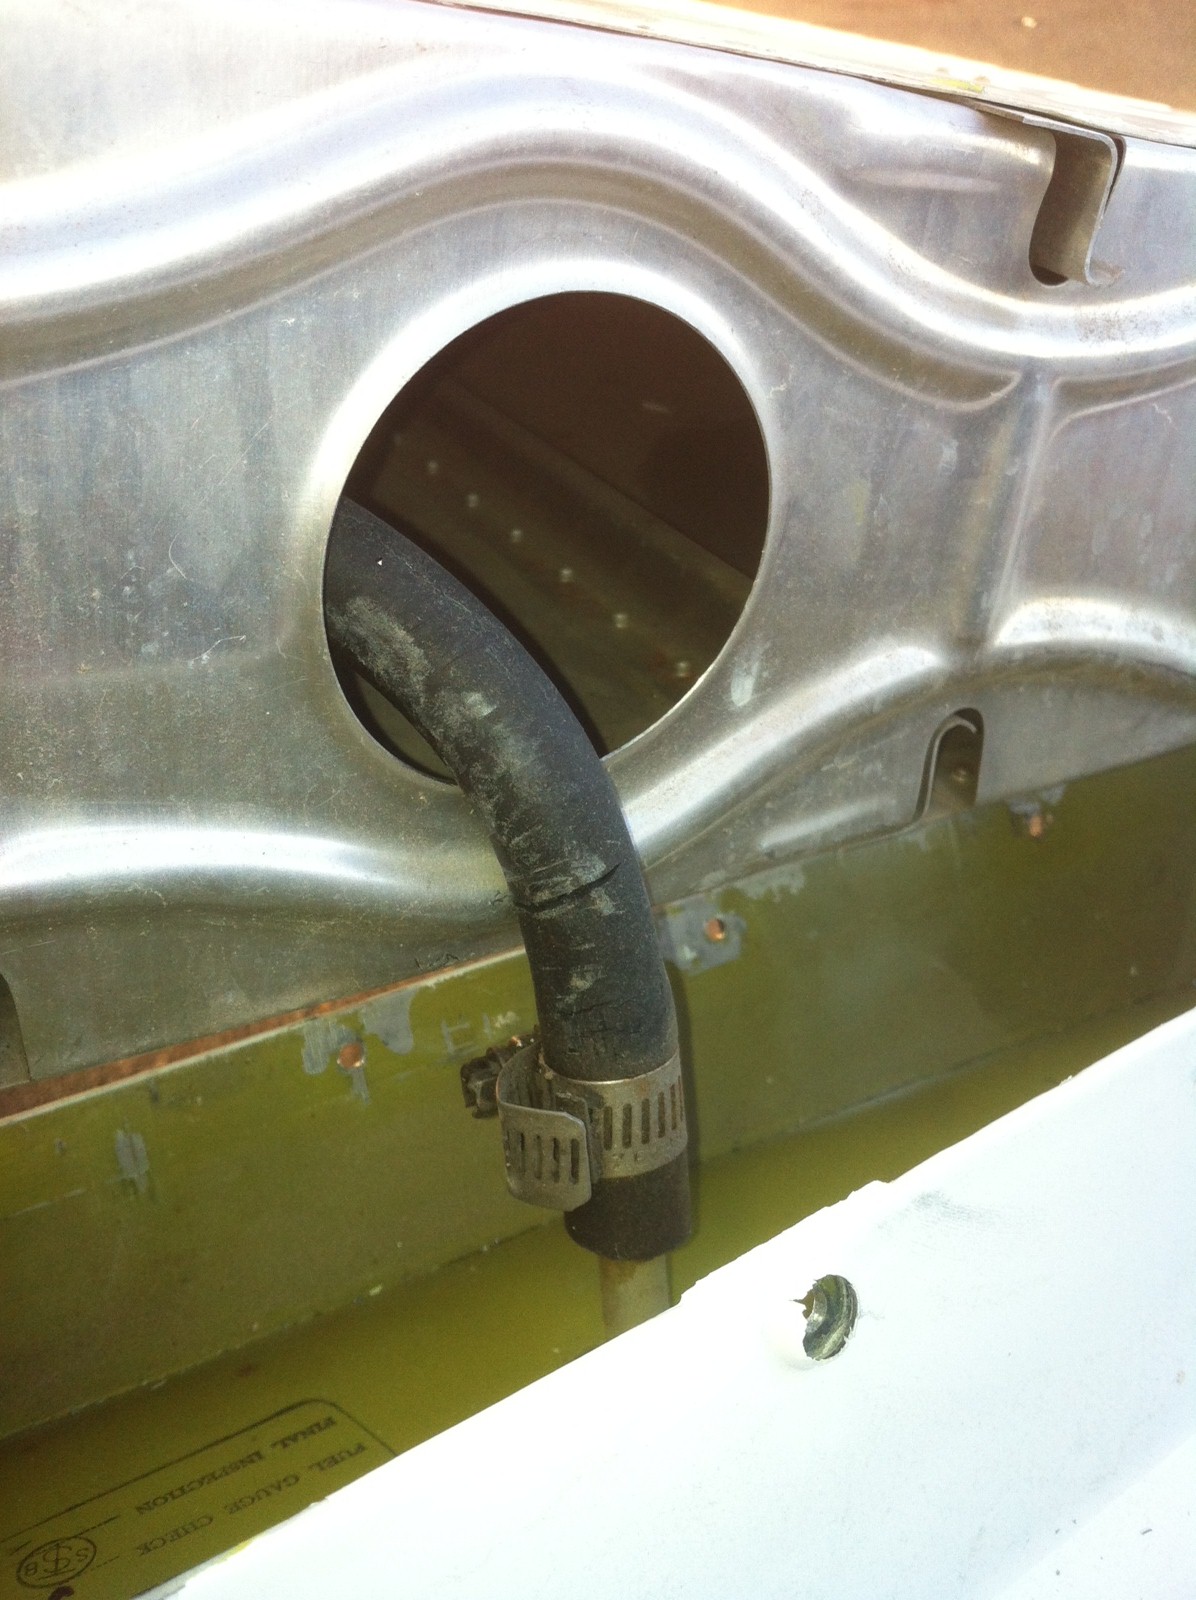
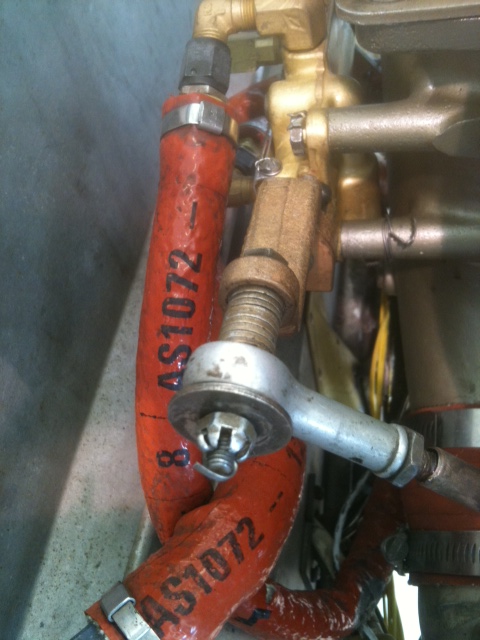
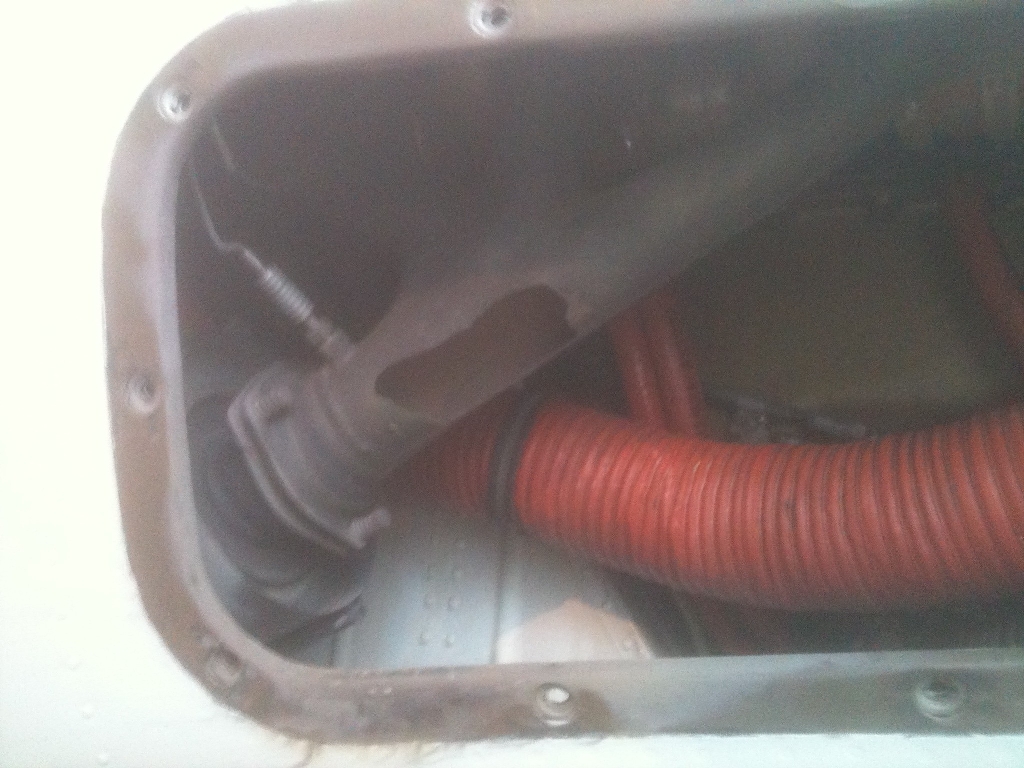
Does it Smell Like Gas In Here - Part 2
Here is a place that might not get the attention it deserves during annual
inspections. The area behind the upholstery panel housing the fuel lines that go
to the fuel selector.
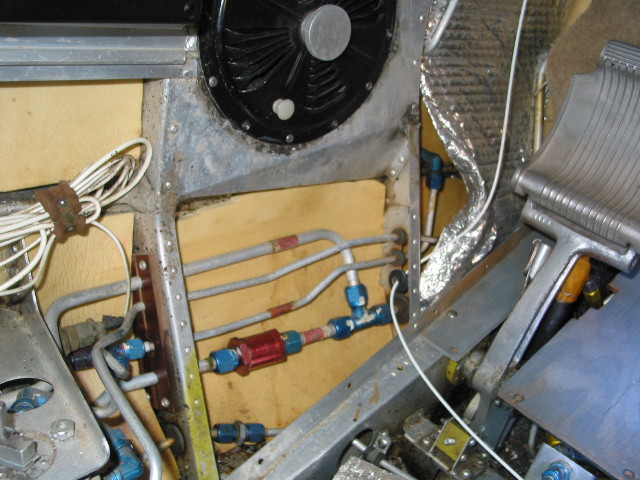
Note the staining on the beige colored insulation behind that array of fuel
lines. Here is what Kevin O. says happened during his recent annual inspection:
".......getting ready to put it back
together when I noticed that the insulation on the side wall in the first
picture had a stained area on it ????
thought that was different---turned on
the boost pump for a few seconds--nothing. Pulled it outside--did a run
up--nothing
pulled it back inside--started putting
it back together--stopped---thought about it for awhile. Decided to do a
GAMI hot start procedure--tank
was on the right--mixture and throttle pulled--turned on boost for 20
seconds--nothing.
switched tanks to left --hit boost
pump--didn't see anything--BUT--I noticed the insulation was a little wet !!!
looked closer--SOB !! I had a small pin hole in the left return line (see fuel
spray in picture below).
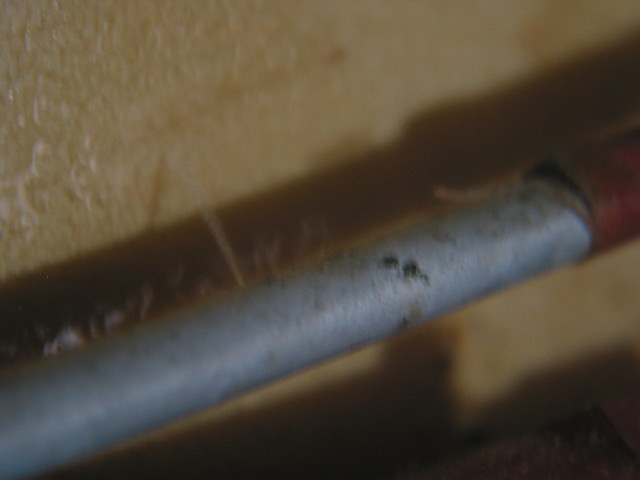
Never smelled fuel in flight--the only
time I got a slight odor was when I did a Gami hot start . Thought I was
smelling fuel from a little over prime after I had cooled down the fuel pump.
This is on a 1960 deb with 4600 hours TT.
You guys with the older planes really have to look close at these systems--Lot
of things can bite you."
Kevin O. 9/15/2012
Listen folks, some of these aluminum lines are coming up on 50 years old. Make
sure you give them the inspection respect they deserve during your annual
inspections. Don't look for or accept a "pencil-whipped" annual on your
Beechcraft. And no whining when your IA pulls out these panels to look at
things.
Here is what IA, Bob B. has to say about these old fuel lines:
"This is more and more commonplace in fluid carrying lines. Every flaw
has had years to become more than just a little scratch. Fuel lines seem to be
more likely, maybe due to all the different compounds and the normal water
entrapment."
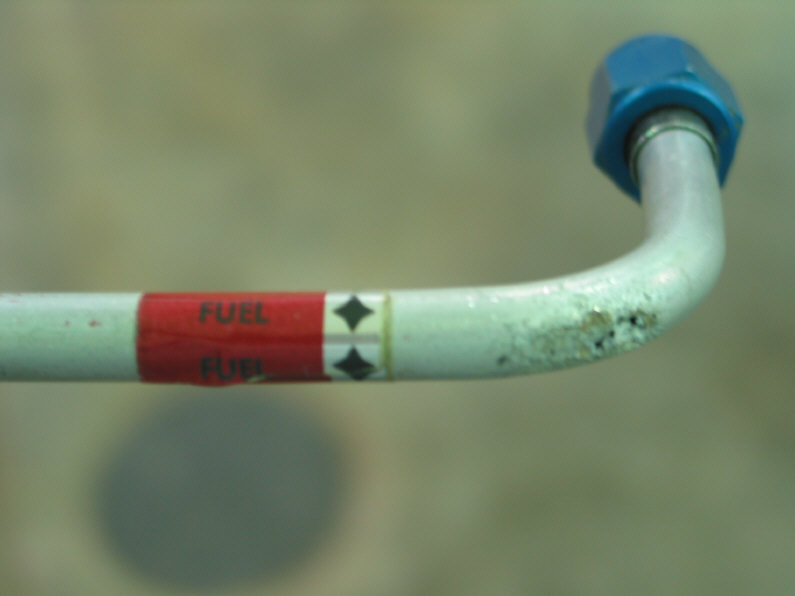
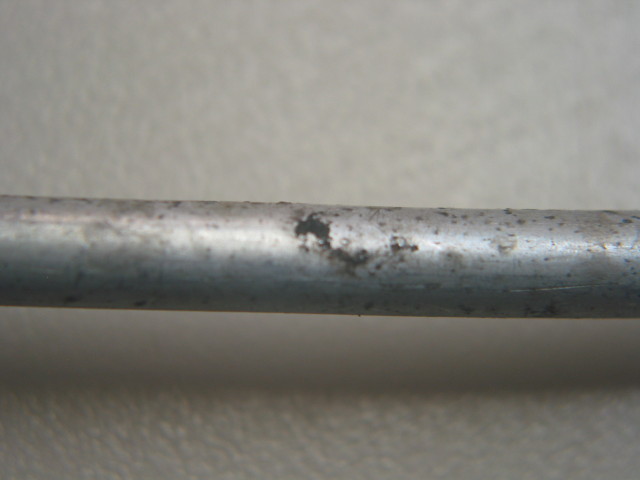
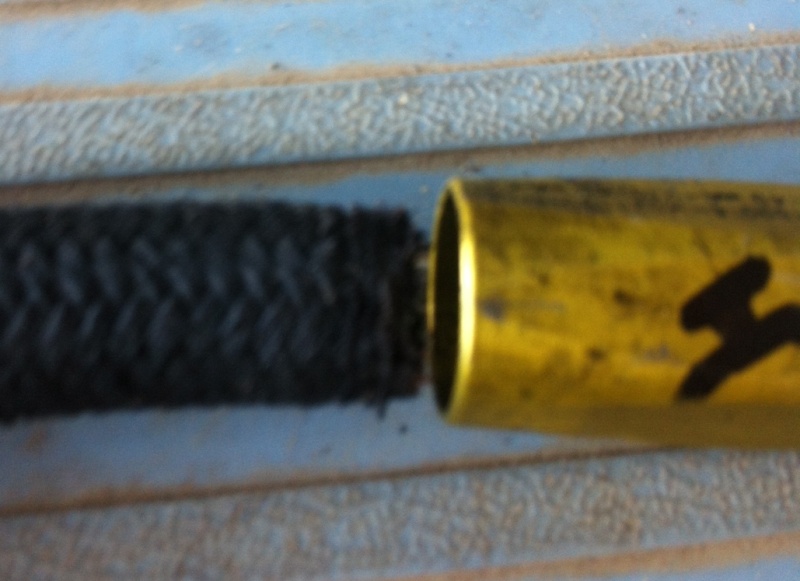
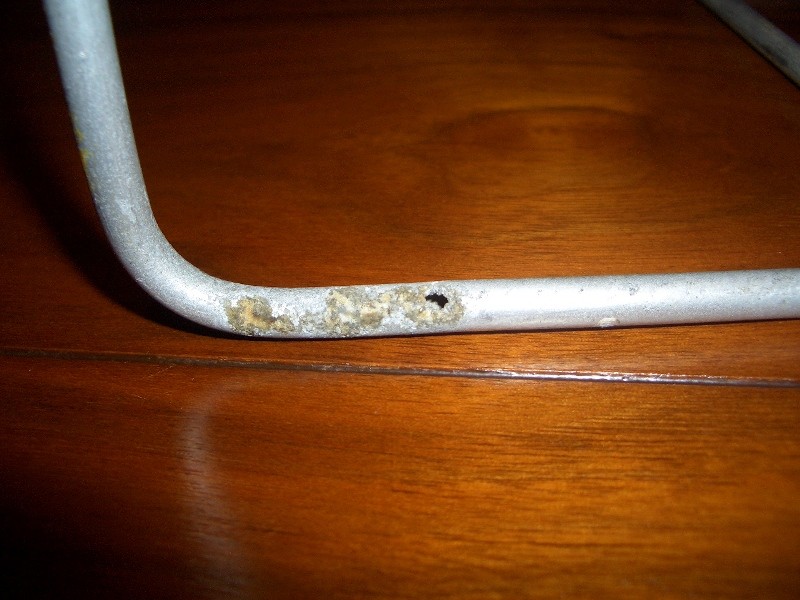
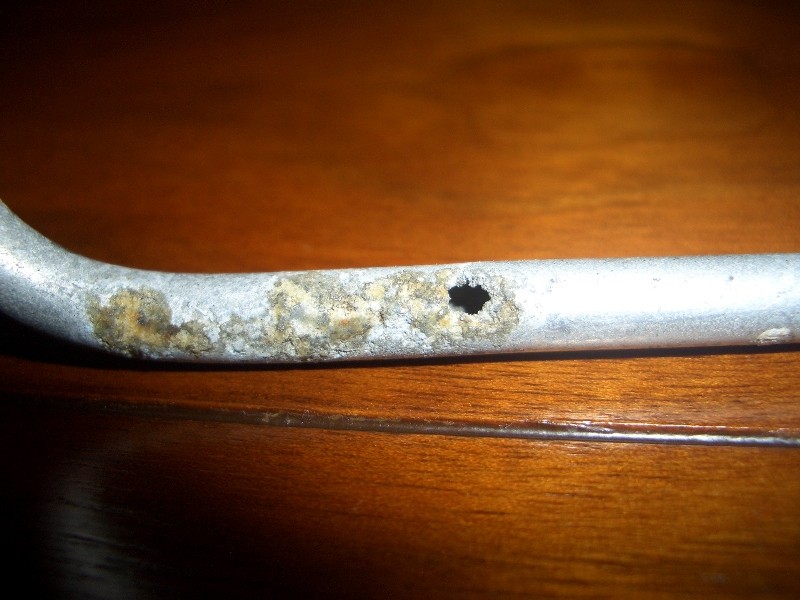
Here is the line as seen with the naked eye.
Note the black corrosion and pitting of the line.
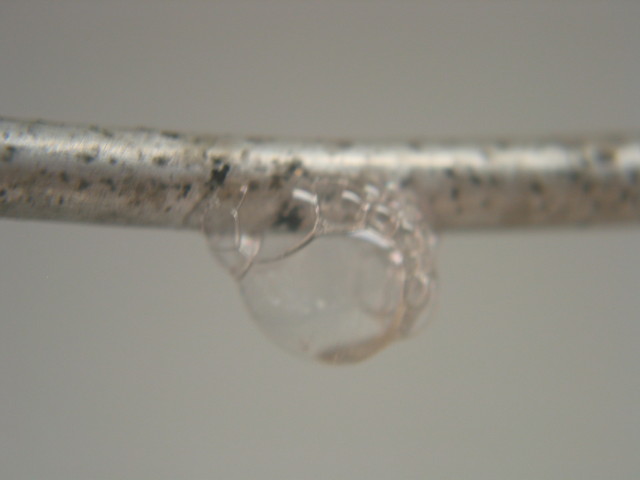
A soap test of the removed line reveals the
porosity of the wall.
Wouldn't you just like to SCREAM at the
knucklehead that left this fuel line laying on the sharp edge of sheet metal
when they installed this owner's tip tanks?
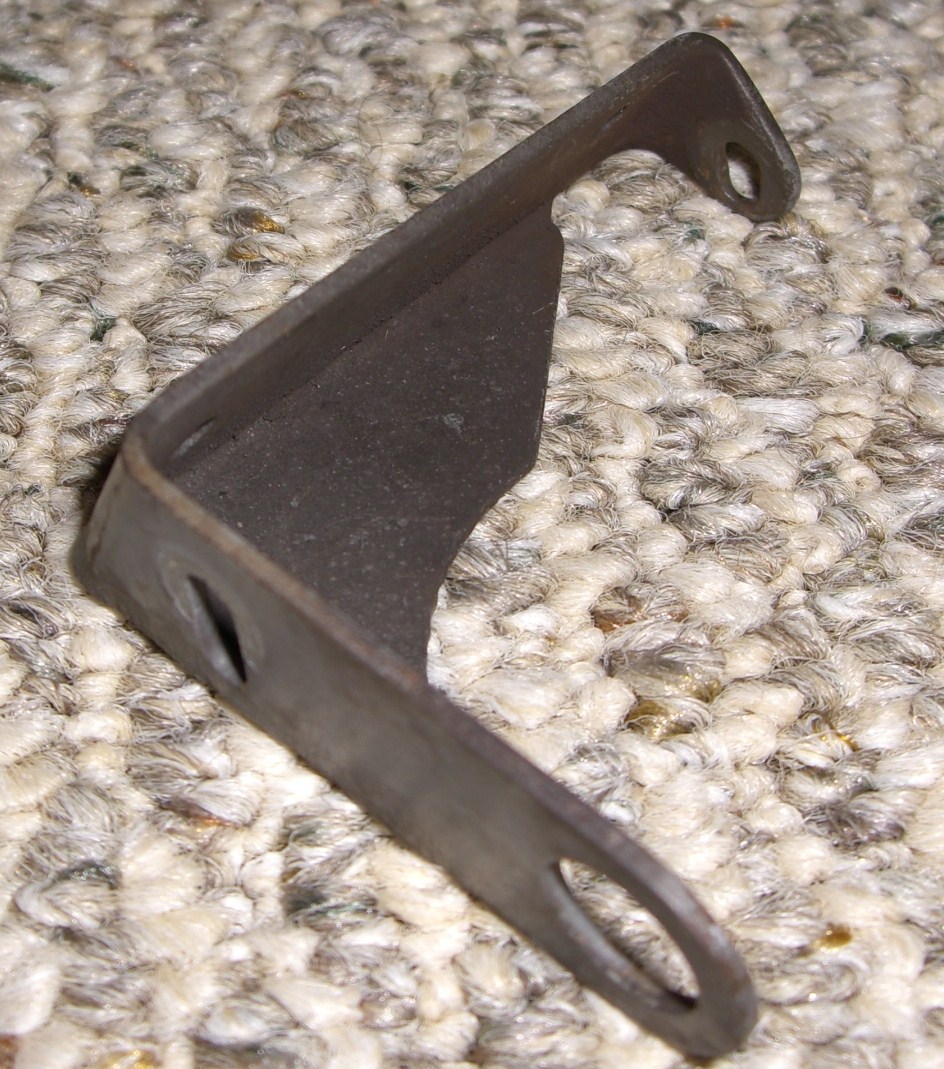
Near Hose Fail (Why
Thorough Annuals are Very Worthwhile!)
In the process of dealing with an exhaust
bracket stud on the base of the intake tubes, we decided to change out all the
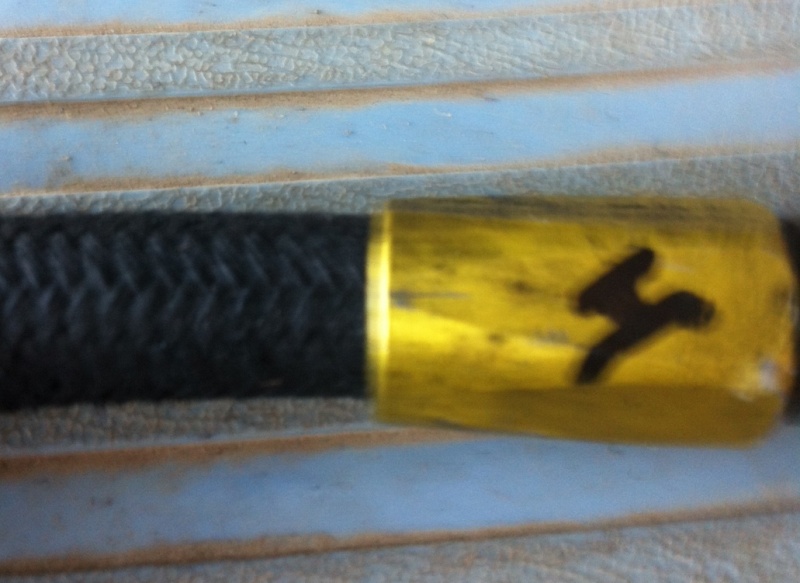
stiff hoses. Here are pictures of a fuel line hose at the back of one of my
IO-470 engines that was laying in there for 9 years since the overhauled engine
was installed. My IA discovered this near disaster when making up the new hoses!
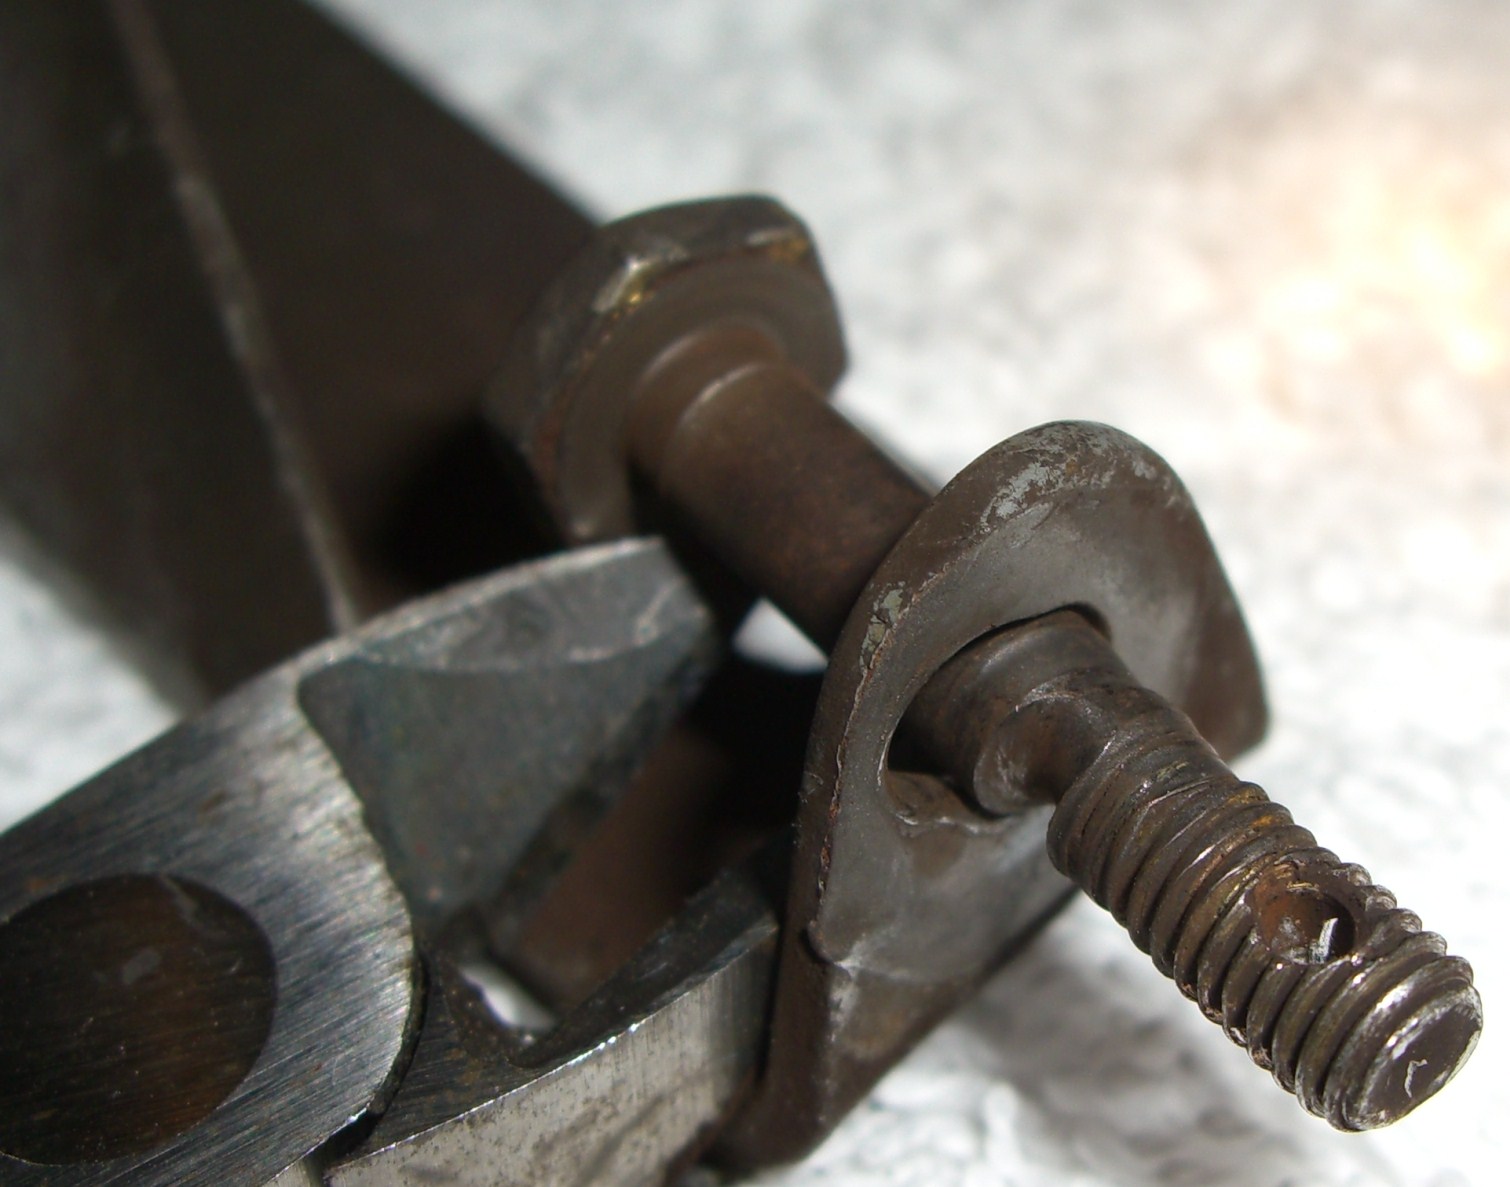
Note how the hose looks very nice in the top
picture and how little actual "bite" the connector fitting had on the hose!
There is nothing wrong with new hoses made up by your A&P/IA, however, know your
mechanic's skills in this area before entrusting something as important as a
fuel or lubricant hose.
Here is a harrowing tale from Beech Talker Gary S. regarding his Baron fuel line
issue:
I lost my right engine on lift off climb out, low
slow and trying to clear trees and houses, put it down in field no place to go,
point is, NTSB, FAA and attorney all said, "Sounds like fuel line collapse, we
see this quite often, but never got to talk to a survivor", I said REALLY, You
know this but don't say anything?
I bought my new Baron 3 months ago and required a
annual before closing. I asked the mechanic did the fuel lines need replacing
around the engines and he replied, they will probably be ok for another year or
two! I said, are you kidding, they are 9 years old and the POH says to replace
every 5 years, he said nobody does that, this was a different mechanic from
before.
The inner liner separates and suction causes the
line to collapse and starve your engine immediately with no notice on takeoff,
most fuel demand. I had the lines replaced $1,500 both sides. My goal is if I
just help save one pilot from this type accident it's worth it to me.
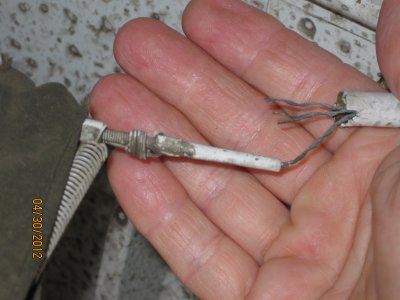
Here is a cockpit fuel line that was buried behind the panel when Dave
B. was doing a Speed Slope Windshield. The aluminum was riding against the steel
wire in the defroster duct hose. The pilot's wife was complaining about the fuel
smell! DUH!
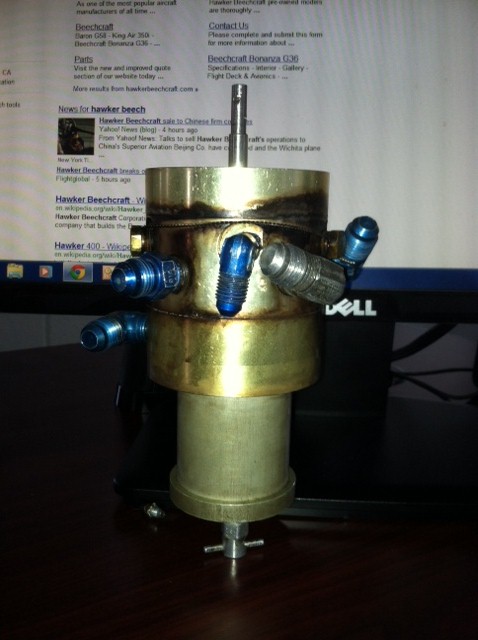
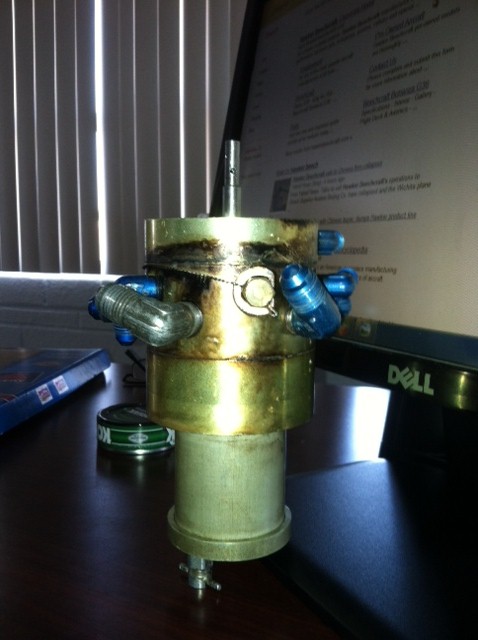
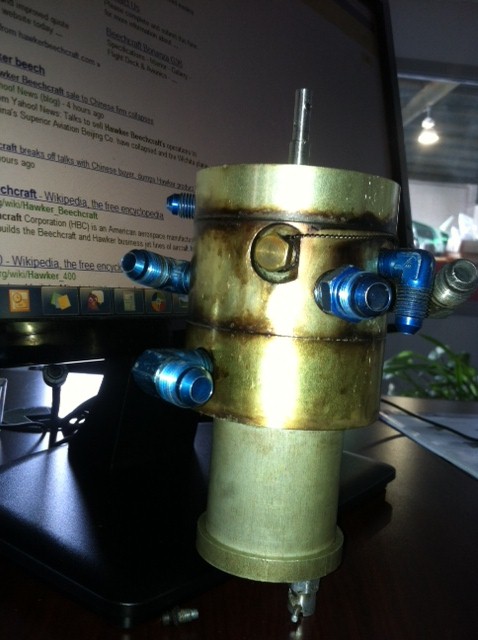
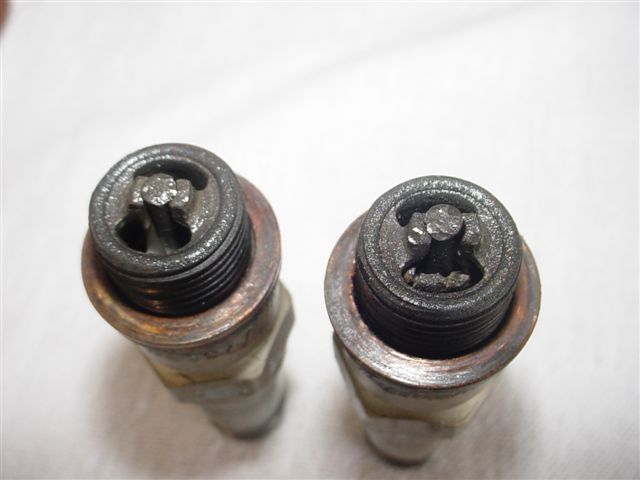
Fuel Selector O-Ring Death
Pictured below is a Bonanza fuel selector with telltale fuel leakage signs of
o-ring death. This is why you want your IA to uncover it during the annual and
give it a good inspection. How many years do you think you should get out of
those WWII vintage nitrile rubber technology o-rings anyway?
By the way, McPeck Aviation has an O-ring kit solution for Bonanza Fuel
Selector Valves HERE
PS: Check out the flurosilicone o-ring page
HERE to see if there is a much better o-ring that
your A&P will allow to be used in your fuel selector. Flurosilicone o-rings have
been reported to give exceptional service life in fuel cap and brake caliper
applications.
Here's a story from CSOBeech visitor P.B. from Amarillo, TX which points up the
importance of good o-ring maintenance/servicing of the fuel selector. DUH- Bad
o-rings is a way for air to get into your fuel system and make for some
troubling engine running.
By the way, if
you are removing your Bonanza or Debonair fuel selector, check out this
MANDATORY Beechcraft Service
Bulletin SB-2518
P.B. writes as follows:
I recently had a difficult time diagnosing problems with a newly OH’d engine
(IO-520BA). The engine was from a top-rated rebuilder.
The symptom: engine would start normally, but only run for 2-3 seconds unless
the boost pump was used, in which case the engine would run rough due to overly
rich mixture from excessive pressure.
The fuel pump (newly OH’d also) was the first suspect, but it tested OK.
My friend (automotive Master Mechanic) brought his handheld/operated vacuum
pump & we tested the integrity of the fuel system AFT of the firewall.
Using a clear section of hose, we attached his vac pump to the fuel supply
line where it hooks to the engine driven fuel pump. When we applied vacuum, fuel
was pulled thru the system,
but had about 50% bubbles with the fuel (hence the need for clear fuel line).
We believe when bubbles entered the engine fuel pump, the pump immediately lost
prime & the engine stopped.
There were no fuel leaks aft of the firewall, so we figured it had to be the
fuel selector valve. The problem ended when we replaced the valve with a new
unit. I ended up buying a new valve, because after calling
around I could not find a facility to re-build my old valve (it had an early
P/N, but I was told by HB it was exactly the same as newer P/N).
As for which parts inside the valve were bad, the major suspects were the
small O-ring (.25" dia) located where the selector shaft enters the valve body,
and a large O-ring (1.5" dia) that is located immediately under the valve’s top
plate. The indents are located on the top of the top plate. The small O-ring can
be replaced without removing the selector valve, but not the large one.
I believe that bubbles can easily enter the ‘up-stream’ fuel lines of older
a/c (my F33A is a ‘73 model) and make an engine MUCH more susceptible to vapor
lock. It appears to me that ‘vapor lock’ is actually cavitation of fuel pump due
to air ingestion.
This "up-stream fuel system integrity test" is VERY EASY to perform. A hand
held vacuum pump can be had for $25 or so.
I’m an avid reader of the NTSB files, and am disturbed at the many cases of
IO520 power loss with no known cause. I think many/most of the
unexplained power loss incidents can be explained by this, or some variation of
this.
Check out the flurosilicone o-ring page HERE to see
if there is a much better o-ring that your A&P will allow to be used.
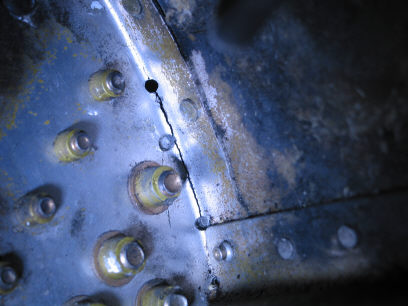
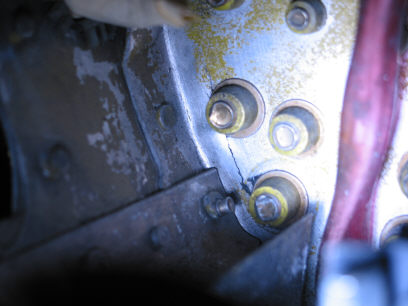
Let's Stop Drill The Spar Carry Through
Section
Pictured below is a Baron 58 carry through spar section. The picture on the
left with the stop drill is the front. Picture on the right is the back of the
spar on the lower left side.
Glenn Biggs is putting the Beech Spar Repair Kit on it! (Contributed by Kevin
O.)
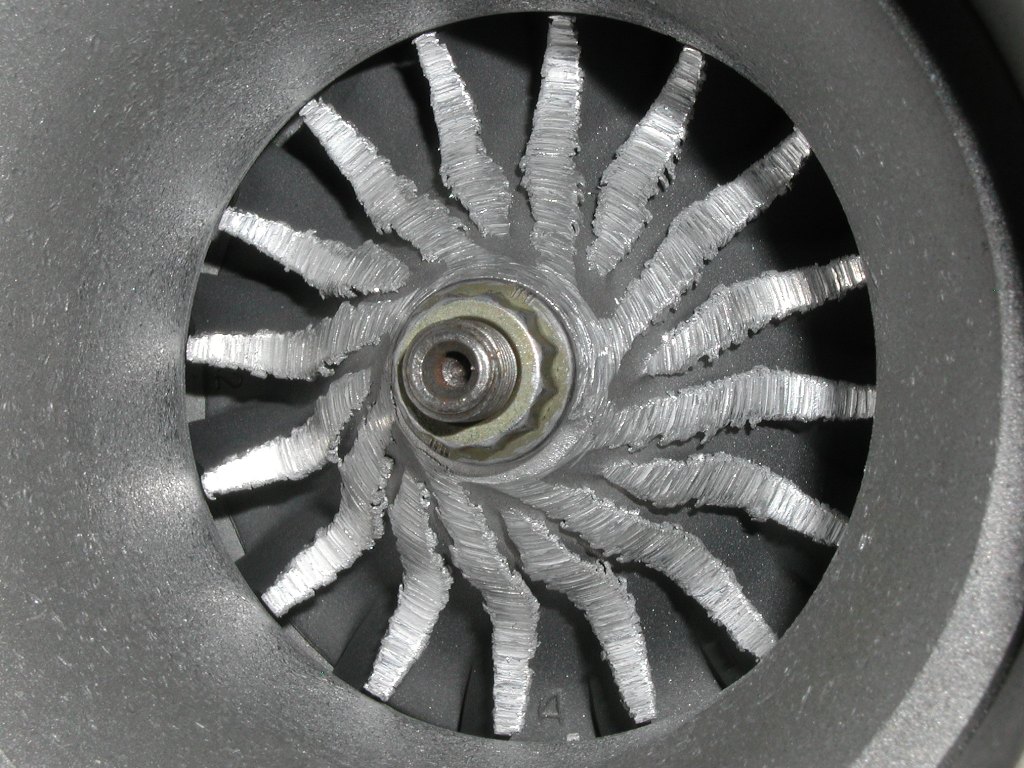
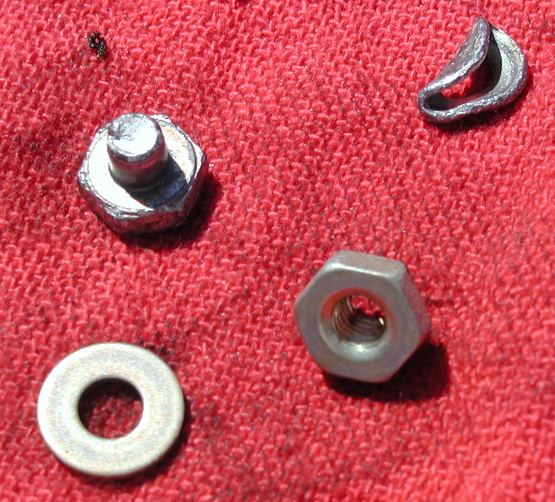
Engine FOD Disasters
Beech Lister, Greg B., reports the following:
Some pictures from 2002 when I had an AN3 bolt come loose in the induction
airbox behind the air filter and ahead of the turbo charger. Trashed the turbo
and launched tiny bits of metal downstream through the intercooler and into the
engine. The AN3 bolt and a washer was found loose in the airbox having been
ground down to almost nothing. The metal lock nut found sitting below the airbox.
The intercooler trapped a lot of the metal, but enough passed through into the
engine to warrant a teardown.
The messages I took from this were:
-- Check torque on induction bolts often!
-- Consider safety wire or other backup on fasteners that can find their
way into the induction
-- Do business with companies like Tornado Alley that know how to treat
their customers right!

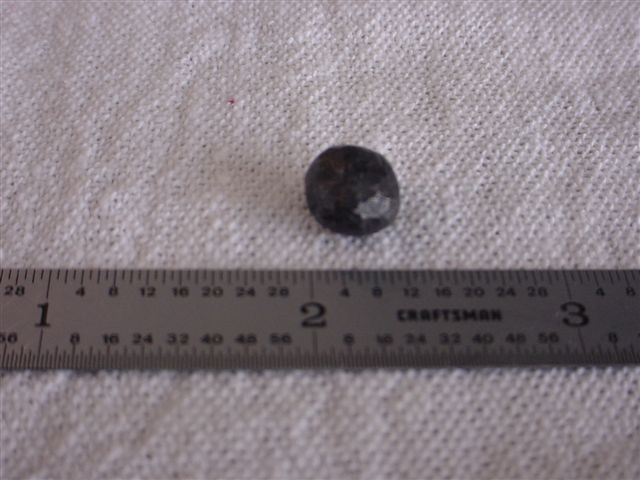
Beech Lister, Jeff W., had a nut come loose and got ingested
by one of his Travel Air cylinders in flight. Jeff writes:
Here is what happens when a loose #10 nut wanders unsupervised in the
intake air box. At least that's what we assume it was, it's the right size and
mass, although we never did find any missing hardware anywhere on that intake or
engine.
I was fortunate, this happened at 11K ft about 20 miles from the town
where my in-laws live, so it amounted to little more than an inconvenience. But
an hour earlier I had taken off from Gaston's on a hot day, I would not have
liked to have lost a cylinder on the climb out of there. The little Travel Air
doesn't have any cylinders to spare.
Here are his photo results:
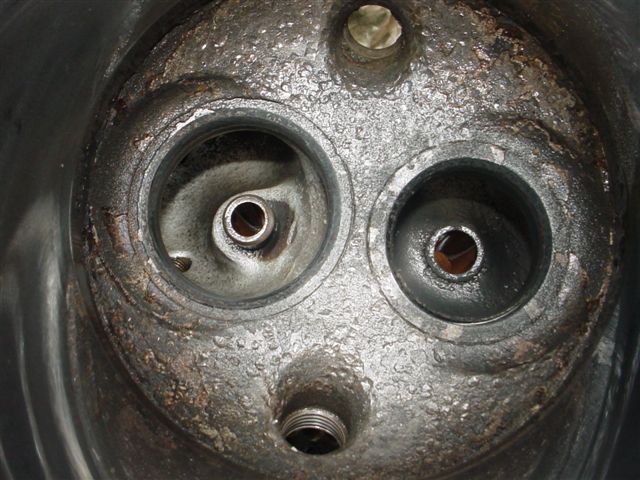
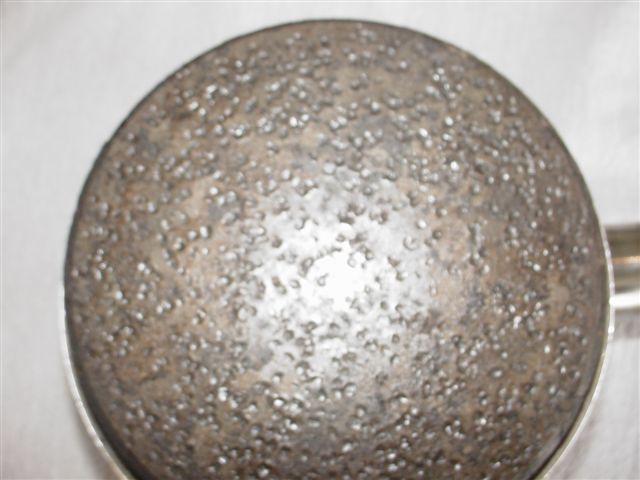
Engine Corrosion
aka: I'm "Saving" My Engine
Here's one of the biggest reasons you need to fly your
plane/engine more than 450 hours in six years - Corrosion!
Aircraft and factory reman engine were based all it's life in
San Antonio, TX (KSAT).
Here's the rust evidence:
High humidity and inactivity very likely contributed to this
engine's very early demise. What a waste! Be a CSOB by flying your plane more
often and not letting corrosion be a possible outcome for your very expensive
engine.
Pirep and pics courtesy of Aerobatic Bo owner Chuck G.
Bolt Too Long - Easy Fix (NOT!)
Here is a real gem - for an engine control cable attachment found by Stuart S.
Here is a picture, contributed by Kent F., of a standby vacuum
system cable that was nearly sawed in half by the elevator cable!

I hope the elevator cable is OK!
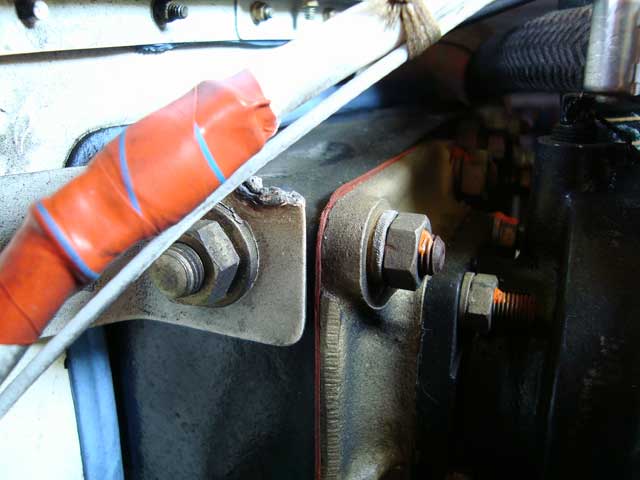
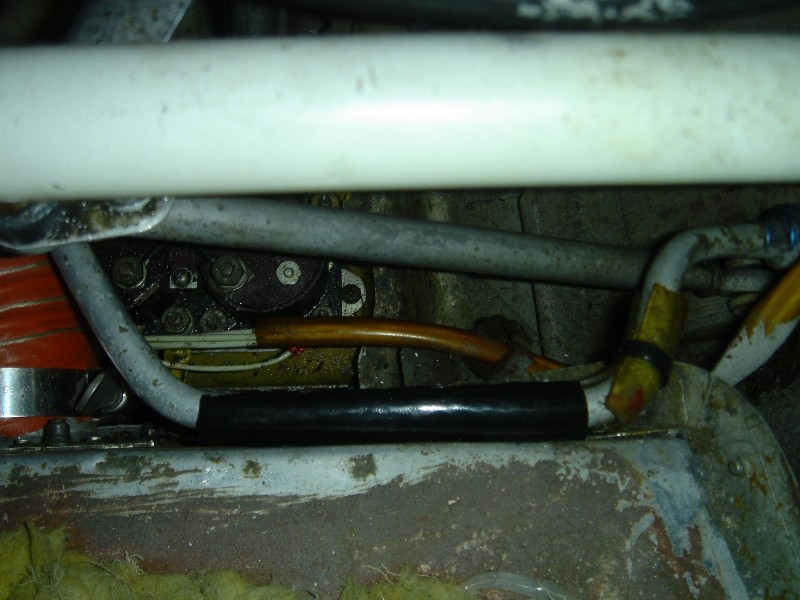
Battery to Alternator
Wire Chaffing
Can You Say:
"Complete Electrical Failure in Flight?"
Bonanza owner John B. reports the
following:
The engine gages were rebooting occasionally, the
EDM700 and FS450 as well as the P1000 tachometer would shut down and start back
up - with the attendant self-check - as if the battery master had been flicked
off and back on. Worse, it happened with no rhyme nor reason and last time out,
the avionics stack rebooted too and thus, the MX20 rebooted as well. Confounded,
I sought advice and set out to find the cause with instructions largely
consisting of looking for bad connections, or grounds.
Imagine my surprise at finding the fat wire
coming off the alternator, which goes through the firewall on it's way to the
battery master, grounding against a piece of sheet bracket for the baffles!
Worse, each time it arced it was eating away a bit of the bracket - eventually
perhaps even being enough to self-correct as it created clearance - picture
attached.
Was it the fault of the shop, which performed the
annual? Absolutely not!
However, the issue 'does' arise from being in a
shop, giving credence to the old saw. You see, the very first day I owned her I
found the terminal where that wire attached to the alternator was improperly
crimped 'and' the wire was too short to permit properly adjusting the drive belt
tension. So the mechanic in Dear Valley (Phoenix) simply spliced in a section of
wire (to make it longer) and crimped everything properly. End of story, right?
Not quite because in retrospect he also should have added an Adel clamp for
support.
Fortunately, dressing the bracket (along with a
dab of paint), plus once again splicing in a piece of wire (and this time
supporting it with an Adel clamp), will put things right.
Moral of the story? Don't be too quick to assign
blame. Lesson learned?
Eyeball all wires to ensure they're properly
tied-off or supported and NOT rubbing on other things!

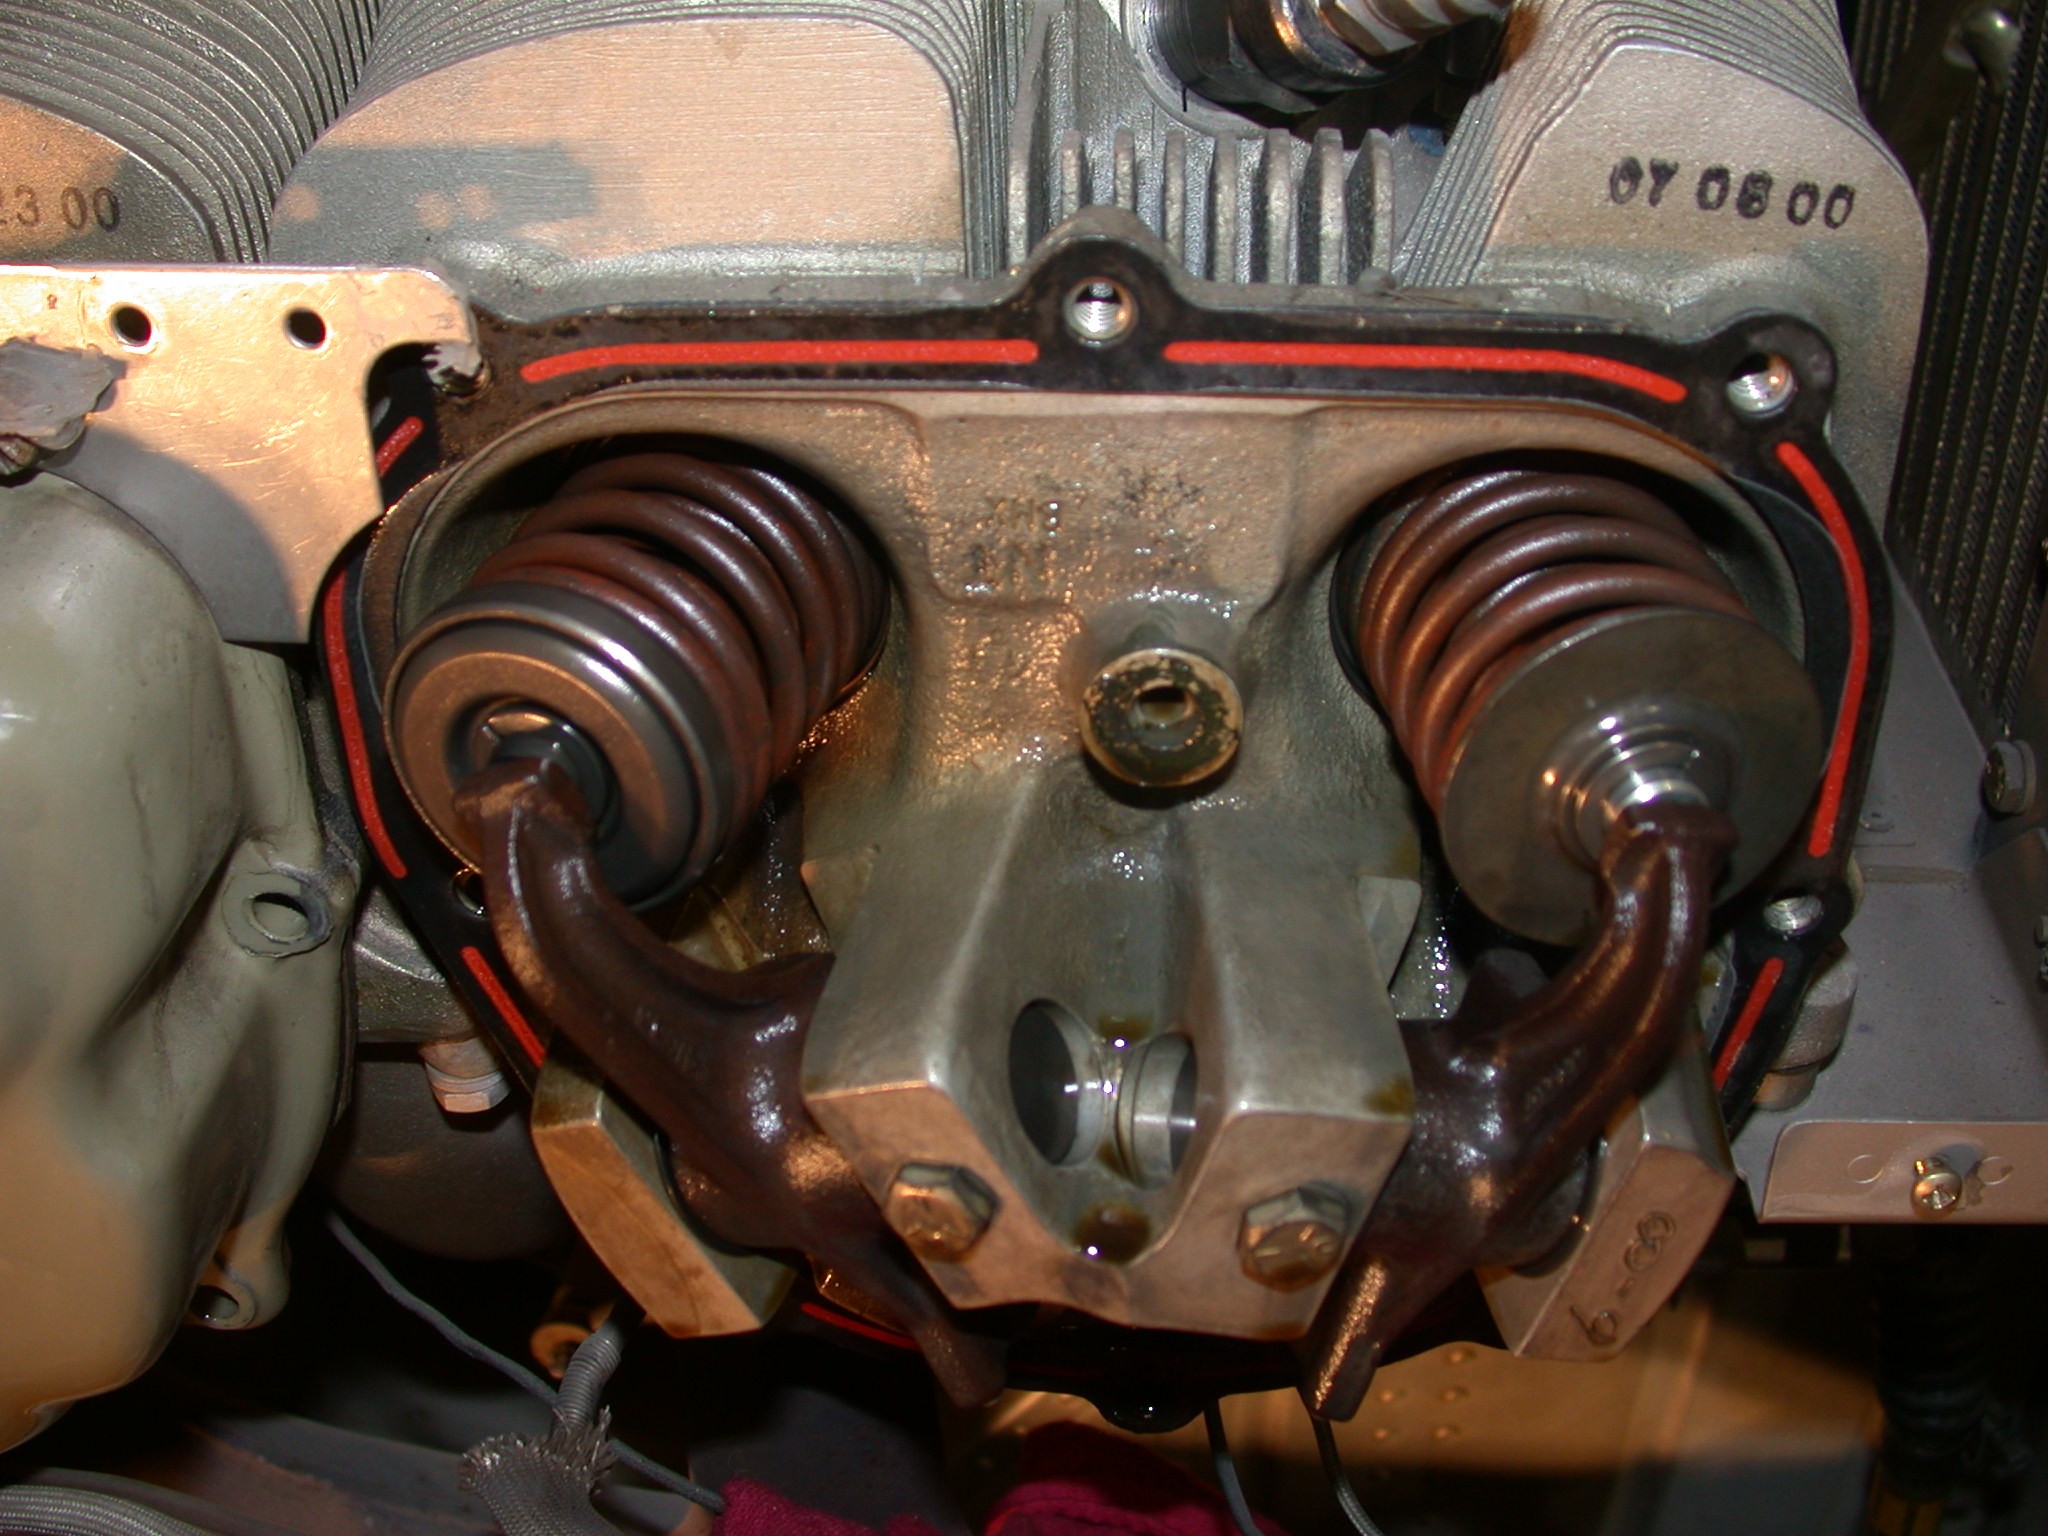
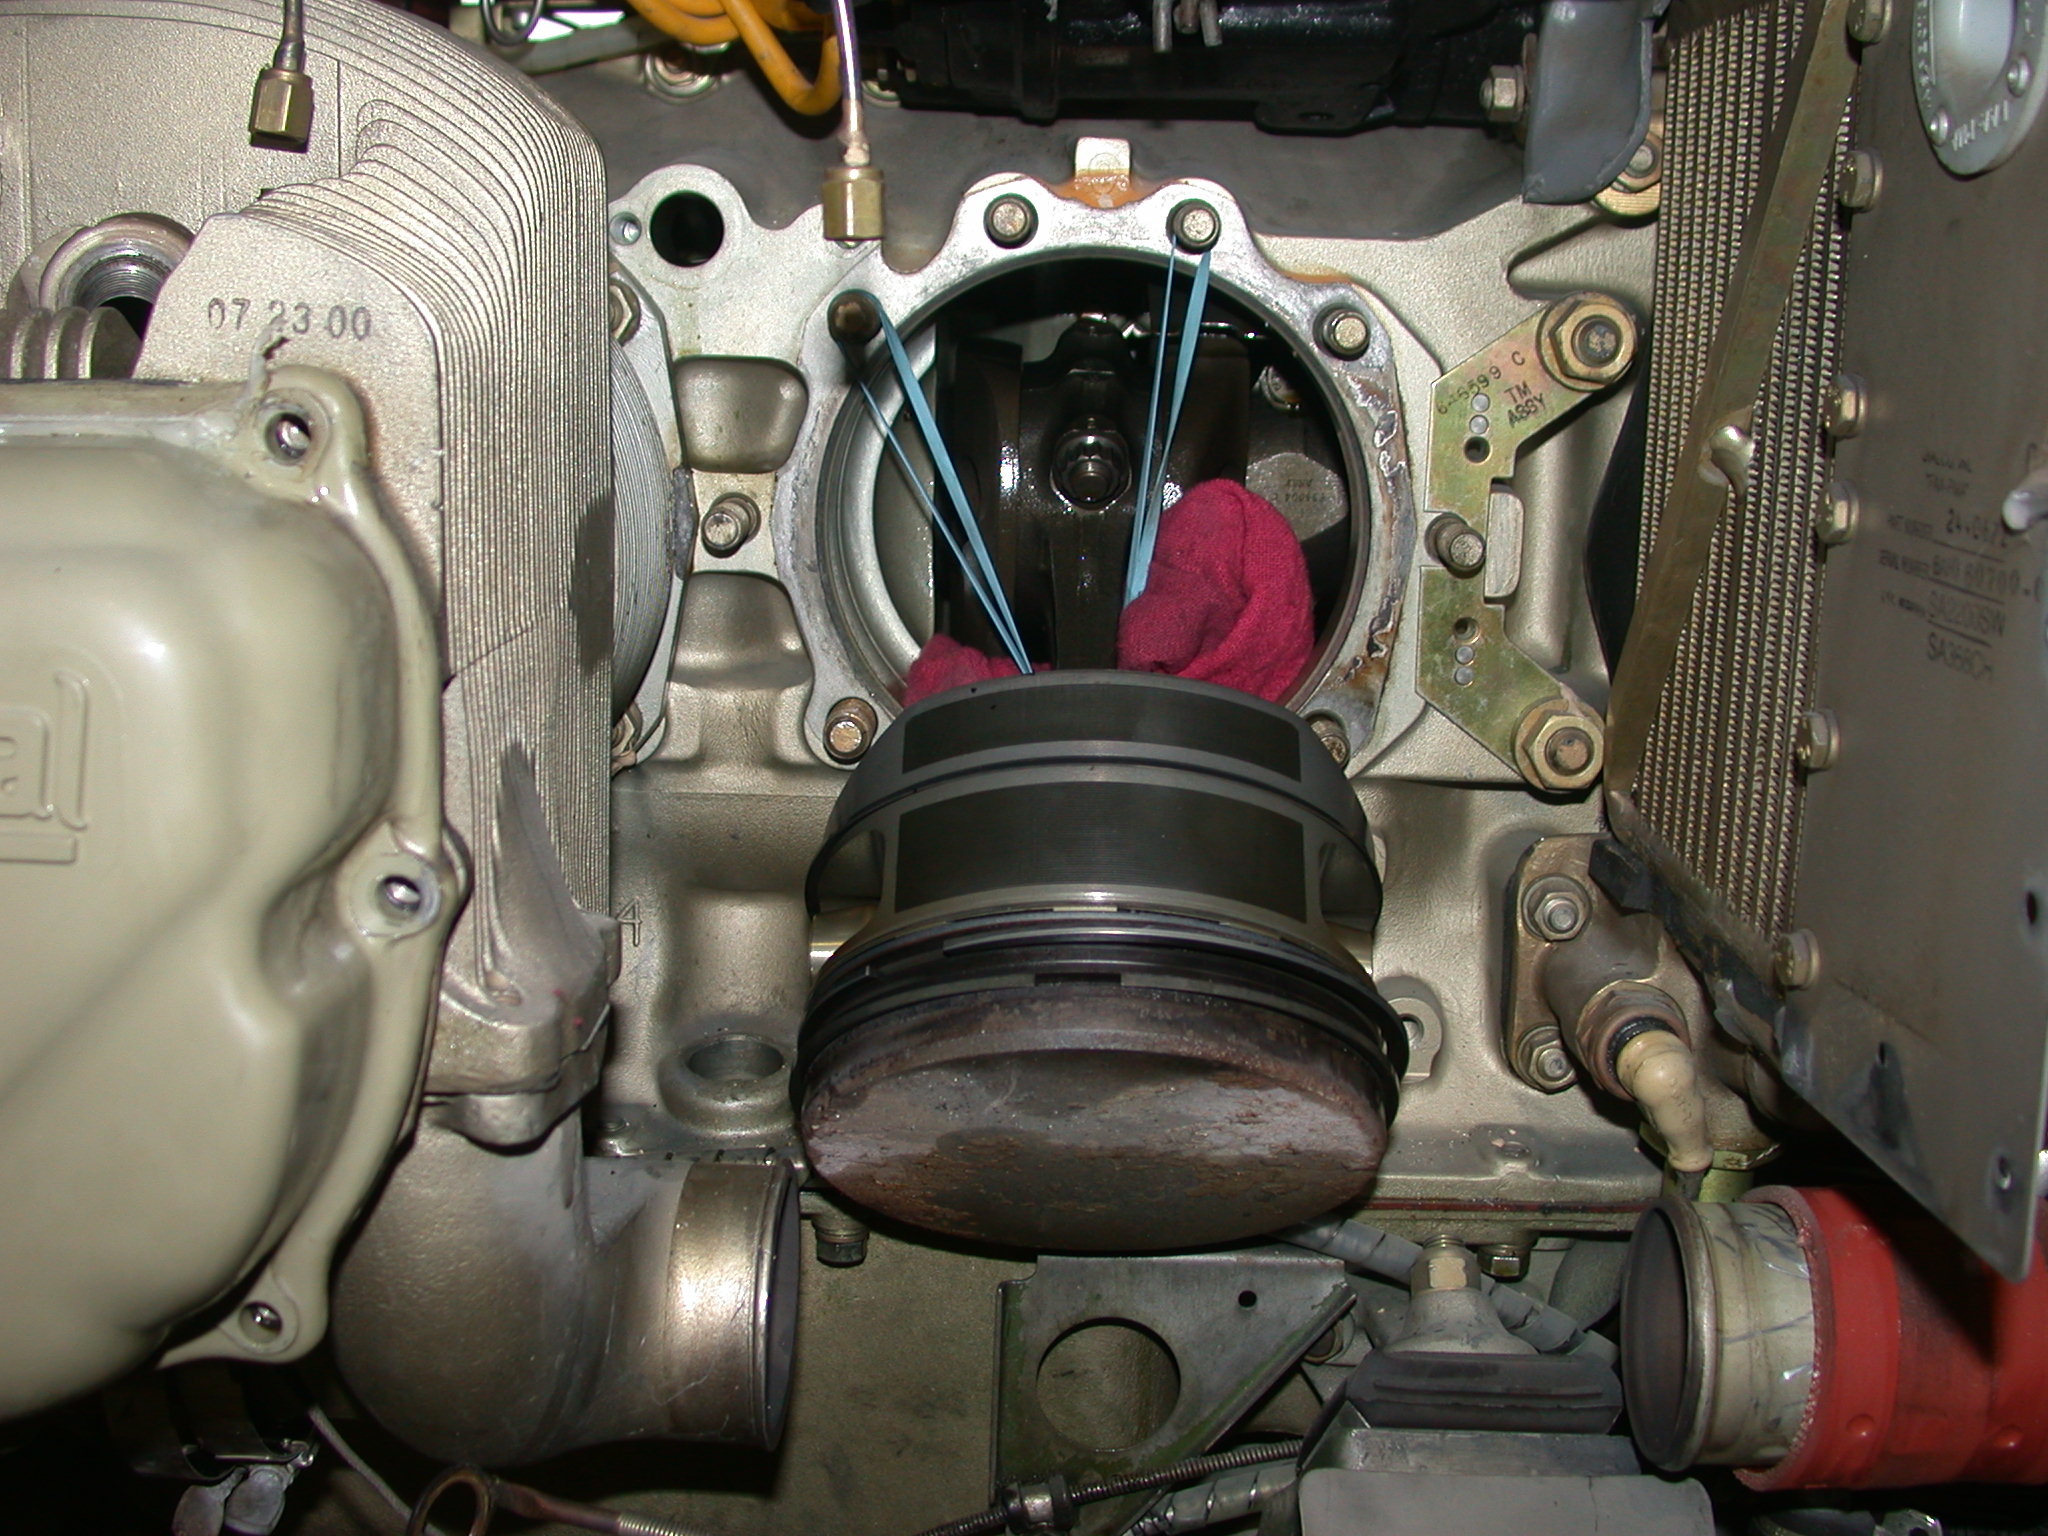
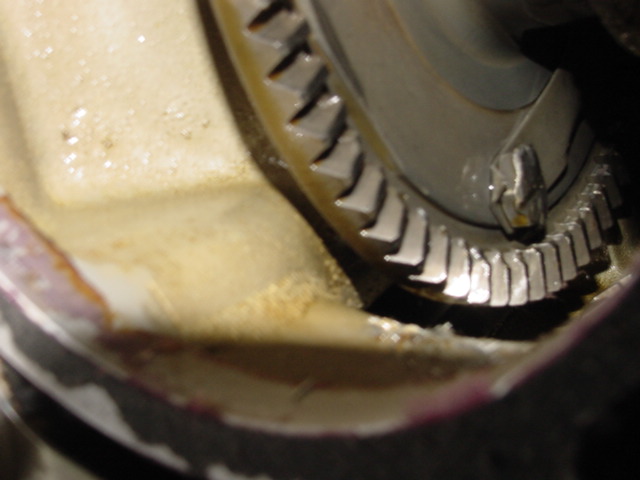
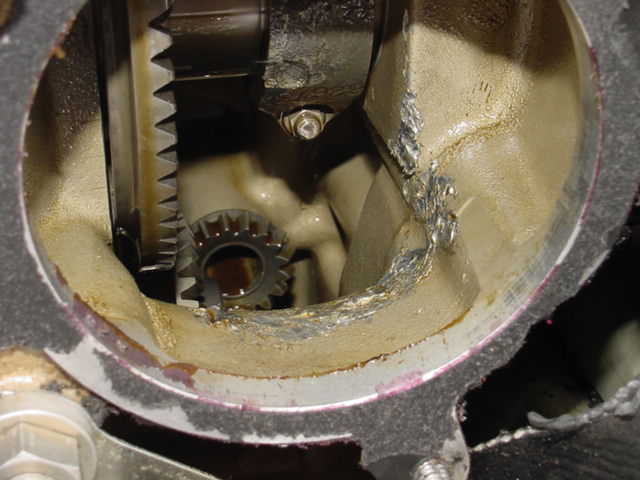
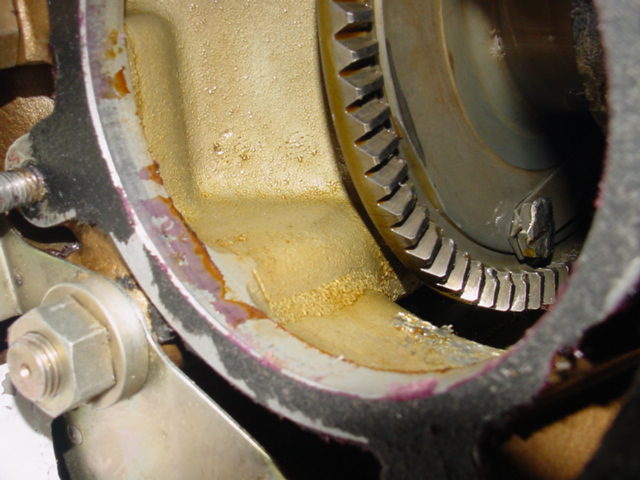
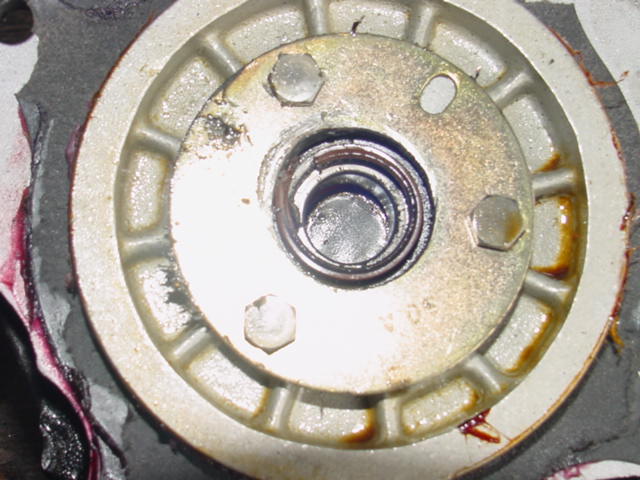
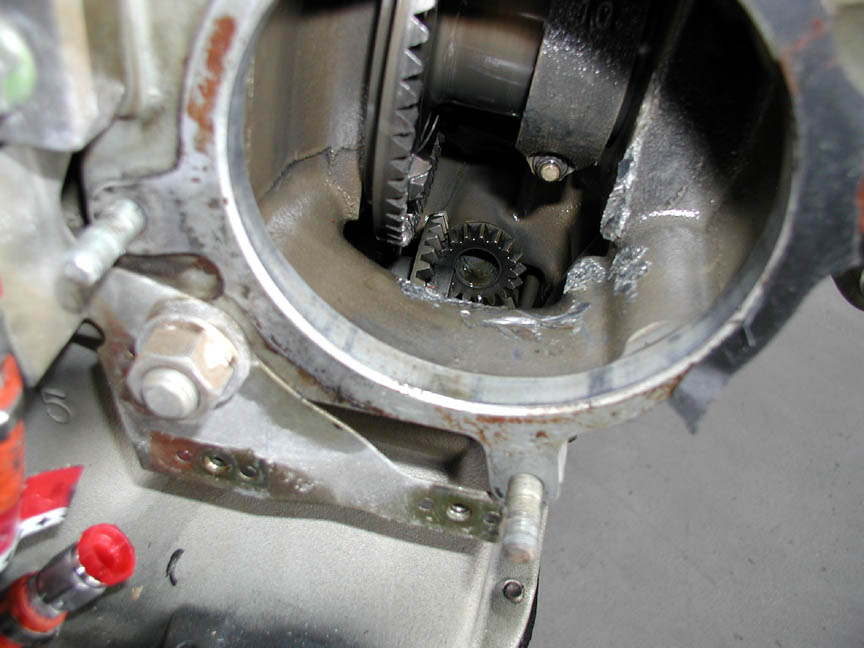
Geared Alternator
Failure Trashes TN IO-550 Engine
Can You Say:
"What the Hell Happened Here?"
Be sure your mechanic follows this
SB from TCM regarding the
installation of the alternator coupling assembly!
Throw that
DAMN WASHER away! Here is another geared alternator service letter
from Hartzell:
A-140
Bonanza owner Jim H. reports the
following in the Beech Talk
thread
HERE:
"First of all, as you know, I was very pleased with my new
Bill Cunningham engine. Everything was good...except...about 3 months ago, the
alternator failed flying into ABI. I have a backup and the airport was close, so
I charlie miked and had them look at the alternator. It had failed electrically,
so they replaced it. I flew home happy as clams.
Until I got about 10 miles out of Montgomery...and it failed again. The guys at
Montgomery aviation fixed it...and again, it was an electrical failure. The guys
at Abililene aero stood behind it and everything was all good. The newest
alternator was installed on August 10.
Worked great for 17 hours (foreshadowing) and as I was flying toward
Jacksonville to watch a football game it failed again. Oh, pooh, I thought.
Considered continuing...hell, I did have a backup...but good habits prevailed so
I did a quick 180 and returned to MGM (which was close...I had just left).
Today my guy called me to tell me that the gear had broken, there was metal in
the engine and...well, it is the precise opposite of all good. I shudder a
little to consider some of the possible outcomes if I had just shrugged it off
and flew on...the engine didn't sound one whit different. Probably would have
when the pistons started coming through the crankcase, ya reckon? It was a
fairly mild IFR day, but...
We're going to pull the engine and send it back to Cunningham to get it fixed
right. I've called the supplier of the latest rebuilt alternator and he is open
to at least discussing making me whole.
My local shop installed an overhauled alternator from a
company whom I am not...at this point...naming. It was purchased by Abiliene
Aero in replacement for the one THEY put in. So at this point, the only company
with a "mark-up" involved is Abiliene Aero...and they did not apply that mark-up
to the alternator in question.
Obviously, the overhaul shop that provided the alternator is at least trying to
find out how much my local guy is responsible, as is reasonable. I guess at this
point I'm just trying to define the cast of characters, and understand who owns
the responsibility. My local guy is calling it a flaw in the driveshaft, which
seems pretty reasonable. If that flaw is in an overhauled part, seems like the
overhauler is the guy."
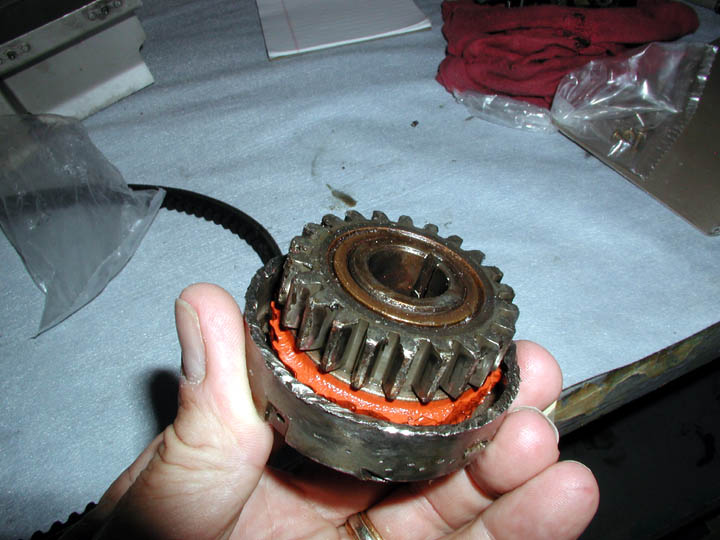
Be careful out there with these geared alternator
installations. It is interesting to note that this was indeed an elastomeric
coupler configured alternator. Stay tuned for further reports as the failure
analysis on what caused this type of failure moves forward.
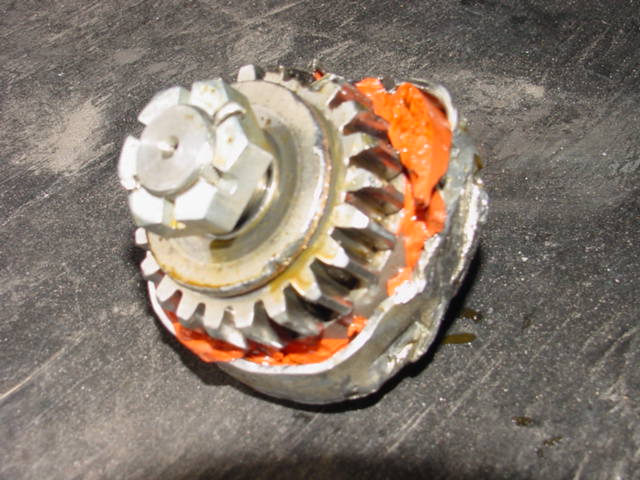
Here are additional pics from this analysis:
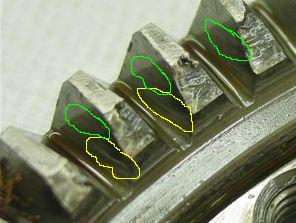
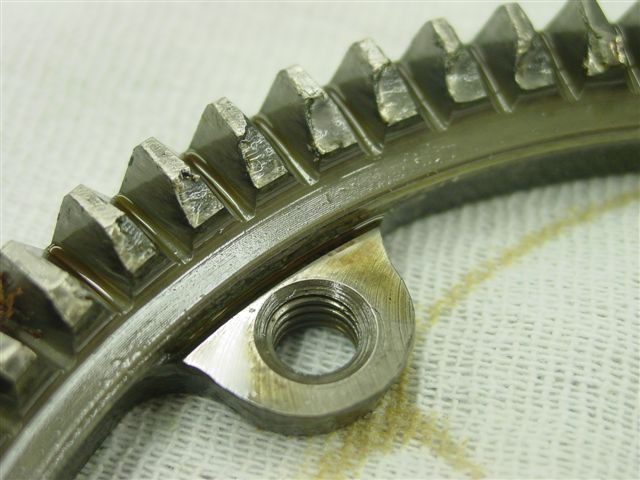
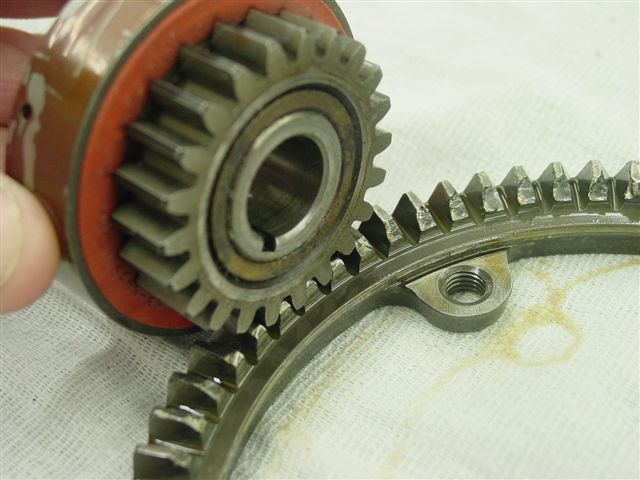
The current thinking thus far is that this was a
gear lash setting problem. Stay tuned for additional data and results of the
anaylsis. Here is a Beech
Talker Ed B.'s comments:
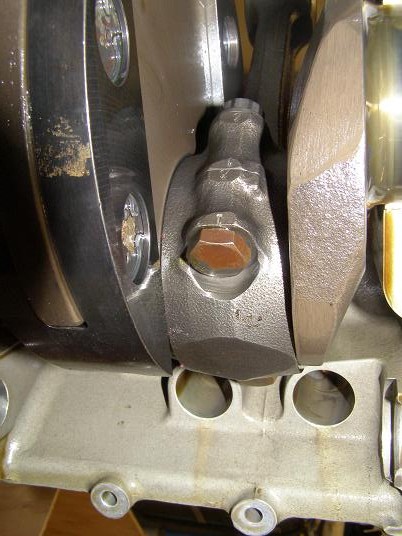
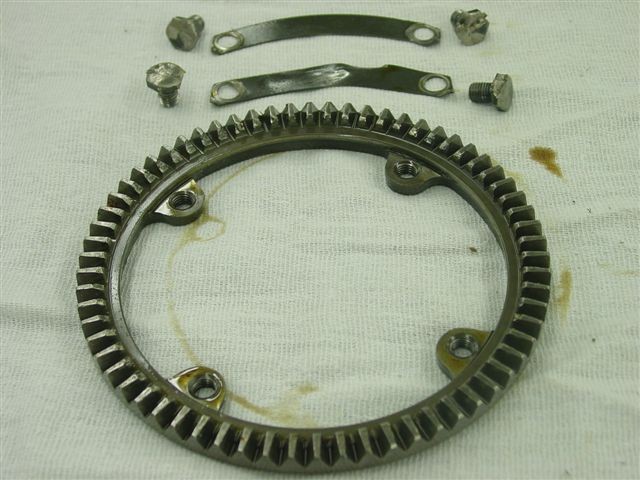
Based on the gear photo it appears that the gears were too
closely meshed. Yes, that would most likely be cause by the alternator being
mounted too far back, i.e. towards the ring gear, in its mounting hole.
As we discussed a few weeks ago, one would need to do a measurement and
tolerance stack up study of the parts to find the real culprit. However, to do
that would require access to the engine design drawings. Short of someone being
kind enough to offer those up it seems that it would take a subpoena to get a
peek at them. Dimensioned surfaces that come into play are all of them that
affect the gear interface, e.g. crankshaft ring gear mounting flange, case
thrust bearing surface, alternator hole diameter and center, alternator mounting
flange dimensions and center, etc.
As for measuring the lash, it does seem to be a PITA. As mentioned above,
PlastiGuage could be a candidate. I have also read that Experimental
builders employ lead solder to accomplish the task. The problem with both of
those methods is that the alternator needs to be removed after the lash is
checked, which provides another opportunity for error during reinstallation.
Plane-Power describes the best lash measurement procedure that I have seen for a
gear driven alternator, albeit not an IO-550. They require that lash be verified
at the alternator fan after the alternator is installed. They cite a measurement
of "typical lash .075".
Rough math says that that would translate to a lash of about half that, or about
.032", at the gear interface. That's huge and indicates to me that the ring gear
is expected to come forward about .022" due to dynamic flexing under full load.
A gear lash of .005"-.010" is what I would expect to see for a full load design
value in this arrangement.
Interesting stuff. Not rocket science either, but it does take a little finesse
to properly install that alternator. It's not a "plug-and-chug" deal.
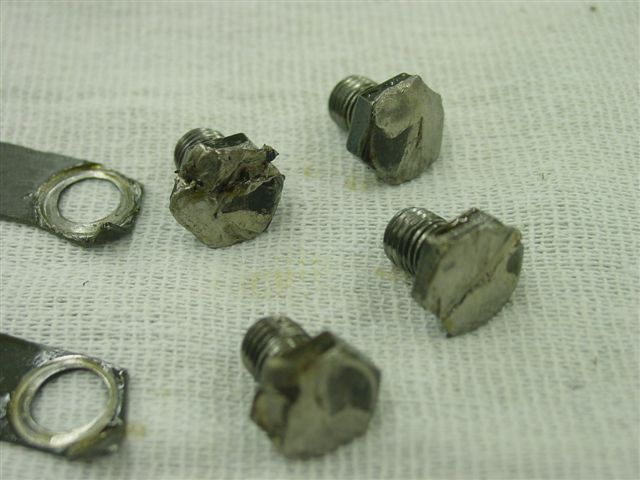
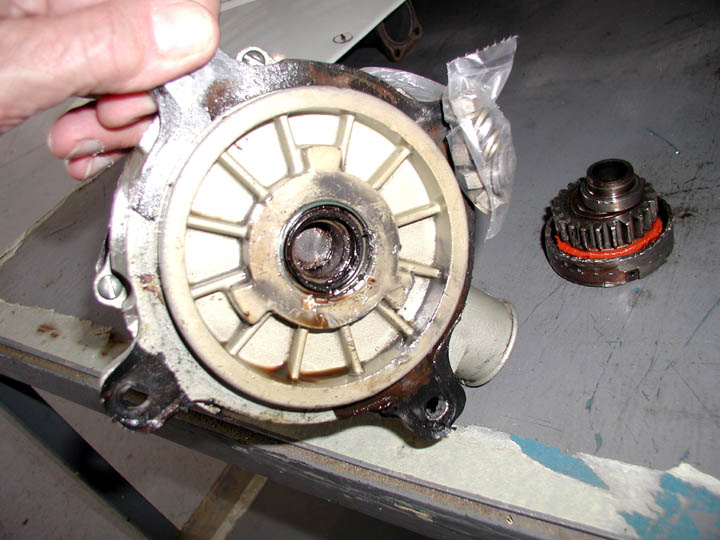
Another Geared Alternator
Failure Trashes Engine
Be sure your mechanic follows this
SB from TCM regarding the
installation of the alternator coupling assembly!
Bonanza owner Ron V. reports his geared
alternator failure:
"The solid steel alternator
shaft broke inside the alternator allowing the stub to fall into the engine
oil sump while the gear and clutch assembly bounced around in the crankcase. I
have seen another instance where this resulted in the entire crankcase
breaking open, removing the alternator and a lot of oil from the engine.
Although the damage to the ring
gear was nowhere as obvious as Jim's, upon engine teardown, the crankshaft was
found to be damaged and had to be replaced. Magnefluxing revealed small cracks
in the crank around the ring gear mounting holes. Two months and Daytona
Beach, FL and $17,500 later, this V35B was back in the air.
TCM had a period when some
engines' alternator mounting pads were improperly machined resulting in an
overly tight fit when installing the alternator. The failed alternator shown
here replaced another that had the lower left hand mounting lug broken because
the alternator would not properly seat in the mount. This was discovered when
trying to locate the source of a minor oil leak that found its way to the
windshield."
Here is another way that a
geared alternator comes apart - putting washers in the assembly that don't
belong in there!

TSB Final Report
A07W0186—Engine Failure and Collision with Terrain
On October 26, 2007, a privately operated Piper Malibu PA46-310P was
en route from Salem, OR, to Springbank, Alta., on an instrument flight
rules flight plan. During the descent through 17 000 ft at approximately
55 NM southwest of Calgary, the pilot declared an emergency with the
Edmonton Area Control Centre, indicating that the engine had failed. The
pilot attempted an emergency landing at the Fairmont Hot Springs airport
in B.C., but crashed at night at about 19:12 MDT, 11 NM east of
Invermere, B.C., at approximately 3 633 ft ASL in wooded terrain in the
Rocky Mountain ranges. The pilot and two passengers were fatally
injured.
Read the whole story
HERE
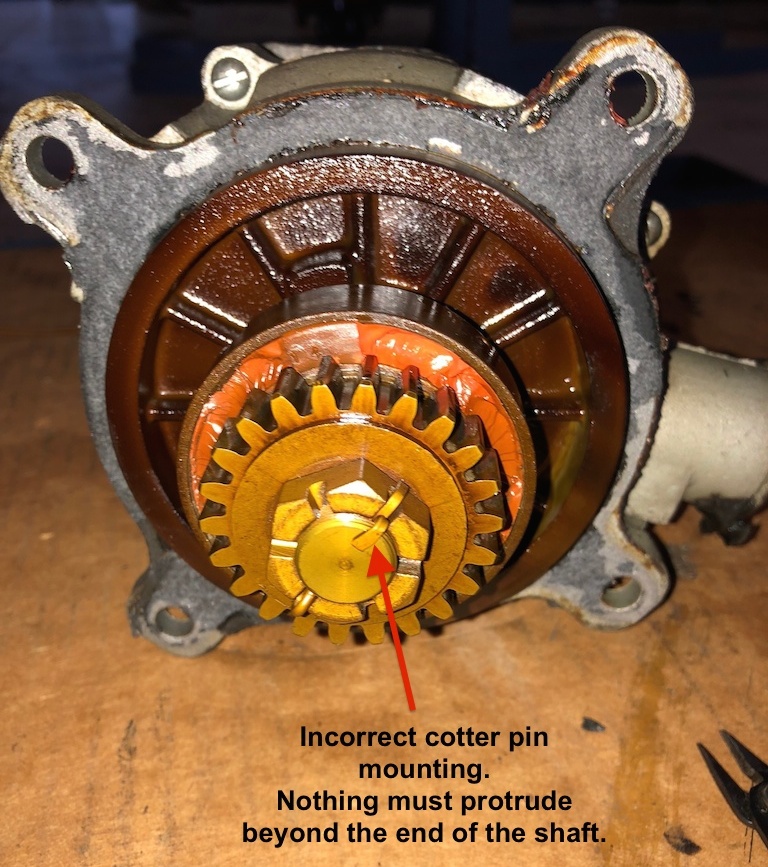
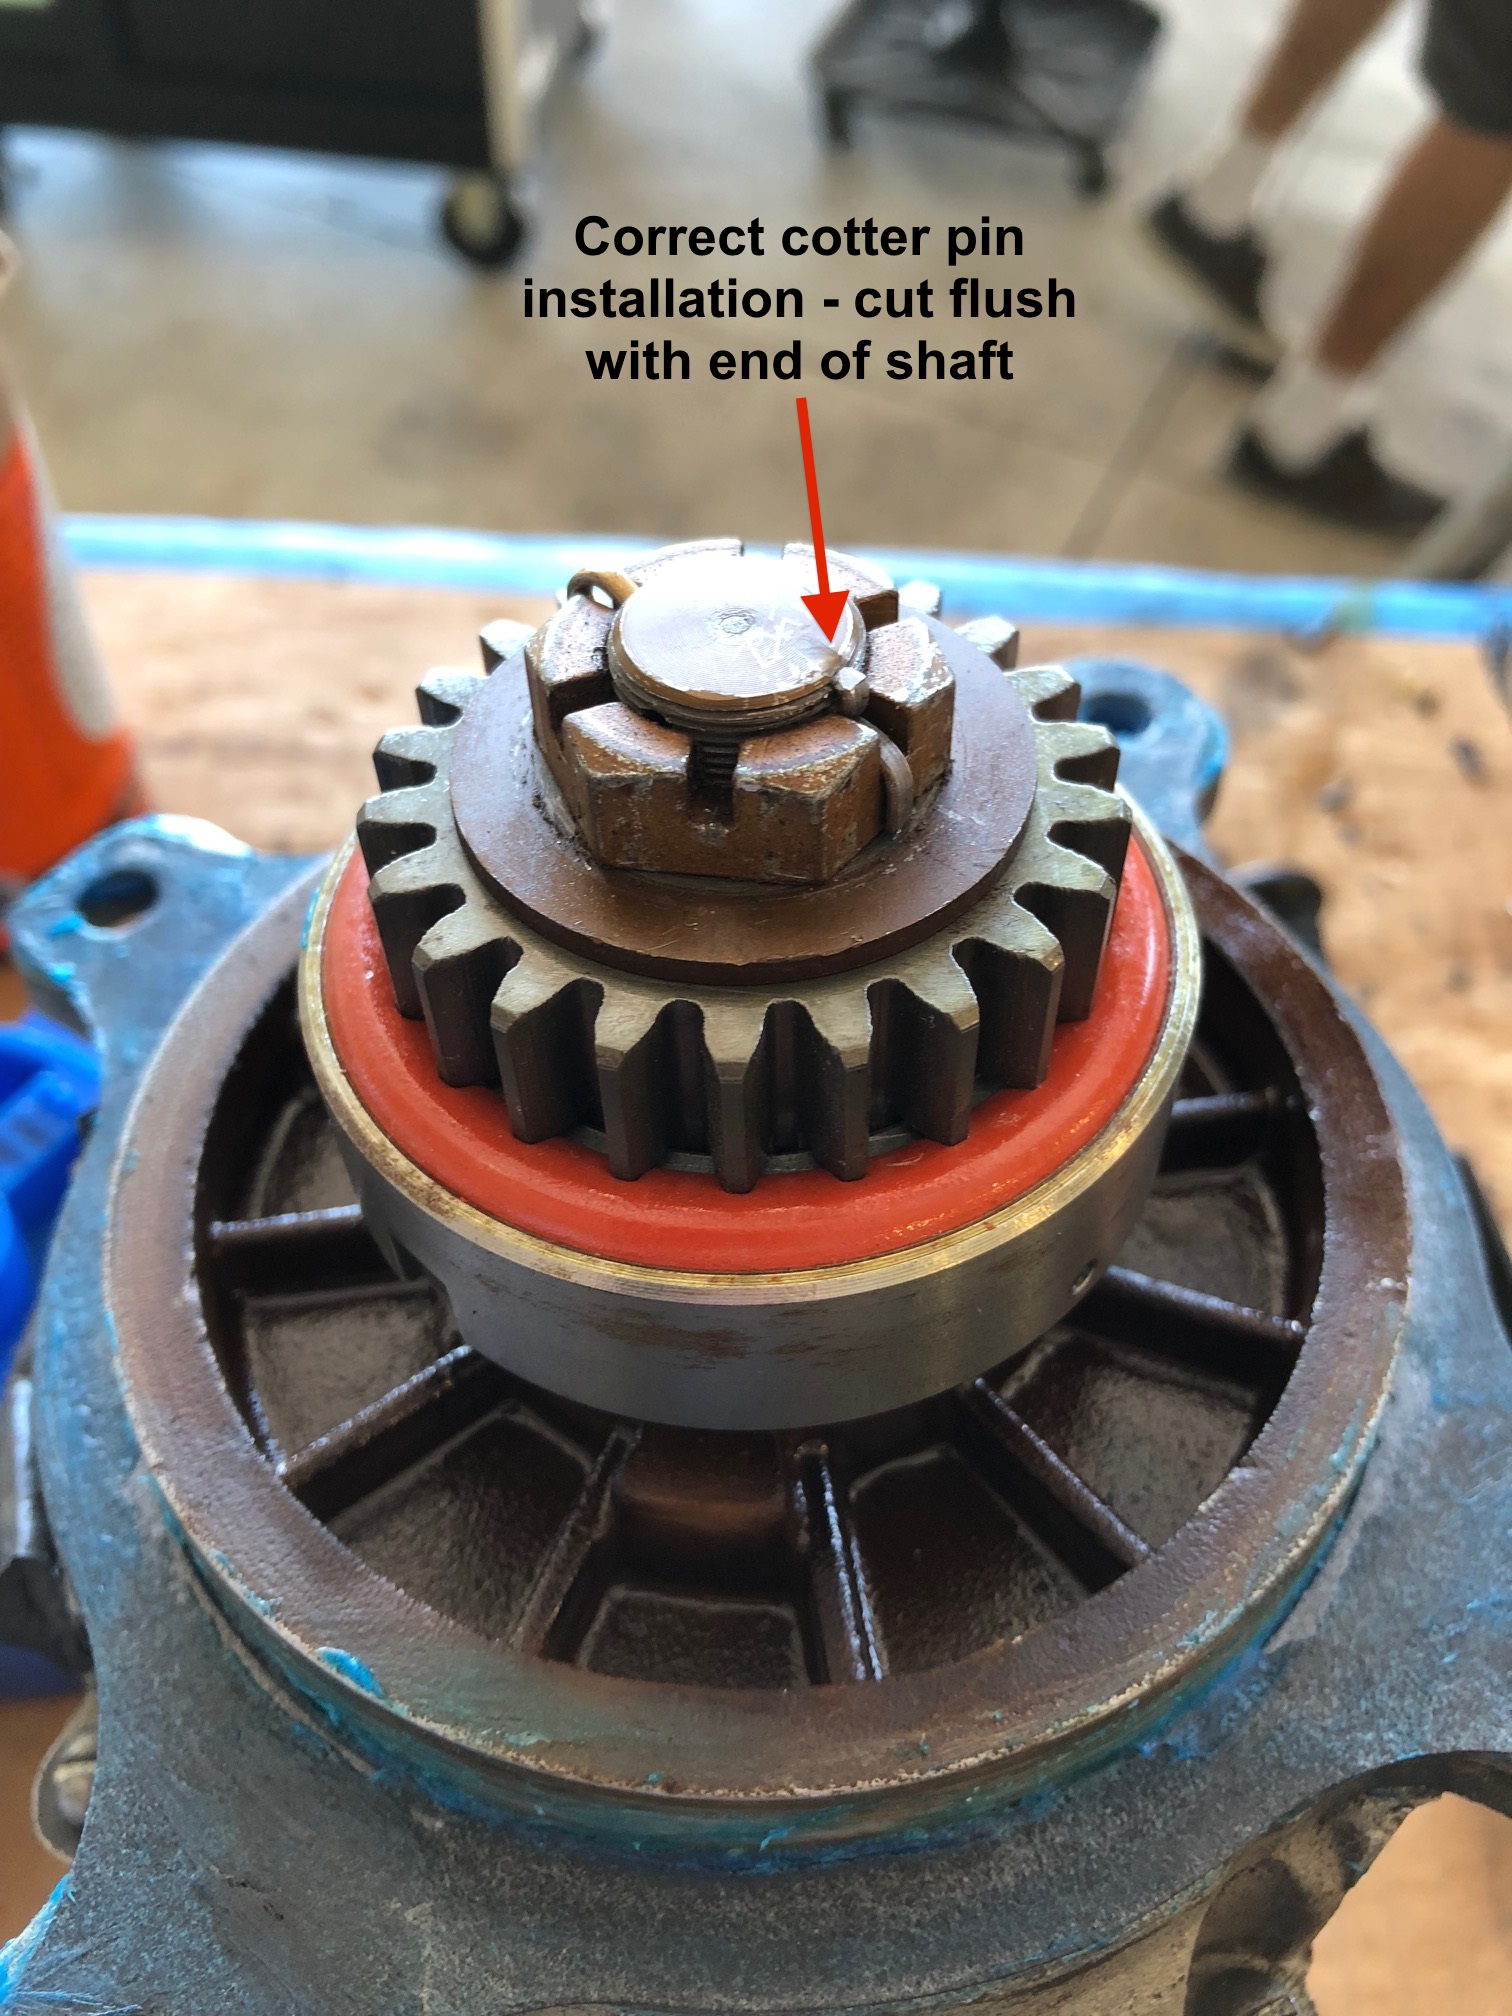
How to PROPERLY Assemble
The Geared Alternator
Coupling
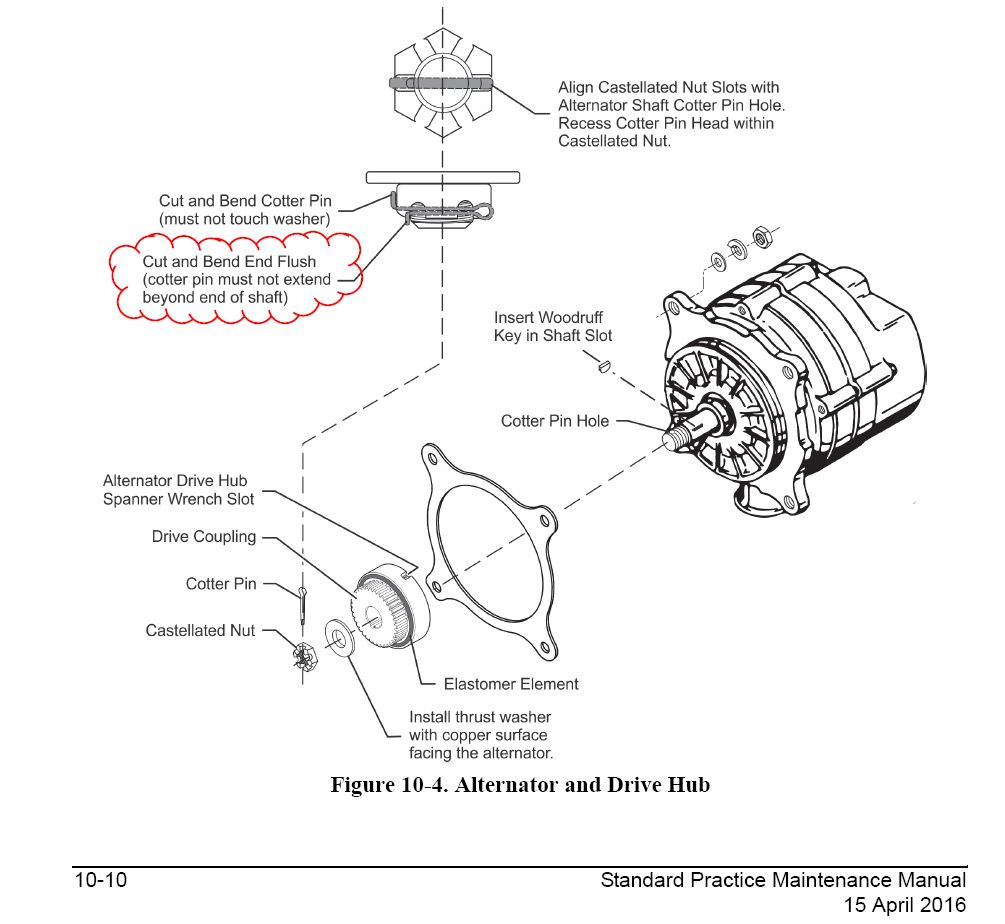
As evidenced by the above images, improper geared
alternator coupling assembly can lead to an in-flight engine trashing disaster
! Before anyone
touches this critical engine component, whose parts run inside the engine, you
might want to be sure the person performing the R&R (removal & replace) has a
great track record of experience with this piece of gear OR has properly briefed
themselves on EXACTLY how to do it and what the watchouts are. One of the
watchouts is the cotter pin installation. See below for an INCORRECT example and
a CORRECT example and also refer to the Standard Practice Maintenance Manual
excerpt image above.
TCM Emergency
Lifter AD 2009-24-52
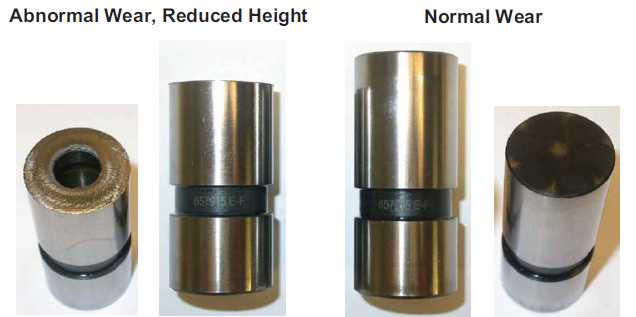
This pic was found in the TCM service bulletin regarding
abnormal lifter wear. I'll refrain from categorizing my thoughts about this part
.
TCM Grounded the affected engines, read
HERE
The Emergency AD is
HERE
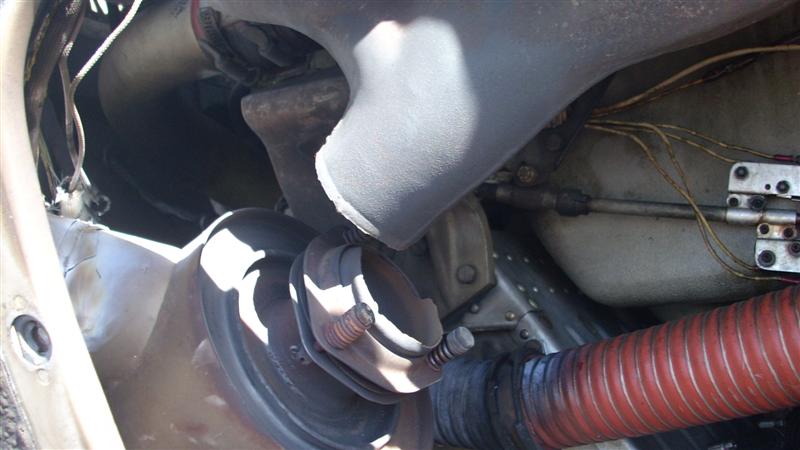
Nose Gear Near Miss
(What's wrong with this picture?)
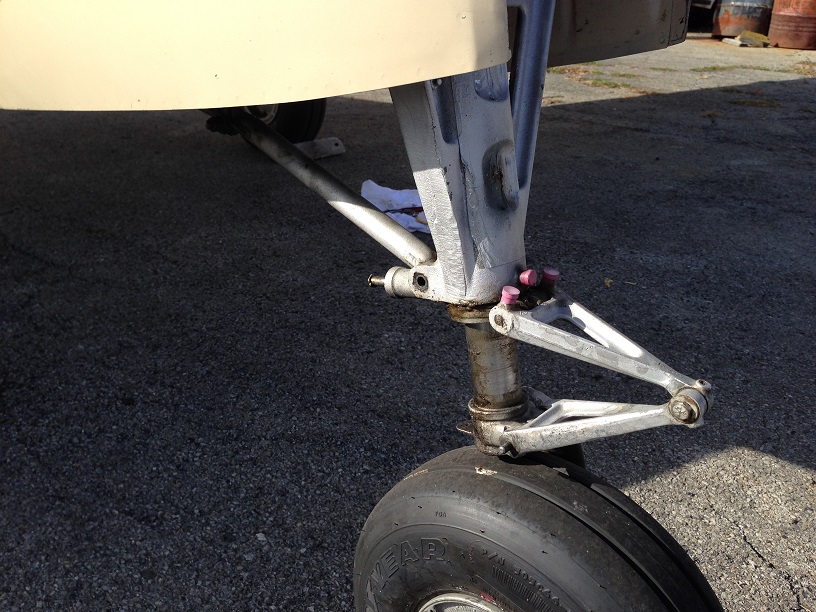
The above image and following pirep comes to us from
C35 Bonanza owner Doug G.:
While I was working with my A&P on the tip tank
fitting, a fellow with a new-to-him B35 was there, too. They had done a bunch
of work on the return collar his Hartzell and completed the test run was a
success. At one point I came out and happened to look down at his nose gear and
saw something that made my stomach turn into a knot (see the photo). The bolt
had cracked and the head and much of the shoulder departed the aircraft. We
carefully stuck an awl in to see how much bolt was still there and it appears
that 1/3 was left from the nut side. That doesn’t leave much to keep things
together! A shorter bolt was quickly slid in from the right side and any plans
for flying until the gear was thoroughly gone through were scrubbed. The owner
and my A&P were thankful this was caught. This could have easily led to another
classic Bonanza (with freshly O/H blades and hub) heading to the beer can
factory.
I bring this up as something we can often overlook on a
plane we are very familiar with.
Y’all be careful out there!
Doug
C35
Prop Governor Arm Wear
BeechTalker Brian E., found the prop control cable rod end to Woodward prop
governor control arm connection loose. As you can see in the picture it has been
loose for some time and the control arm has become oblong.
5 clap smilies to the first guy who can tell me that this control arm is not
Beechcraft PN 35-944051-1 (Bonanza IPB fig 47 item 23), which supersedes in
RAPID to 35-944051-13 and costs $317.89.
10 clap smilies for anyone who can recommend an alternate CSOB source of supply.
He found 3 cases where this had previously happened to ABS members on his trusty
ABS CD, but no PN or source of supply. You might want to put an eye on yours.
Run the prop control full in, and then back it off 1/4". You should be able to
see it from the left gill door.
If you can help Eric, contact him at
BeechTalk.
What Battery Acid Boil Over Can Do
This picture is courtesy of BeechTalker, Mark O. and his A36.
He's moving to a sealed Concorde battery after this event. See his BeechTalk
thread
HERE
See a battery box refurb narrative
HERE if acid had destroyed or damaged your
battery box.
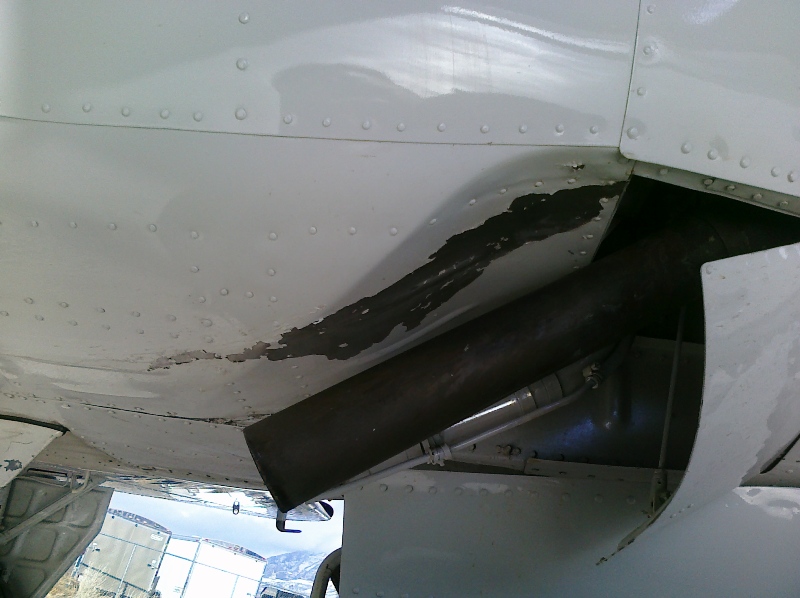
How Are Your Exhaust Flanges?
Are your exhaust manifolds original >30 year old units? Well
if so, keep an eye out for weakening in this area as well as all other areas of
this critical engine component. Hey, does a >30 year old exhaust manifold owe
you anything? I didn't think so!
Here's another exhaust failure that was caught in the nick of
time before it melted scat hose and potentially let CO into the cabin

Here is an exhaust system that went waaaaay past it's useful
service life.
This exhaust system failed at 8,000'. Fortunately the pilot realized something
was amiss and landed quickly. It might be a good idea to give these old exhaust
pipes a squeeze when cold from time to time and if they don't "feel" rigid
enough to you - get something going to find a replacement!
It's also a great idea to have some form of CO detector in
your cockpit. Check HERE for a CO detector
narrative.
How are Your Uplock Cables
Above is a find on an A36 during an annual. A
good idea to move that tygon tubing back a little every once in a while to take
a peek at the condition of the cable end.
Manifold Pressure Gauge Leak
Baron C55 owner Steven F. noticed issues with his MP readings
and posted this to the Beech List:
I have a C55 Baron with 520's and have noticed
that the MP needles during run up were off about an inch of pressure. Over a few
months they were a little more than an inch of MP during idle, run-up, and in
landing config. I helped with the annual as always and paid extra attention to
the induction hoses, making sure they were all tight and in good condition. I
also removed the ball valves in the induction tubes, cleaned and replaced. It
did not make any noticeable difference on the next flight.
After the 4 hour return flight from Sun N Fun I placed the mixtures rich, props
forward, with the throttles around 17" of MP to land, I got a gear warning horn.
I had about 5" less MP on the left engine compared to the right side with the
gear not down it was enough to cause the gear warning horn to sound.
Talked to my IA again and he still believes it to be a MP problem. I plugged the
ball valves on the induction tubes and conducted another run-up, no change.
With both engines at 1K RPM I have 15" left MP and 22" right. at 1700 RPM 17"
and 22"
At TO power and rolling with everything forward I'm at 2,650 on both and 28" on
both.
After much troubleshooting, here is what he found behind his
panel in the area where the hard line gauge plumbing came in contact with
defroster ducting:

Great find Steven!
Note to selves: while you're crawling around checking your
airplane, be especially mindful of ANY chaffing of ANY hard lines with ANY other
pieces of the airframe or structure. Applying some PVC tubing split down the
middle or other hose material held on with wire ties will do wonders for
eliminating these kinds of issues.
On my last annual I was on "chafe patrol" in the area of the
landing gear where the fuel lines come in from the wings. Here are the results
of that "patrol"
There are some very close places in that area for those hard
fuel lines to rub on!
What Size Piston Did They Put in My Engine
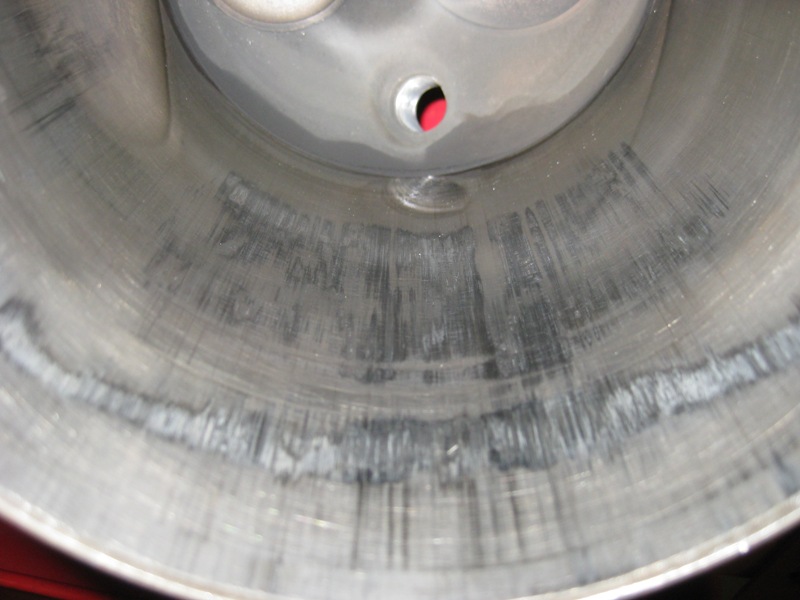
This is what was found after a shop disassembled a
Beech Talker's engine 71 hours after a complete top overhaul! While not
confirmed, several engine gurus have commented that this looks like an
incorrectly sized (oversize) piston placed into the cylinder bore. I guess
blindly slamming cylinder components out of the box onto an engine is not such a
good idea?
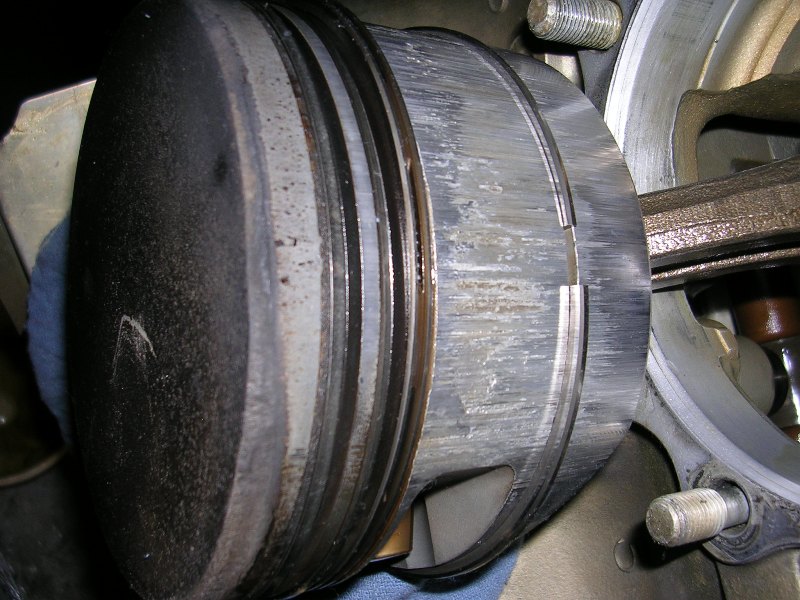
Piston Destroyed - Mag Timing?
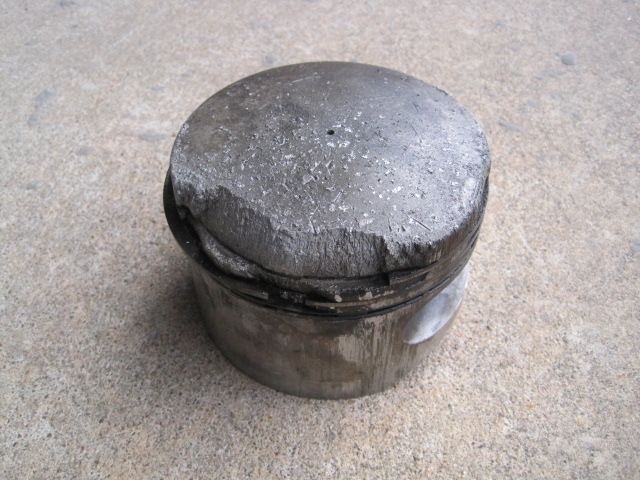
Per Kent F.: At about 1100 hours since engine overhaul in 1982. I think it
has been eroding for some time. Plane had new mags and plugs installed during
last annual in November, about 20 hours ago.
Wonder if the mag timing was correct?
Gear Motor Run to Failure
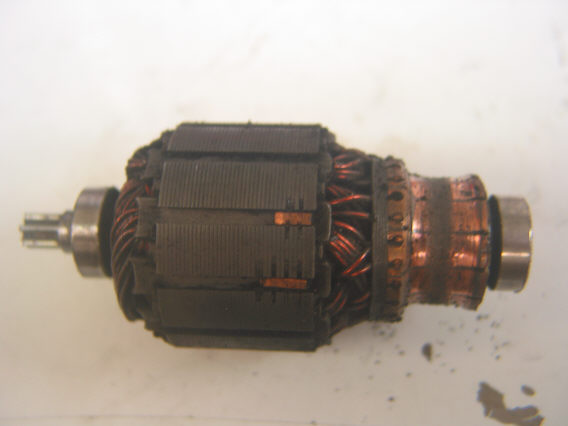
Here is a 24V landing gear motor out of a Baron with an estimated TIS ~6,300hours, however, it
clearly does not owe it's owner anything. It's been run to failure and the
armature is toast.
Below is a picture of the brush that came out of it compared to a new brush.
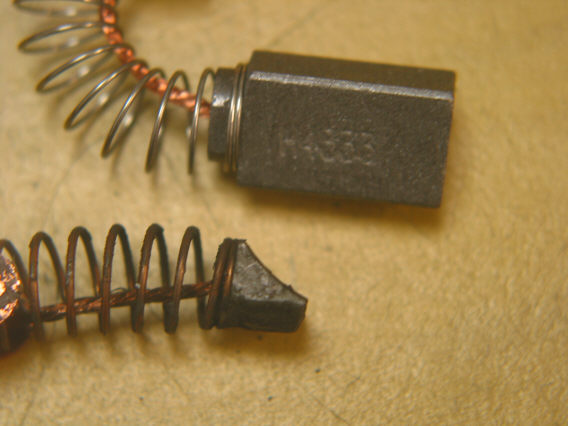
If your gear motor has been in service for a very long time, pull it out and
have it serviced by a professional motor shop. 12V motors are reported to have
shorter life than their 24V siblings. Don't get stranded and have the
extra expense of NDA charges to get back to being airworthy again.
Cessna Nose Fork Prang!
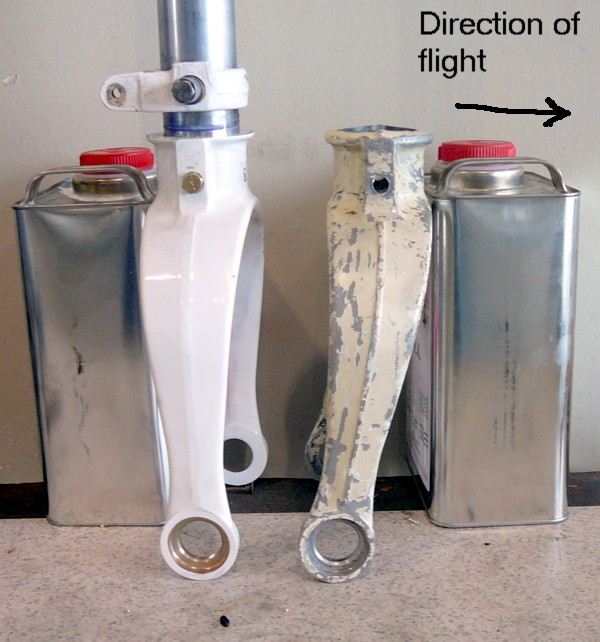
Here is what the submitter, Steve W., says is the story:
Years ago I annualed an old C172A for a guy whose long time "mechanic" had
passed away. Noticed the nose fork pretty early into the project, & asked the
owner about it;
"Yeah, so & so hit a curb with it a few years ago......'Jake' (the dead guy)
said it would be OK."
I guess it would be OK, since the gear just hangs out there in the
breeze....LOL
Blocked Control Pulley
Pictured below is a Jim R.'s find in his relatively new to him P35 Bonanza
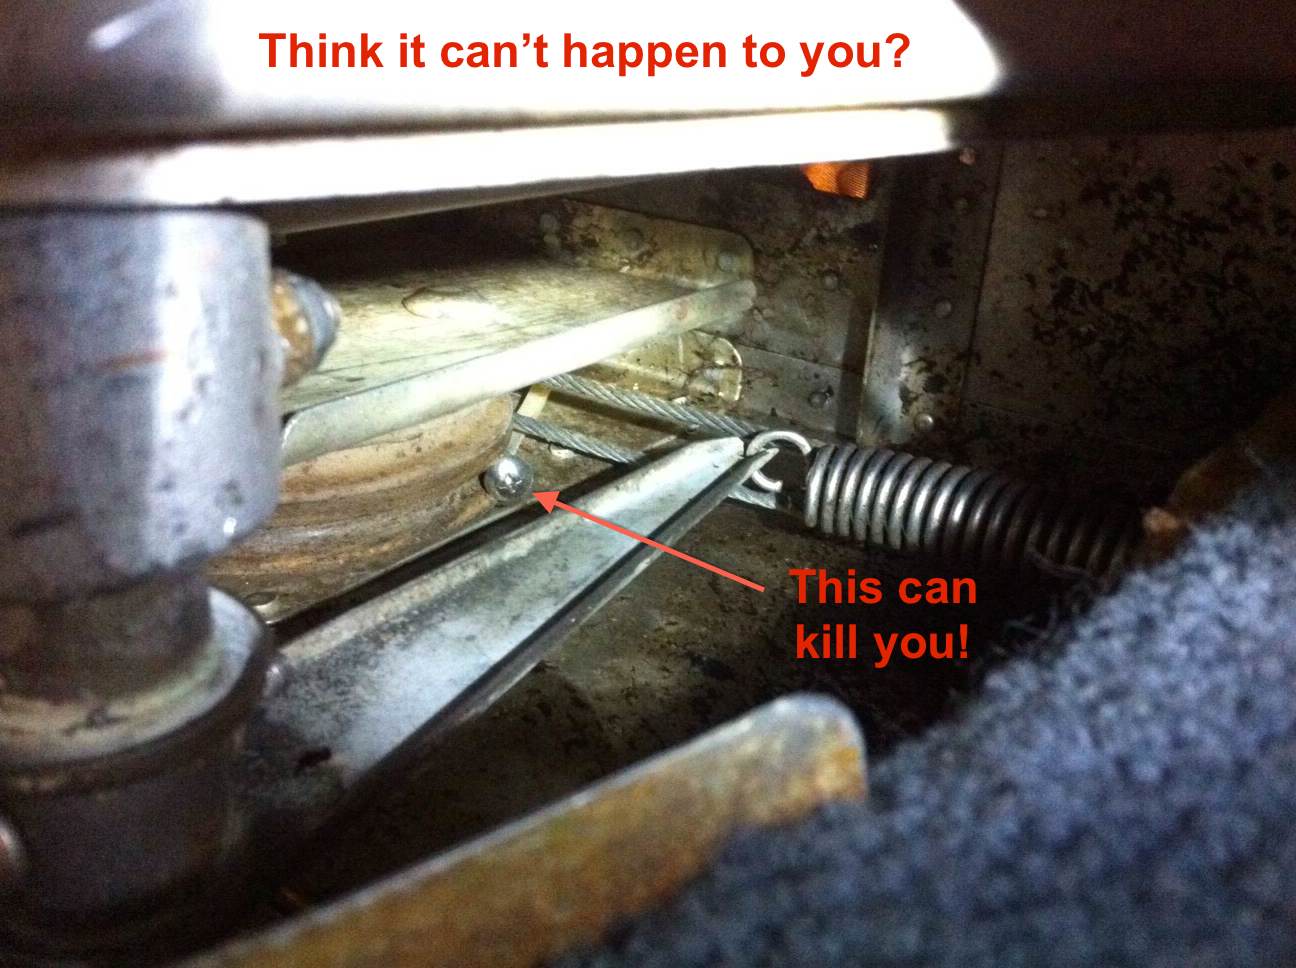
Here is his story:
"I was about to depart from West Texas to fly to eastern NC this morning
when, during preflight, I discovered my ailerons would only "turn left." My
ruddervators felt stiff as well. The plane was towed last night with a rudder
and yoke binding gust lock in place. I flew the plane two days ago with no
problem. I am about 15 hours out of a fresh annual."
Thankfully, Jim's pre-flight checked the controls for "Free & Clear" and he
stopped what he was doing to get to the source of the control issue.
Don't even think about what would have happened if this screw had not found its
way into the pulley on the ground and had done it somewhere in flight!
Be sure you know your maintenance provider well.
My personal practice for over 10 years has been to remove my own floorboards and
reinstall them myself (as well as all the other owner allowed items as well as
other items under IA supervision during my annual). While doing so, this affords
me an ideal opportunity to get my head down in all those areas and look for and
vacuum up any and all FOD in the belly. It also insures that I am the guy who
eyeballs all the screws going into the floorboards to insure that a LONG screw
does not go anyplace that it shouldn't be going.
If you've ever stuck your head in your airplane when the floor is up (if you
haven't you really owe it to your pilot credentials to do so, IMHO), you will
see that the control surface cables and pulleys run very close to the
floorboards in some areas. If you put a LONG screw in the wrong place you can
contact a cable or a pulley.
Where was I, Oh yeah, by putting the floorboards in myself, I can insure that
after I put the screws back in, I manipulate the controls and listen for any
scratchy noises or resistance in the controls.
Nuf said!
PS:
HERE is an article by Bonanza owner, and ATP rated pilot,
Dr. David Rogers that outlines another near disaster as a result of a
control system blockage. Pay close attention to this one folks as you will learn
the importance of keeping absolute clearance around the whole of the control arm
scissors that live under your glare shield and behind your panel.
Mechanic Leaves Flashlight in Airframe
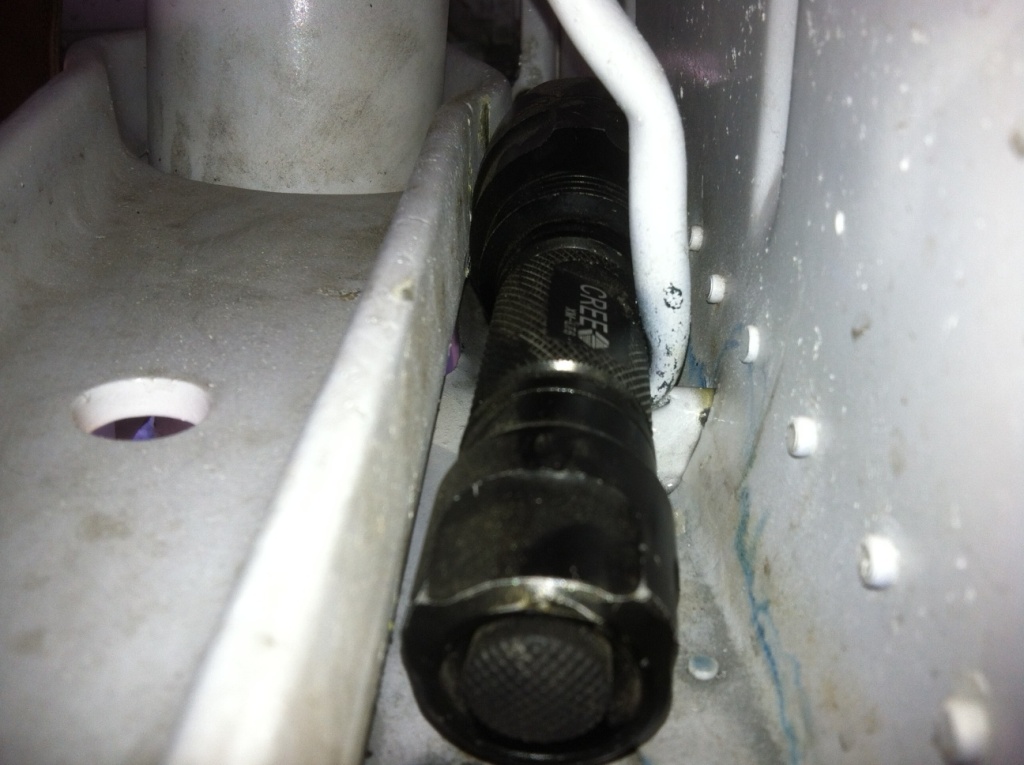
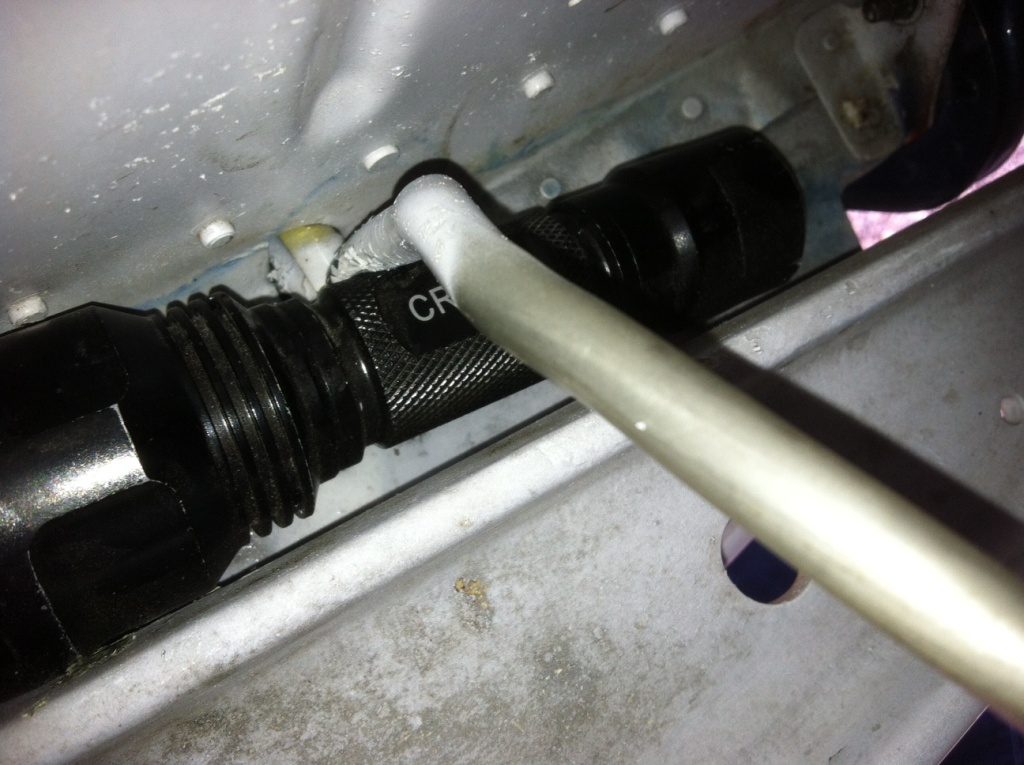
The above images and below narrative come from
a Beech Talking Bonanza owner who wishes to remain anonymous. Here at
CSOBeech.com we respect confidentiality requests and are thankful that the
submitter chose to share this with the Beechcraft community so that we can be
more watchful of our aircraft after maintenance, regardless of the reputation of
the service provider.
Here is his narrative:
Someone working on my airplane left a flashlight on the shelf above the main
landing gear adjacent to the wing bulkhead. It was not visible from the regular
viewpoint one gets during the pre-flight inspection of the gear. In order to see
it, I had to stick my head all the way up into the top of the gear well and look
down on it. I was able to get a better angle on it by sticking my camera into
the space. In the photos, you can see a metal hose being compressed by the
flashlight: this is the tubing that pumps fuel from the tip tank into the main.
Amazingly, the gear was able to completely retract and extend (thank
goodness!) without binding, but when the gear retracted, it squished the
flashlight into the hose and ruptured it. My first clue was during the flight,
when I was unable to pump fuel from the tip. My second clue came after landing,
when I saw fuel dripping all over the gear assembly.
The first image is looking from the front of the plane aft, with the wing
bulkhead on the right of the picture, and the top of the gear assembly to the
left. The second picture was taken by me sticking the camera up into the top of
the well and pointing it down to see the flashlight. You can clearly see the
fuel stains on the bulkhead and the shelf.
The submitter states that this was the second "forgetful" mechanic event to
his airplane in a couple of months! Lastly this gem of a mechanic subsequently
left a flashlight in the submitter's tail cone, which was found during an ABS
service clinic later that same year! The second flashlight was sitting right
between the elevator and rudder control cables, and was only detected when the
tail cone was removed for the service clinic inspection. It was not possible to
have caught it during a regular pre-flight since it was inside the tail cone.
Thank goodness it didn't wedge into a control cable!
We are pleased to report that, thankfully, this mechanic is no longer in the
employ of this shop!
If, for whatever reason, you find that you need to use a shop for your
maintenance (and many do), please consider a very good look over your airframe
before it is buttoned up for the first flight after maintenance!
If you've got maintenance pictures worthy of this "Rogues
Gallery" Please
 E-mail them to me with your details!
|