|

Is your Garmin GPSMAP-276, 296,
376C, 396 or 496 losing it's time clock memory or you have to Auto Locate all
the time because the unit does not remember where it was when you last turned
it off?
FYI, here is the
Auto Locate
procedure:
Hold the "Out" button down, hit the power
button. Don't release the "Out" button until it asks you to acknowledge "I
Agree".
To "refresh" your XM
subscription click
HERE
Well, these could be symptoms
of the (expletives deleted) 3 volt VARTA MC621 internal battery having died!
Step-by-Step Garmin Internal Battery Replacement Procedure w/Pictures
My buddy Al has a just over
1-year old Garmin 496 and has been having to auto locate his satellites more
and more often. He did some research and found many people with these portable
units are having similar issues.
The issue appears to be caused
by the internal battery only recharging during external charging with the unit
ON! So all you folks who leave this portable in your airplane for weeks at a
time and then go fly for an hour or two and MAYBE have it plugged in for
charging while it is ON will be barely charging this internal battery.
After a while of this kind of operation, the internal battery becomes
discharged or worse, may become unresponsive. Leave your unit on overnight
from time to time plugged in for charging and you can avoid this potential
issue.
This is the internal battery
for the Garmin portables, the rechargeable VARTA MC621:
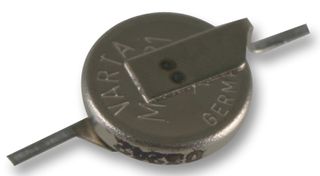
Type: Lithium Manganese Dioxide. Voltage: 3V. Capacity:
3 mAh.
Height: 2.15 mm. Diameter: 6.8 mm.
The spec sheet on the VARTA
MC621 Battery is HERE
. It shows a capacity of 3.0 mAh is rechargeable and has a rating of 1,000 cycles, whatever a
cycle means.
Just swell, because I have read
reports of GARMIN wanting a $350 (396) to $400 (496) flat rate repair charge to change
this little internal battery, that is reported to have been replaced by some
users with nothing more than a CR-1025 watch battery. Be careful because the
CR-1025 battery is NOT rechargeable!
My research shows that the CR-1025 battery
is 10mm in diameter and the MC621 battery is 6.8mm in diameter. See the
Energizer CR-1025 spec sheet
HERE.
One user has reported on the internet that he installed the CR-1025 battery
with good results. I also note from the spec sheets that the CR-1025 is 30 mAh
vs. 3 mAh for the MC621. Did I already say it's NOT rechargeable like the OE
battery? You decide!
Not exactly what you wanted to
hear if you are an owner of one of the high dollar 396 or 496 units and the
battery dies just after one-year warranty coverage has expired.
Don't get me wrong, Garmin Tech
Support is great and they have helped me a number of times with my 376C issues
over the last two years (bad XM puck, completely DOA unit, speaker charging
cord connector blowout, extra unlock codes for my map software).
See the News Flash below for a
great Garmin Tech Support success story.
NEWS
FLASH 2/18/2009: This pirep just in from V-35 Bo owner Kyle H.,
I had been having repeated problems with my 396 taking forever
to acquire satellites and the internal clock was never correct when I turned
it on. I figured the internal battery problem that was described on your
website was the issue I was seeing. I called Garmin and complained. They
suggested a few things and low and behold it got my GPS working again without
replacing the internal battery.
First they suggested using the AC charger and letting the unit fully charge
overnight. I wasn't sure if he wanted me to leave the unit on or not, so I
did leave it on.
Next they wanted me to update to the latest software, which I had already done
and then reset the system. You reset the 396 by holding the Quit key while
turning it on. It will ask you to confirm the reset. You loose all the GPS
settings when you reset it, so they advise users to backup the setting using
the MapSource software before doing the reset. Which I did. After restoring
all the settings after the reset, I turned the unit on and let it acquire the
satellites for about 15 minutes or so. Finally, I checked the internal clock,
wrote down the time and turned the unit off for at least 24 hours. When I
turned it back on the internal clock was correct.
After doing these few steps I haven't had any problems with the unit at all.
While talking to the Garmin rep, he explained that the internal battery is
rechargeable and they've seen a lot of units that are quick cycled (like on
short car trips) and the internal battery never has a chance to fully
recharge. You can tell how well the battery is doing by checking the internal
clock when it's turned on. Is the clock the exact same time as when you
turned it off? If so, the battery is dead and may or may not take a charge.
If the clock is set for a few hours after you turned it off, then that tells
you the internal battery is only able to power the clock for that many hours.
And again, it may or may not be able to take a charge that will power it for a
longer period of time. If after leaving the unit plugged in for overnight, the
internal clock is consistently set to the time you turn the unit off, the next
time you turn it on, then the battery is kaput.
OK, so my CSOB takeaway on this pirep is that
you've got to use these units more often and cycle the battery through some
charging cycles to keep this little internal battery from an early death. Get
out and FLY PEOPLE, use that high dollar Garmin Box (or less desirably, but
just as effective, plug the unit in overnight for a solid charge)!
Thanks for the pirep Kyle!

In the event you decide to deal
with your internal battery yourself, here are some great "How To"
instructions, courtesy of a find
HERE
at the
www.gpsinformation.org
forum. A giant thank you to poster "tsizmo" for his surgical prowess on
dealing with this issue!
Warning:
You will no doubt VOID any warranty protection you may have on your unit by
performing this surgery yourself! Garmin Aviation Tech Support is: 866-739-5687
Also, see the Van's Air Force
thread
HERE for confirmation of other user reports.
Here is a
revised
PDF
of another Battery Replacement Procedure by RV owner Bobby H.
Here is an awesome pirep dated
1/9/2009, from Baron owner and Beech Lister, Richard S., who changed his
internal battery on his 376C with the help from this page (Double CSOB Bonus
points for Richard for using the 376C CSOB Weather Box):
I thought I'd let everyone know that it is possible
to successfully change the internal memory cell we've been discussing.
I was able to do so on my 376c.
I used an
ML614 memory cell with mounting tabs from DigiKey. This cell has the
same 3.0 volt rating as the original cell, but a slightly higher
capacity of 3.4 mAh, versus the 3.0 mAh rating of the original. Another
option may be an ML621, which has a capacity of 4.5 to 5.3 mAh,
depending on the manufacturer. The 614 cell with the mounting tabs was
physically identical in diameter and lead tab geometry to the original,
but just slightly thinner. Thanks for the source on this, Al.
The instructions and pictures from Mike were clear and
accurate. The 376c has an additional ribbon cable to deal with (depth
sounder connection?) that the 396/496 doesn't have. You will need a low
wattage soldering iron with a very fine tip due to the small size of the
leads and very close spacings of the circuit board traces. A calm,
steady hand is needed as well. Skip the caffeine before this task!
Re-assembly was straight forward. I did not attempt to
flow any dry nitrogen into the case during re-assembly, but it would be
easy to do so. You could likely just keep one edge of the case slightly
open and use a gentle flow from a nozzle on the nitrogen bottle you use
for your struts and tires to displace the air inside the case as you
close it and tighten the screws. Anyway, no condensation so far on the
inside of the screen.
The unit started up normally, received solid XM
signals, went through it's auto locate with solid GPS signals, and then
reset itself to the correct time and date. I left it on overnight on the
external charger and it worked fine. I turned it off for 24 hours,
turned it back on and it started right up with the date, time, and
satellite constellation instantly correct. No more wrong
date/time/constellation with auto locate!
BTW, the old memory cell showed 0.24 volts no-load. No
wonder the unit would lose its' mind after about 60 minutes of
power-off.
The whole process took about half an hour and cost
about $10, versus a couple of weeks and several hundred bucks at Garmin.
Isn't this
Beech List great?
Thanks again Al and Mike!!!!
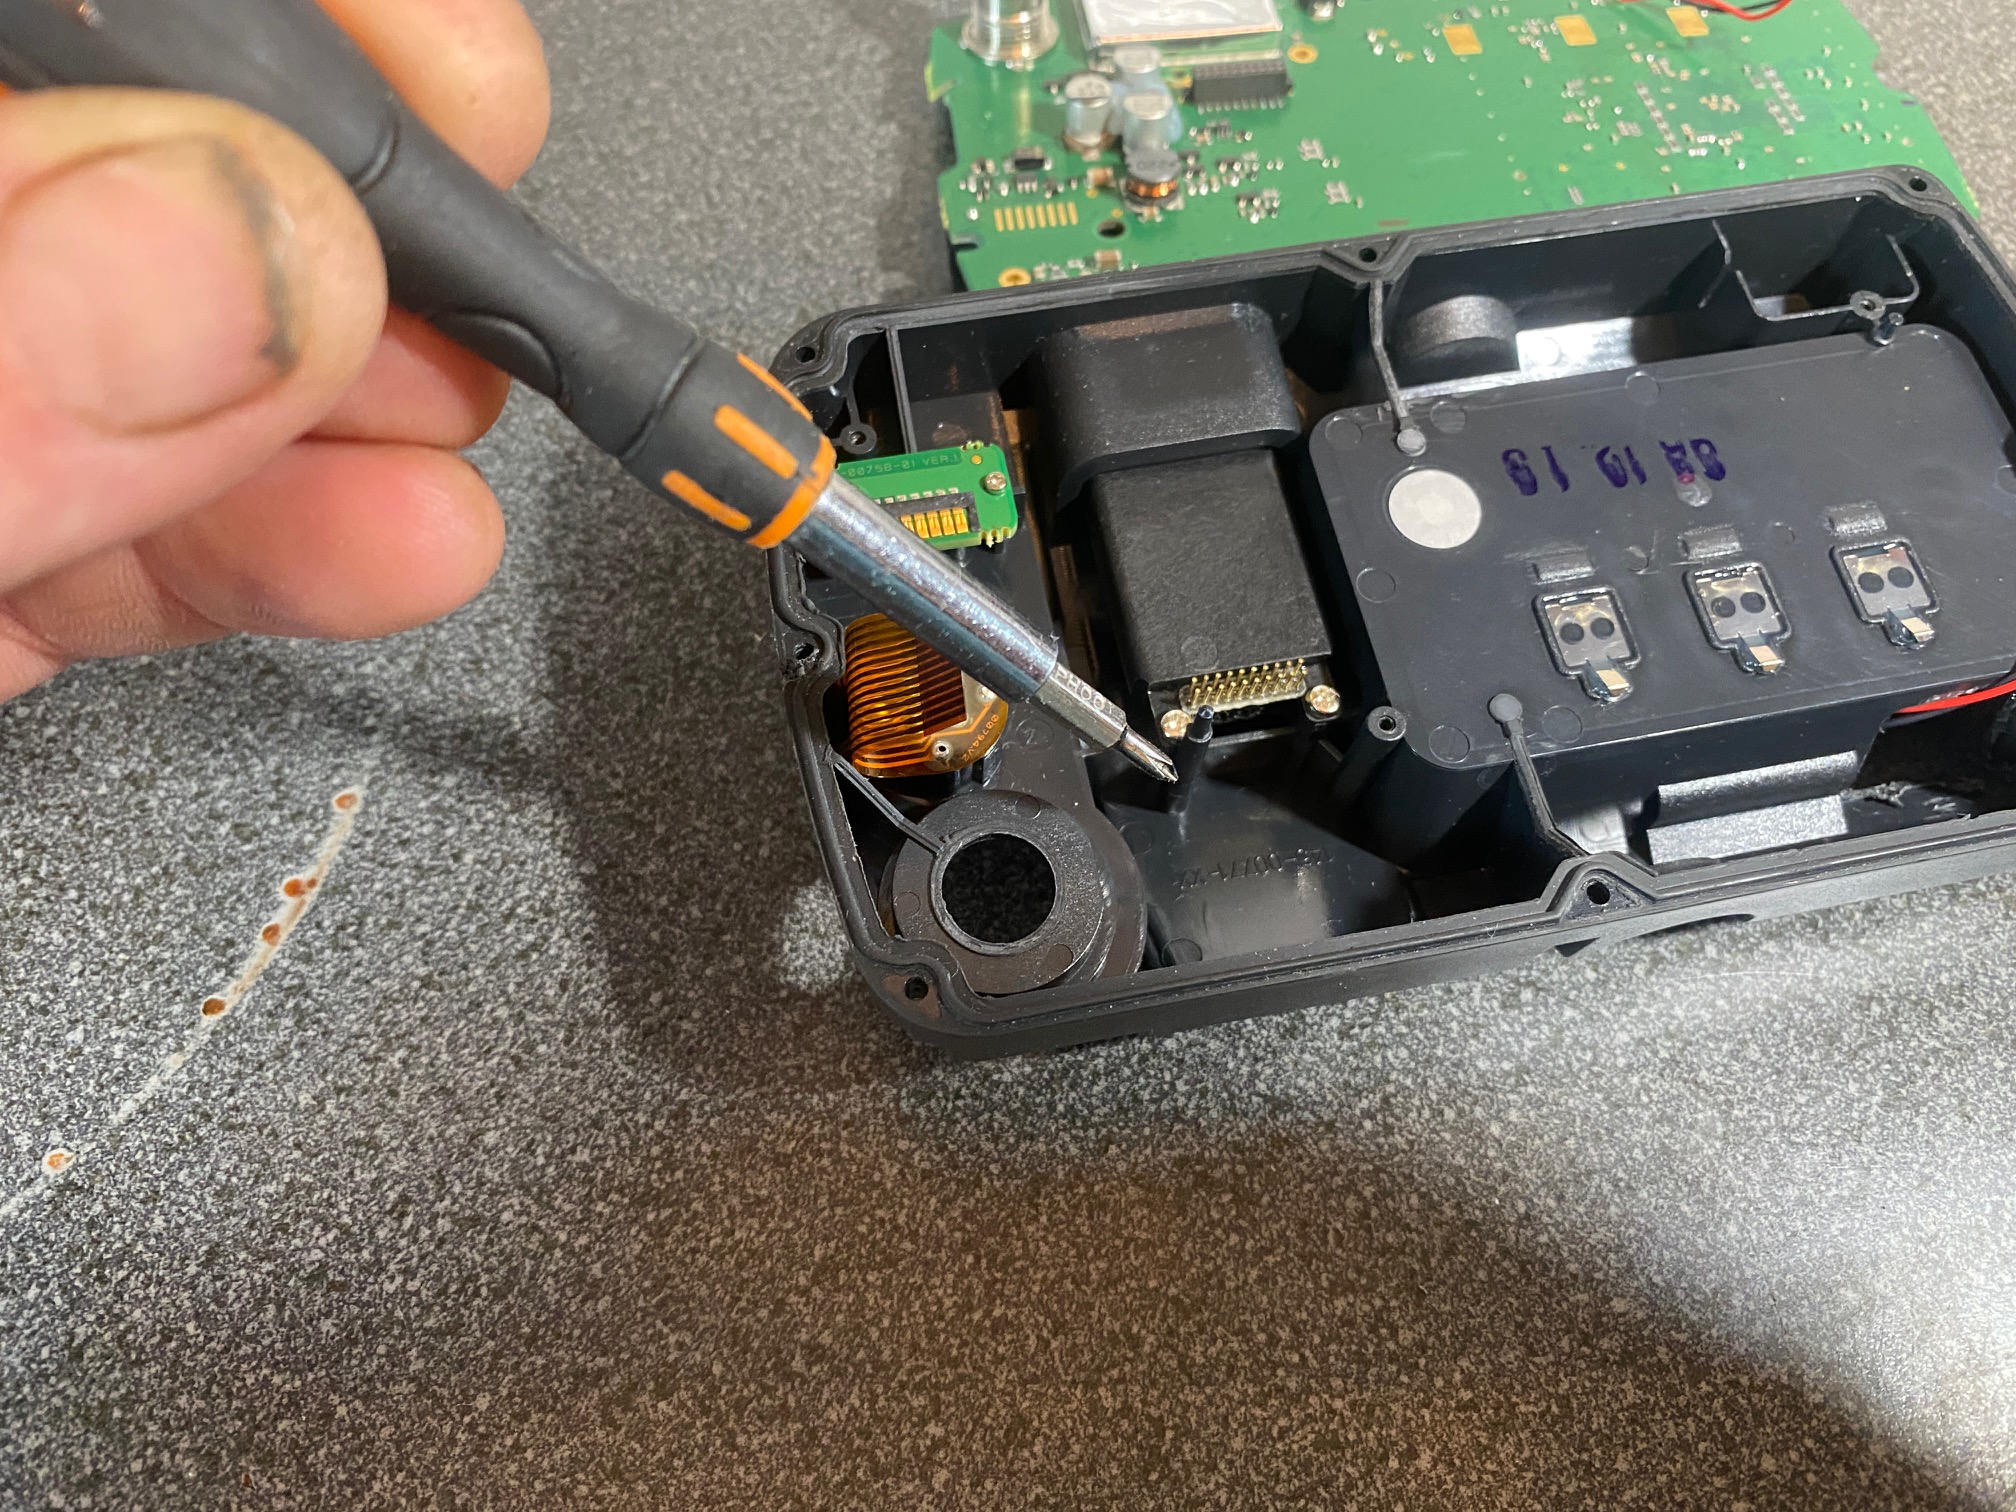
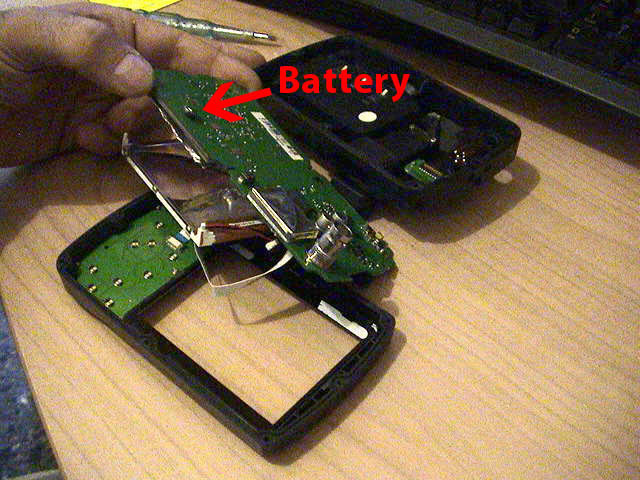
Step by Step Internal Battery
Replacement Procedure
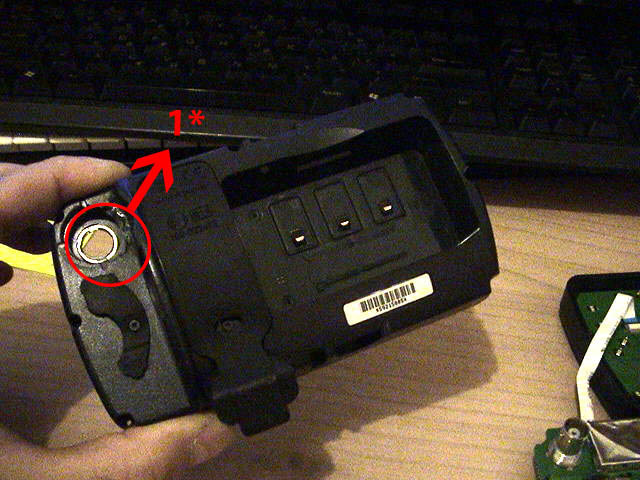
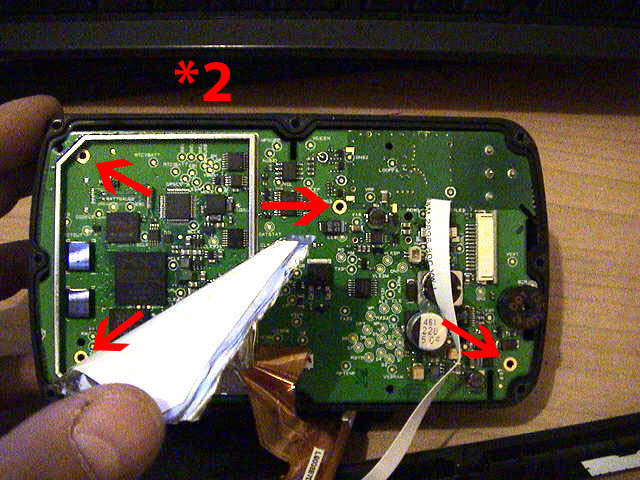
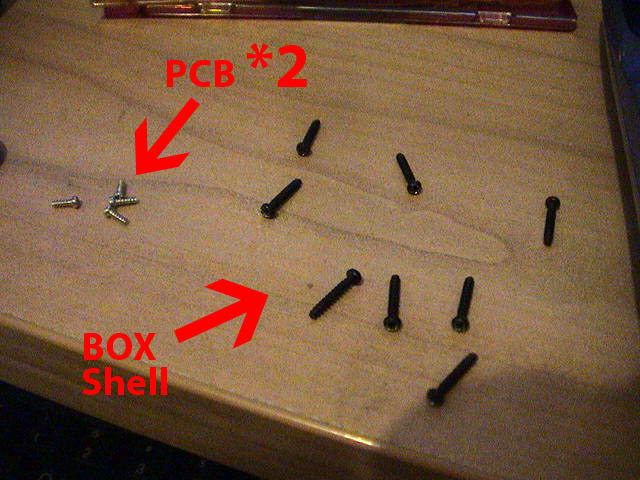
Ok first remove the screws from the box
shell and the ring of the antenna base connector

Carefully lift the aluminum paper behind
the LCD screen (don't worry it has only soft glue)
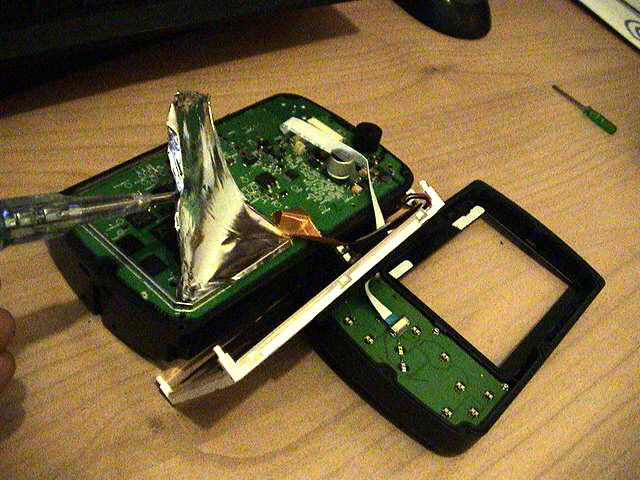
remove PCB screws
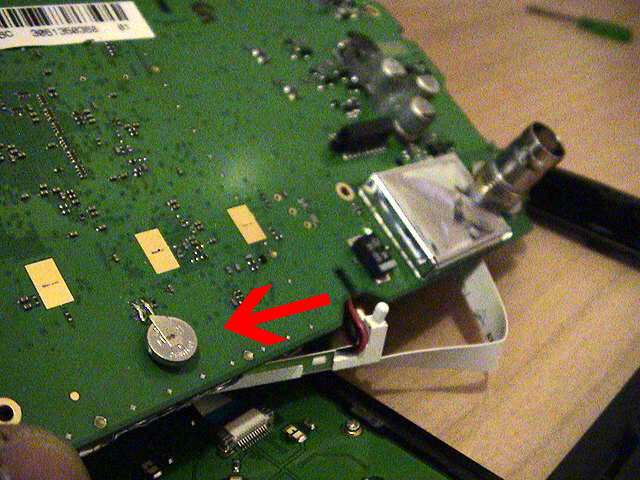
NEWS FLASH!
Here is the latest pirep from Lindy winning
Bonanza owner, Doug G., after he did his GPSMAP 396 and found a ribbon cable
that was not mentioned in the original battery replacement procedure:
"I finally got around to changing
out the battery in my 396 last night. I had your page up with the photos and
instructions as a guide. I came across something that is not covered and
snapped a couple of pics should you want to update the page. I don't know
which model was used for your page, but the 396 (and probably the 496) has
another ribbon cable that is not shown. When I pulled the board out, the
cable came out of the connector on the board (see photo below)."
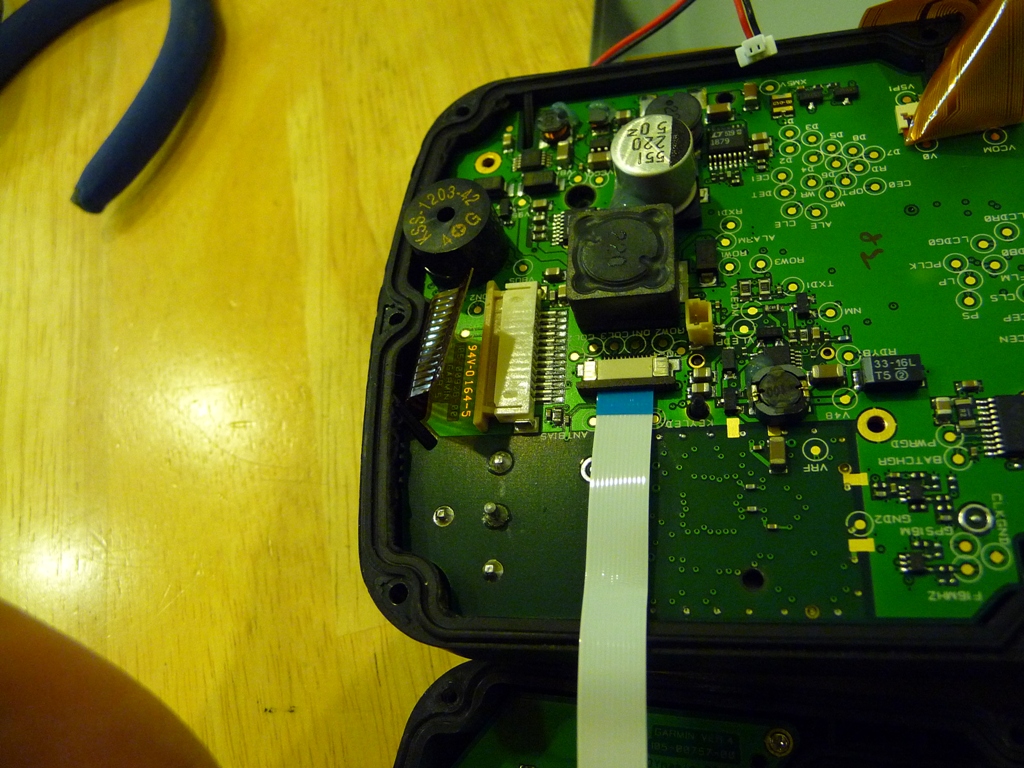
"I may have said some bad words
when this first happened, but then I realized it is supposed to do that. I
pulled the clamp (for lack of a better term) out of the receptacle, slid the
ribbon in and pushed the clamp in to lock it in place (see photo below)."
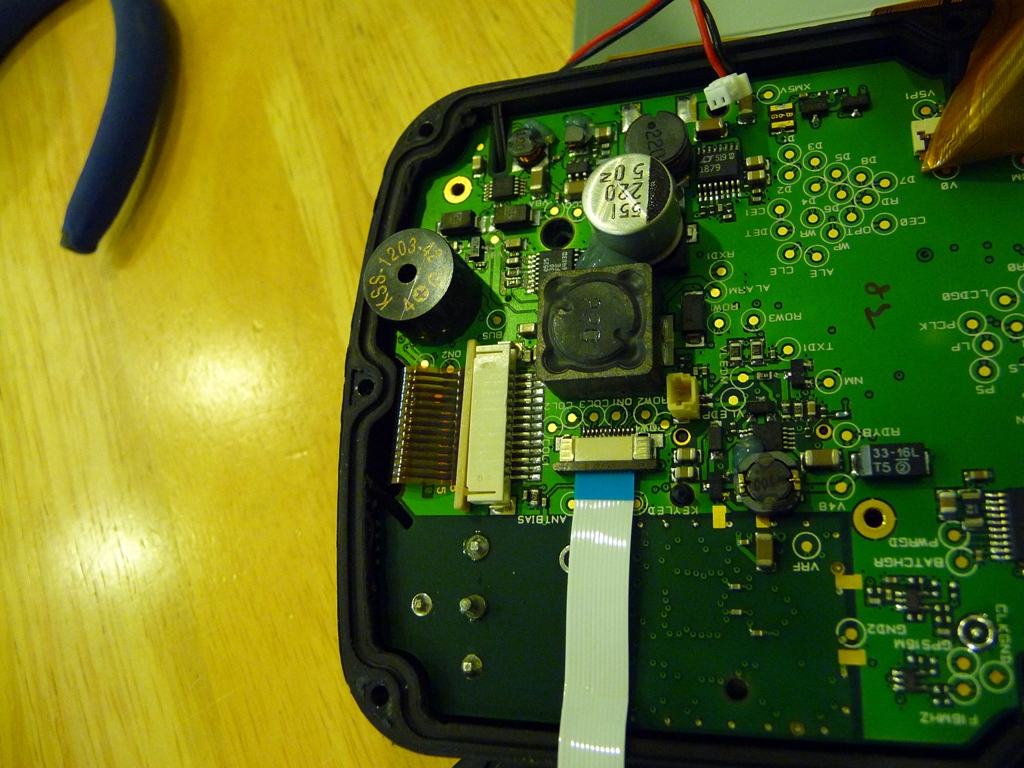
I figured someone else would
probably have the same issue I did and wanted to let them know how to solve
it. You can't get the board out without disconnecting the ribbon.
Paul B., S35 Bonanza owner, advises that the small ribbon cable has a
retainer clip similar to the one just discussed.
at the back of the PCB you can see the battery
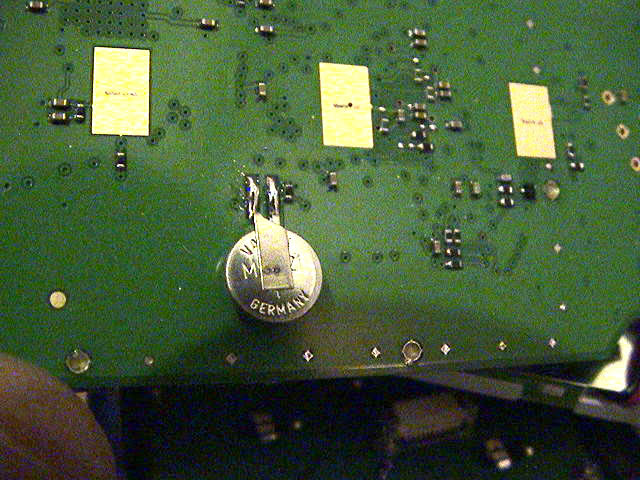
Tip from Paul B., S35 Bonanza owner: use a strip of tape to hold the new
battery in place while it is being soldered.
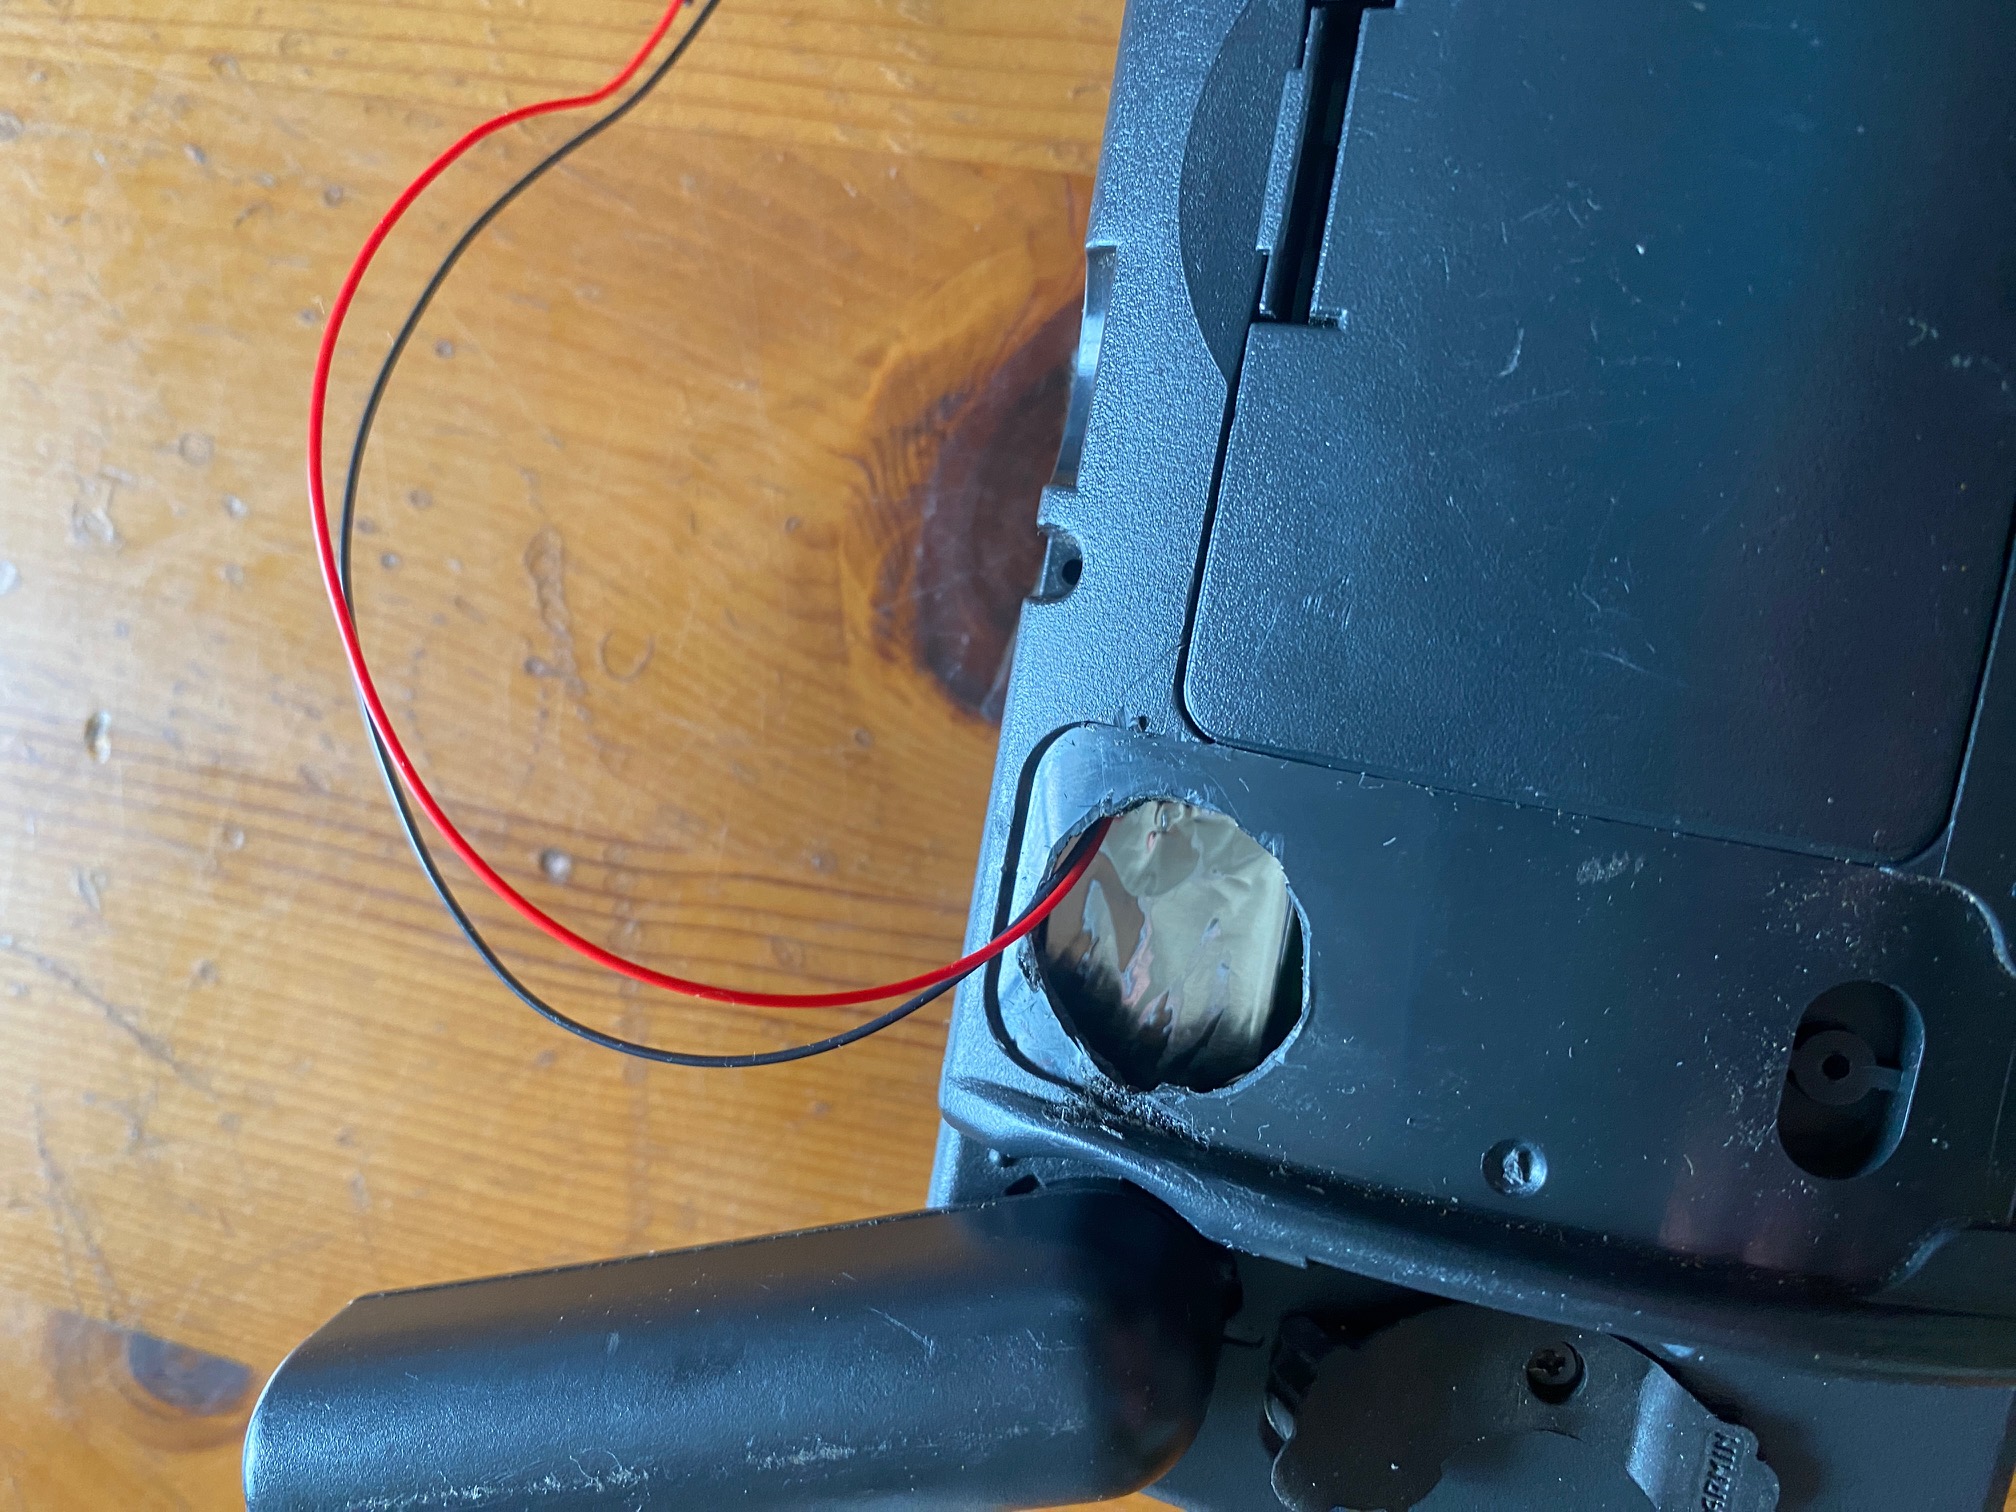
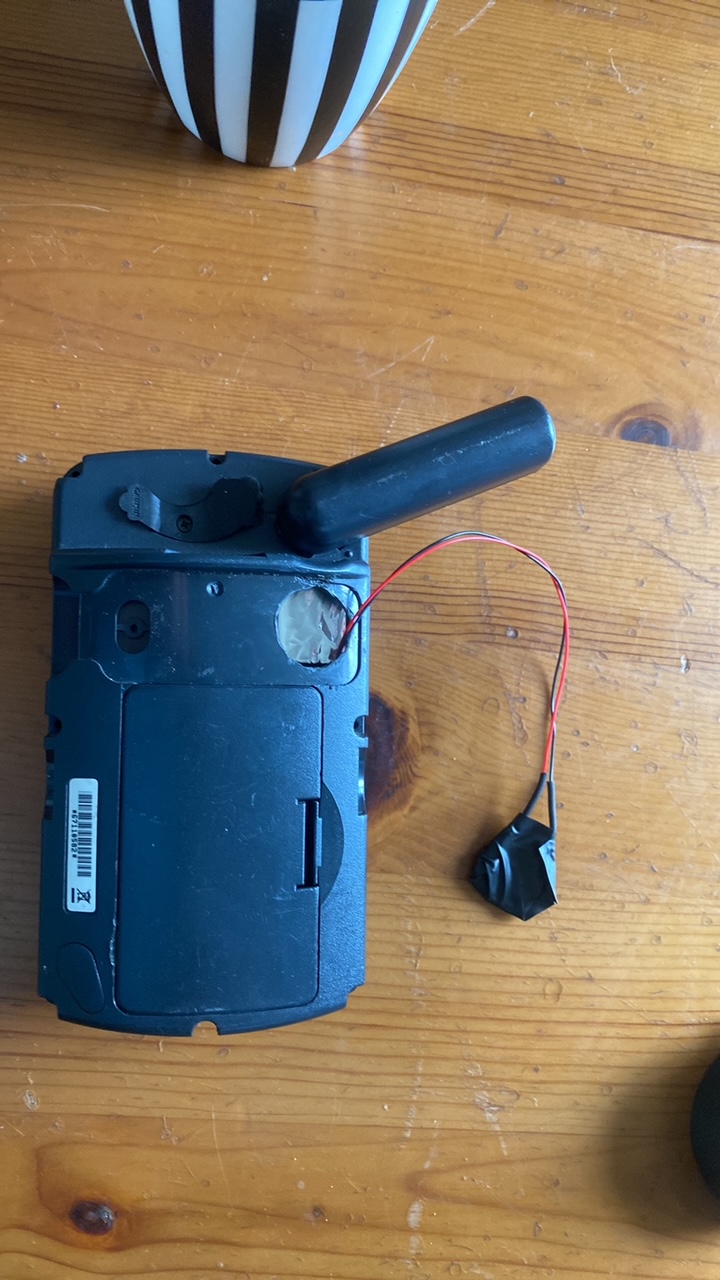
NEIL P.'s SOLUTION
He decided to go with VL2020 cell. - and a hole in the back under the rubber strip. Neil says he will find a grommet or 3-d print a stopper, for the hole.
It's a VARTA MC621

Replace this bugger and voila... no more acquiring
satellites delay!
Sources for the MC621 battery might be:

It also appears some users reported replacing their
MC621 battery with a
Radio Shack #1025. Be advised, the 1025 battery is NOT rechargeable!
You would be well advised to check the voltage,
size and polarity of the #1025 before proceeding with this surgery. My research
shows that the
CR-1025
battery is 10mm in diameter and the MC621 battery is 6.8mm in diameter. One
user has installed the CR-1025 battery with good results. I also note from the
spec sheets that the CR-1025 is 30mAh vs. 3 mAh for the MC621. You decide!
Eveready # ECR1025 also crosses to this battery.
Another source for the ~ $3 - $5, CR-1025 battery might be (click on the
logos):

This looks like the ticket folks! It is an
ML621-TZ1, has 5.5
mAh, is rechargeable, is the proper 6.8mm diameter and has the tabs already soldered onto it.
From Digi-Key
HERE

Digi-Key Has a Comparable MC621 Battery
HERE

Higher 3.4 mAh Capacity, Rechargeable & has Tabs Already in Place
Digi-Key Part Number SY152-ND
Manufacturer Part Number ML614-TZ21
German source for the battery
HERE

Other Boot Options & Fixes
Neil P. provides the following pirep on his Garmin Portable Tech Support experience:
After 2-3 mails from Garmin Tech Support, I got
the date sorted. This issue may happen after a flat backup battery/
battery swap.
Software needs to be version 6.10
There is a set date function … but it is Greyed out and unusable UNTIL… you go to Simulator mode.
Adjusting the date and time - First, make sure the GPS is in simulator mode.
- Double
tap menu, scroll down to setup, use the right arrow, and scroll all the
way over to "time," select menu and scroll down to "update date and
time" which will allow you to select the year.
- Take the GPS out of sim mode
- Walk outside and acquire satellites
There are other multi-button boot combos listed below:
User Data - Hold the Quit button while turning on the device
Master Rest
- Hold
Zoom Out, Quit, and NRST while turning on the device, after letting go
of power, the device should "freeze" on the GPSMAP 296 page, at that
point, remove the battery. Power back on and the device should have
removed all user settings.
Boot Block
- Press and hold the up arrow while turning on the device
Auto-Locate
- Hold Zoom Out while turning on the device
|