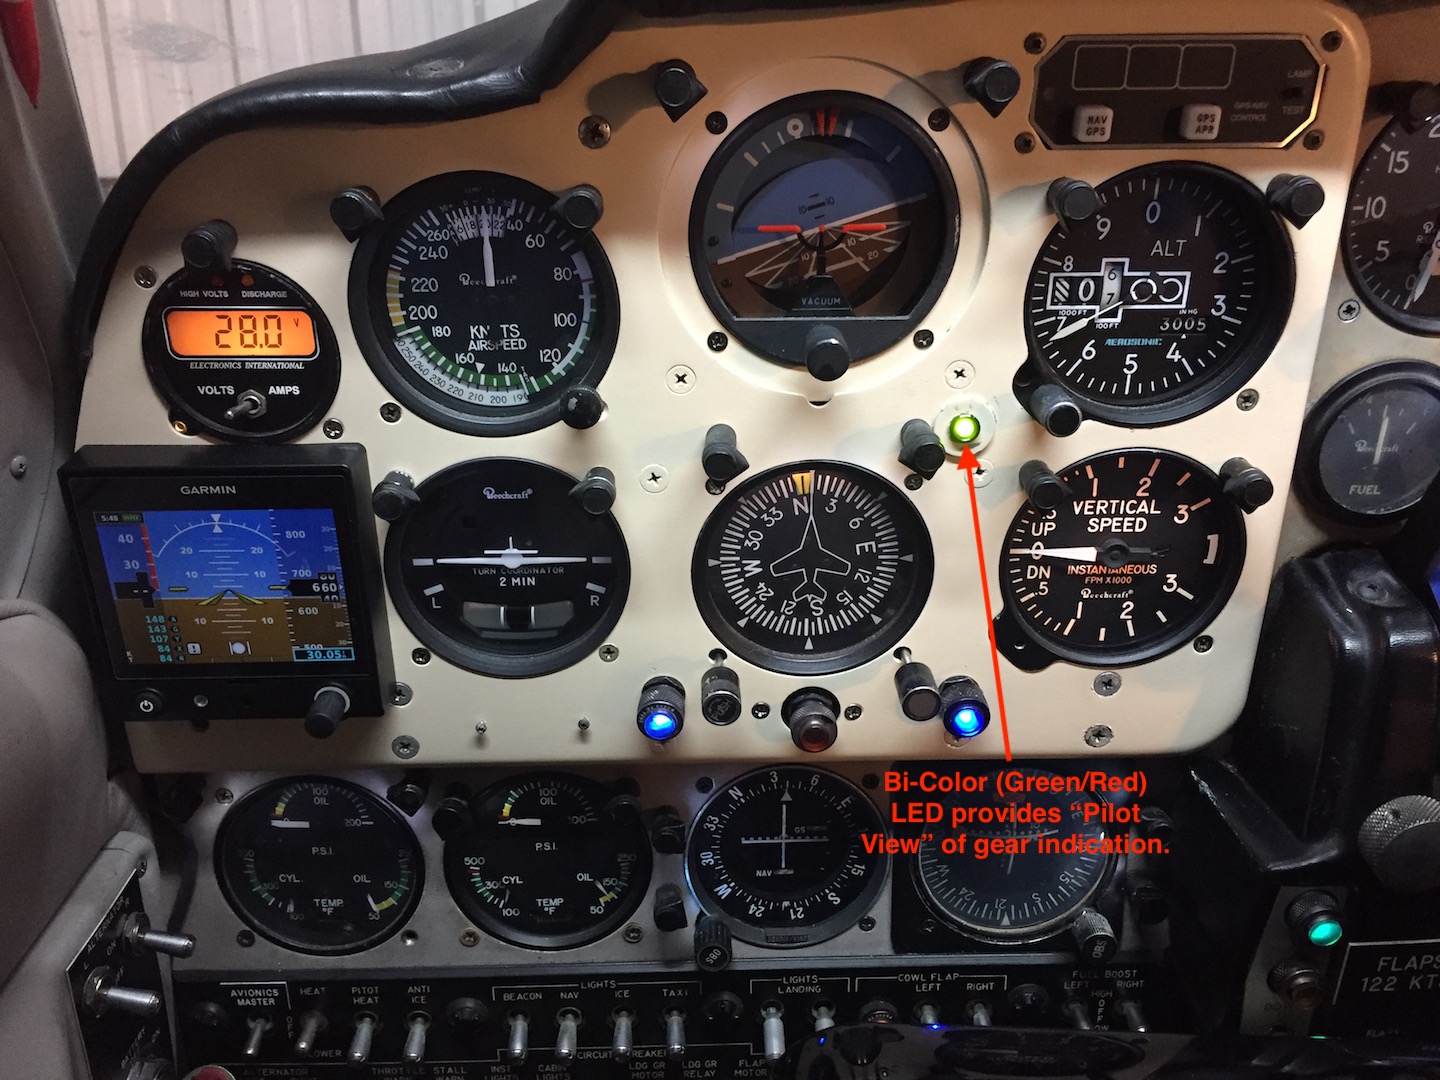
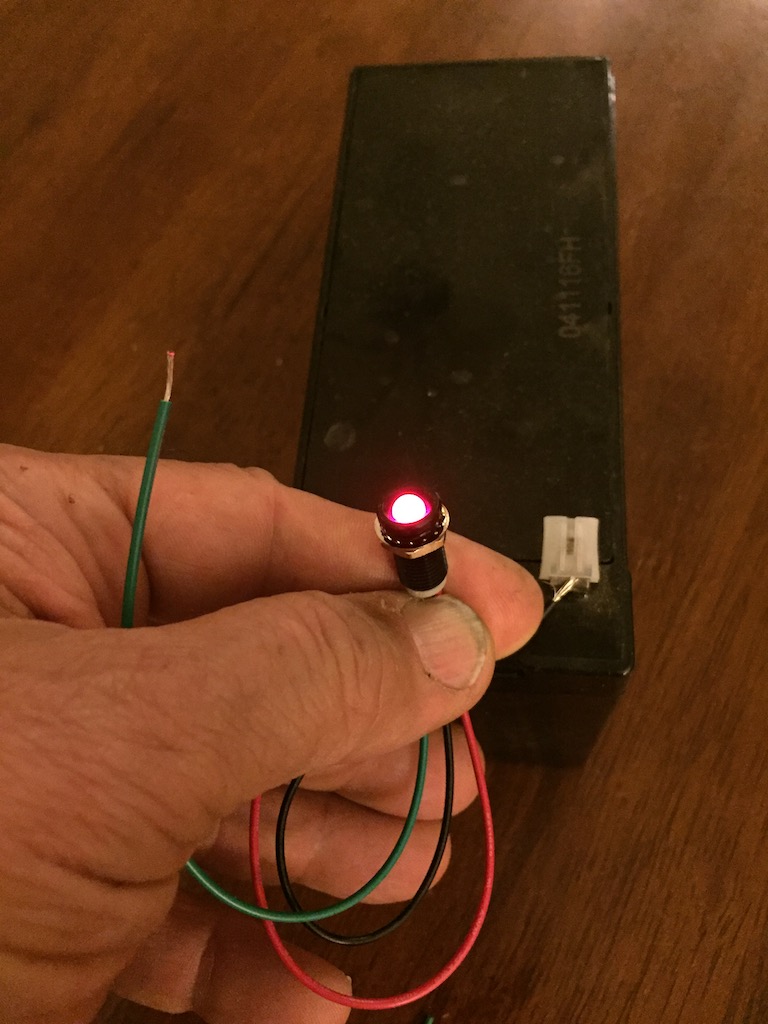
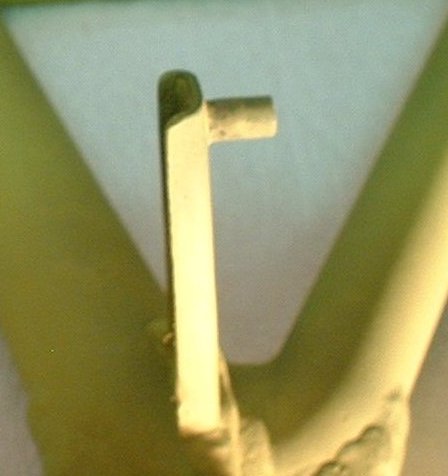
If you find it difficult to see your gear lights
over on the co-pilot side and have yearned for an "in your face" gear light
solution, or are doing a panel makeover and would love to add an auxiliary gear
light indication, this could be the ticket for your panel. The above is a
bi-color LED that will react to the power feed that your existing factory gear
lights receive.
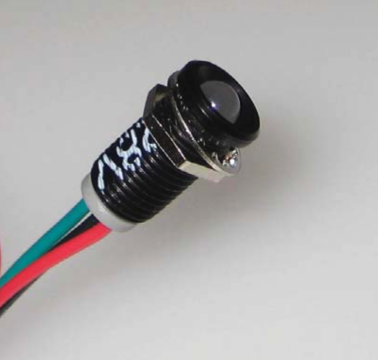
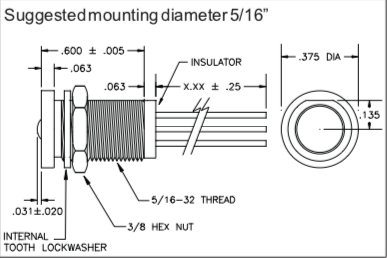
Simple one hole (0.313" diameter) install into
the pilot side panel, fed by the Green and Red power wires of the existing gear
lights and a simple ground connection. One bulb with two indications!
The proper wires that feed the factory gear
lights can be identified by looking in your Beechcraft Shop Manual wiring
diagram section. The wire ID numbers can be found in the bundle leading to the
gear switch and can be seen by an agile person equipped with an LED headlight
laying on their back with their head under the co-pilot panel. An appropriate
tap into those wires and fed to the red and green sides of the bi-color bulb
will result in an auxiliary gear light indication in a place of your choosing.
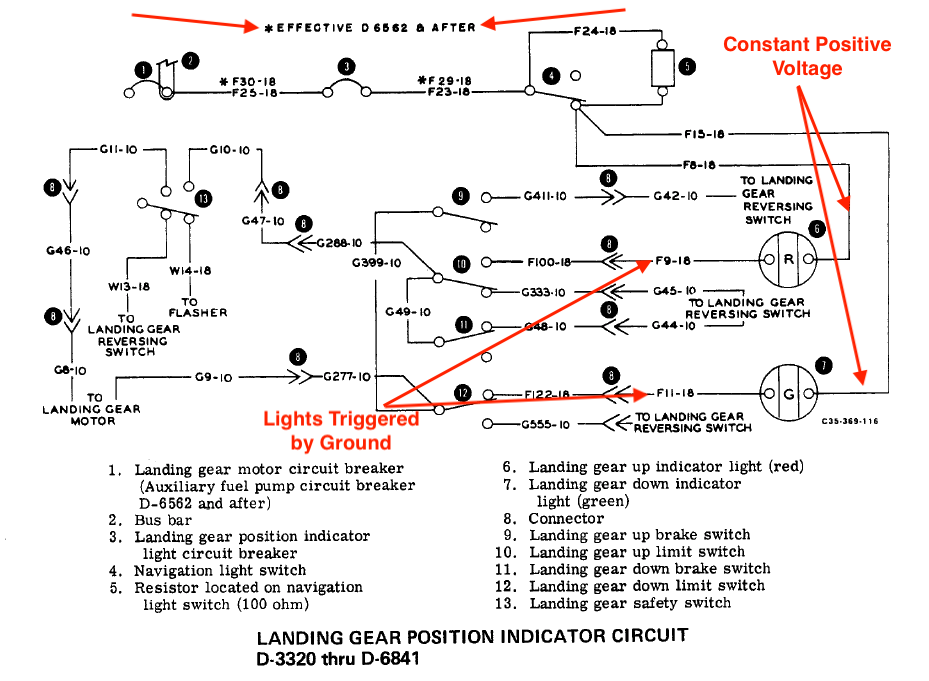
My B55 wiring diagram is shown below as an
example of what to look for in YOUR SHOP MANUAL FOR YOUR SN.
Below is an example of a Bonanza landing gear
wiring diagram - Remember, you must look up the wiring diagram for your specific
SN to properly determine how to make your connections. The wiring diagram below
does NOT apply to all Bonanza SNs.
In the above wiring diagram you can see that the Red and Green lights
are fed CONSTANT POWER positive voltage through the LG motor CB. So, this would mean that the circuit for each light is GROUND
activated.
This means that for the Bi-Color LED to function the BLACK
lead must go to CONSTANT 12V power voltage (when master is on) and the green
lead goes to the GROUND wire leading to the GREEN light which in this diagram is
labeled F9-18.
The Red lead of the Bi-Color LED goes to the GROUND wire
leading to the RED light which in this diagram is labeled F11-18.
As with all things in this realm of modification,
consult your IA/A&P before proceeding with tapping into your factory gear
indicator wiring to add this auxiliary indicator. Some IA/A&P's may simply view
this as a logbook entry minor modification. Your A&P/IA will fill you in on his
view.
The bulbs are available in 12V and 28V versions.
Click the Buy It Now Button below to support
CSOBeech.com with your purchase if you are seeking this type of solution for
improved awareness of gear condition indicator lights.
Purchase Price includes FREE USPS 1st Class
Shipping for US or International purchases.
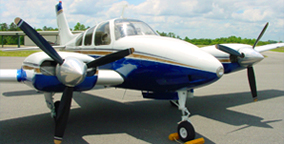
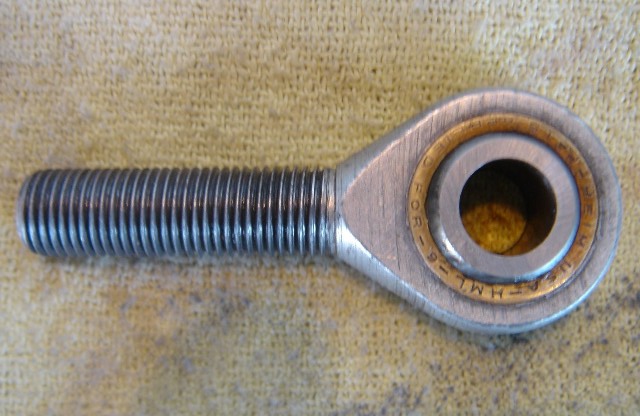
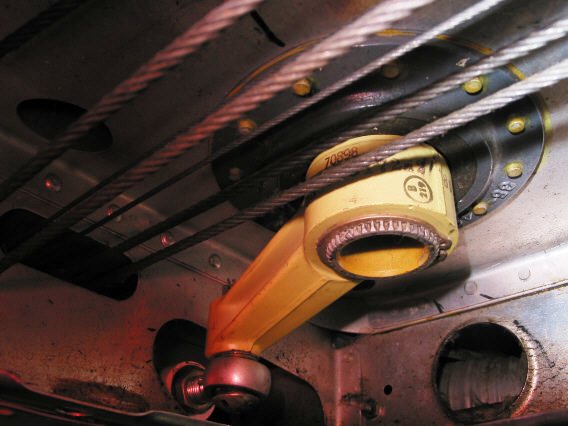
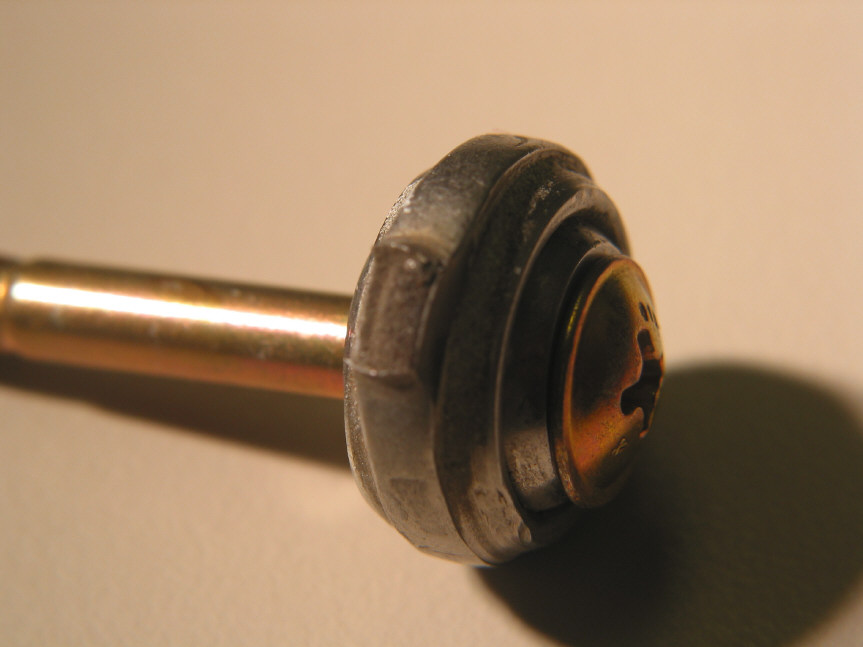
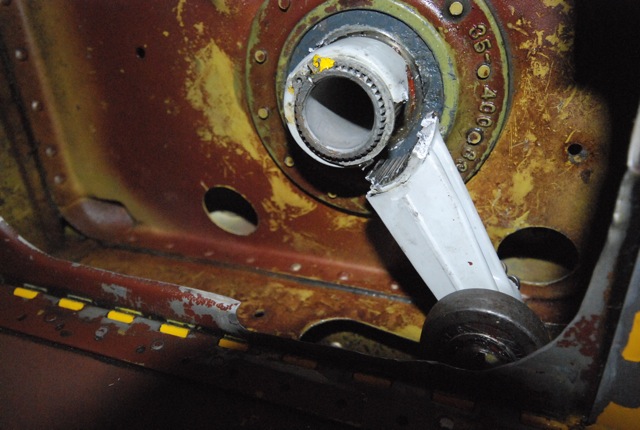
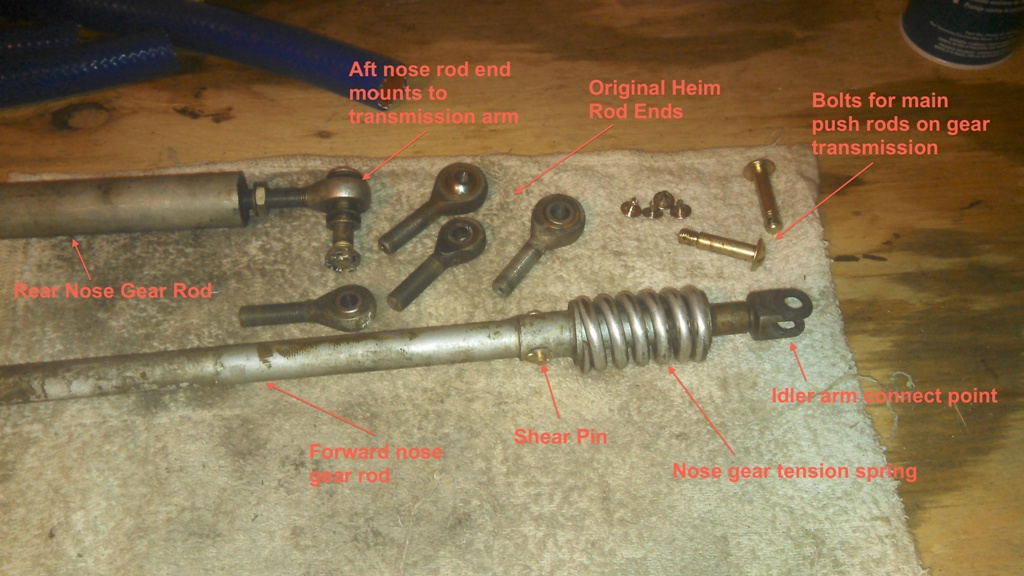
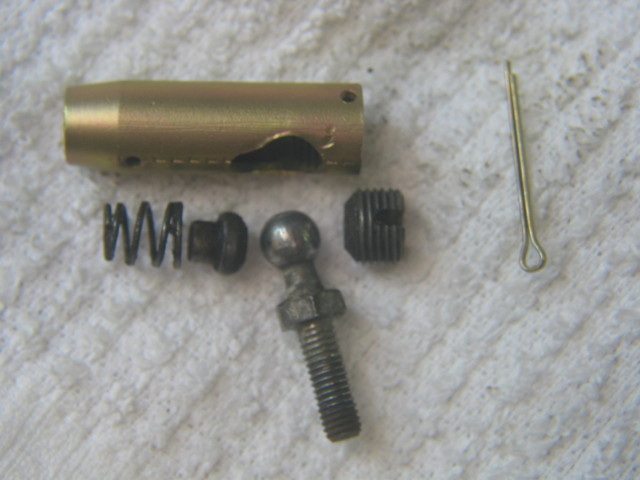
This nose gear Rod End (and several others) is all that is between you and the above kind
of event!
The rod end pictured above is the factory
installed, 4,000hrs TT HML-6 Heim unit from the back end of the nose gear rod at
the gearbox on my B55. It looks perfectly OK doesn't it? But hey, who knows what the metal
fatigue cycling has done over 43 years. This CSOB does not want to find out!
Some People STILL Think Flaps Before
Gear Is a Good Idea in Our GA Piston
Birds Because That's What the
Big Boys Do
Another Recent Victim of Flaps Before Gear Practices
See this pilot's lessons learned document HERE
IMHO, flaps before gear is a BAD IDEA in our piston aircraft. It's best suited to large turbine powered and transport category aircraft. The BEST idea is
multiple GUMPS checks in the landing phase of flight, especially upon
seeing the runway environment (IFR) or the runway numbers (VFR).
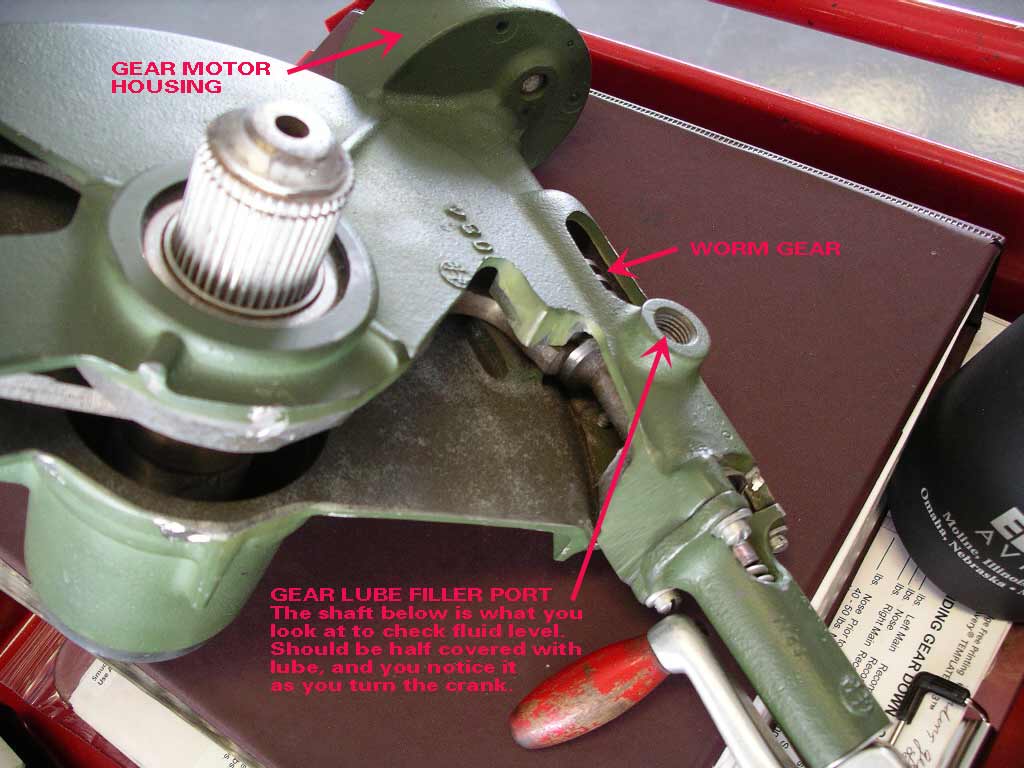
Handling a
Beechcraft Landing Gear Emergency & Troubleshooting
What Beechcraft Nose
Gear Linkage Should NOT Do!
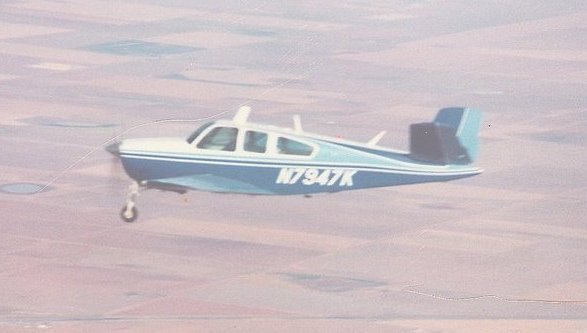
A Bad Travel Air
Landing Gear Day
Don't wait to have a Rod End failure to learn
that the insurance companies have been totaling older Beechcraft that have
suffered a landing gear rod end failure or gear up landing.
They Used to be a Nice B58s....Until Something
in the Nose Gear Failed!
Many gear collapses are a result of rod end
failure (unfortunately, some are the result of confused pilots grabbing the gear
handle instead of the flap handle DUH! Fuh-gedd-aboud touching anything until
you're clear of the active AND STOPPED.
Right behind your engine, the landing gear is
the next system, where a failure will cause major damage to your plane and/or
potential injury to you and/or your passengers.
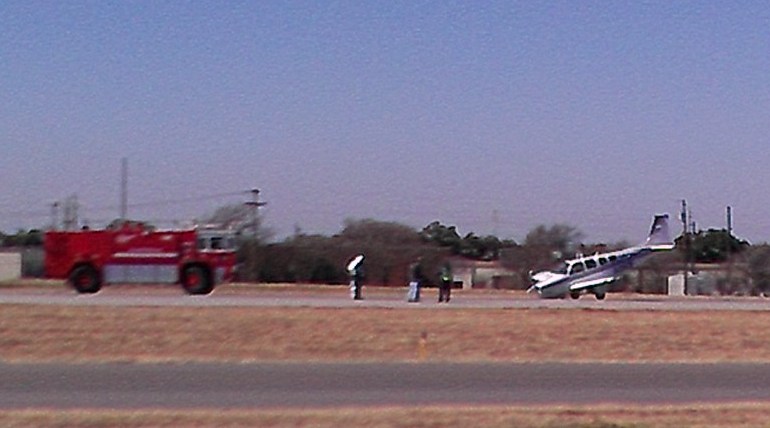
HERE's
a sad audio to listen to starting at ~2:15, where the A36 pilot has flown
halfway across Texas with his tow bar attached to his nose gear. Below is the
fortunate result of ONLY property damage. Can you say
"pre-flight distraction"?
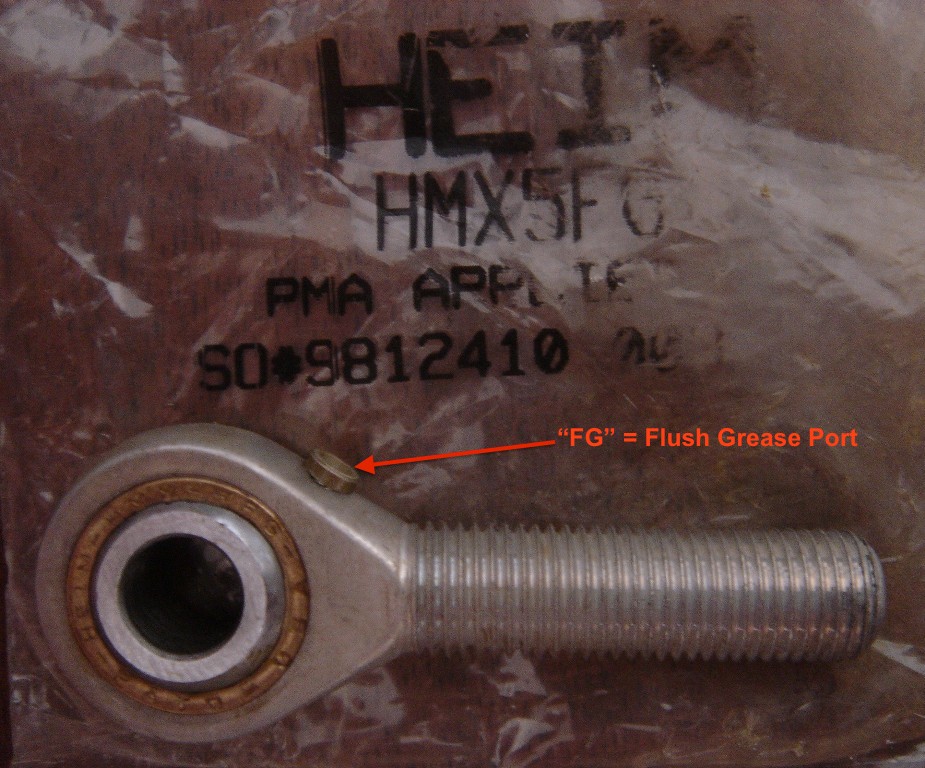
It has been reported that the HMX5FG has been
superseded by ADNE5-323 for the two front rod ends and the aft rod end is
ADNEL6-317.
True CSOBs hate to have expensive things break
or fail.
So spend a little dough to avoid a potentially giant headache and the loss
of your plane. Visit your mechanic and have your rod ends changed at (pick a
number you like: 2,000hrs TIS, 3,000hrs TIS, 4,000hrs TIS).
Click
HERE
to see what happens to a 7,000 TT Rod End and see how the tensioning spring is nearly
"Stacked"! This owner was incredibly lucky in that when the middle
nose gear rod end
broke the nose gear came down but had ZERO downlock tension.
Here is a quote from A-33 Bonanza
owner of the above failed rod end, Stan "The Man" says:
"You must replace these rod ends at no more than 3,000 hours,
you are gambling on a failure that may result in a landing with the nose gear
not extended! I was very fortunate, the aft nose gear retraction rod pushed the
front nose gear retraction rod to lower the gear with the failed rod end. I felt
a thump when I retracted the gear and didn't know what the problem was, so I
extended the gear for the next landing, at home base, at under 100 knots and did
a gentle, smooth landing and slow taxi to the hangar on smooth pavement. When we
retracted the gear the next day on jacks, the nose gear did not retract. We were
very lucky not to have landed the Deb with the nose gear not extended or in
having it fail on the ground. Please do not neglect the nose gear retract rod
ends, there are three of them."
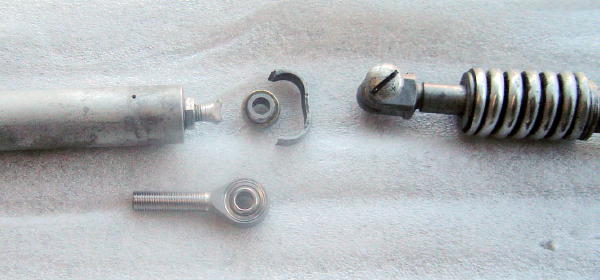
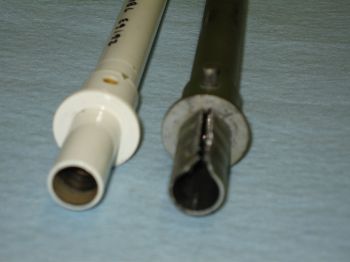
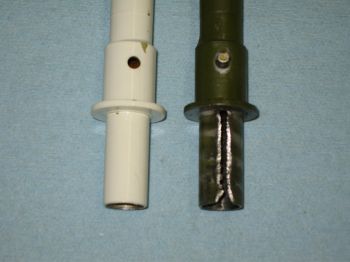
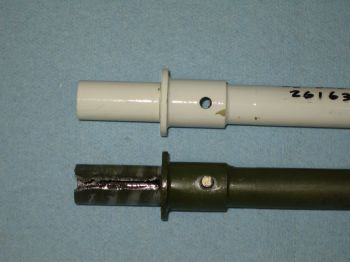
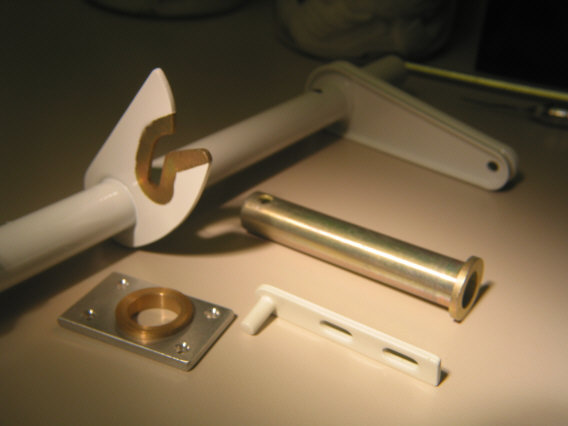
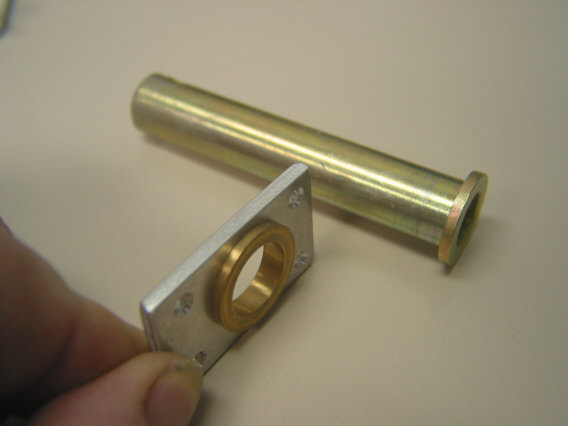
Scary Nose Gear Attaching Hardware Pics
Below are some nose gear
connection hardware pics from 2500hr, 1962 Baron owner Shawn B., who was
doing a landing gear refresh. Pictured are an HML-6 (left hand thread) hollow Rod End and
the connecting bolt for the nose gear rod to the gear transmission arm.
It pays to look at these older parts for fatigue evaluations before you
become a landing gear failure statistic!
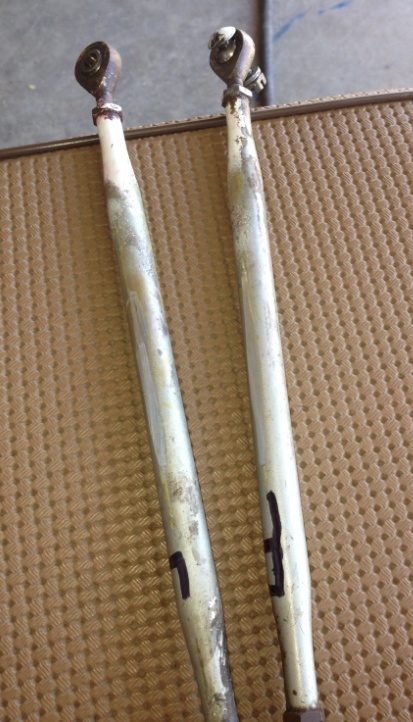
Hollow HML-6
Bent Hollow HML-6
Bent Attaching Bolt-Nose Gear Rod to Transmission Arm
Above picture shows where the HML-6 Rod End and Attaching Bolt attach to the nose gear transmission arm.
Above is a non-Heim rod end side load failure in the nose
gear rod center linkage.
Here is a pirep from Dan MacD. regarding the
info he learned while researching rod ends for his Debonair:
I am refreshing the nose gear mechanism of my 1960 Debonair...
My parts books lists a Heim HMX-5FG rod end for the front end of the
forward nose gear retract rod. I believe "H" is for Heim, "M" for male, "X
for
extra strength, "5" is the size, "FG" is for flush grease fitting. These are
hard
to find. I see it was superseded to ADNE5-323, which is also hard to find. A
HMX-5G appears to be the same thing with a standard grease fitting, and
Spruce sells them for $51.60. I ordered one and it fits perfectly. I still
need to
verify that the grease fitting clears okay, but if not it could be removed
and
a plug fitted. I'd like an HMX-5 (no grease fitting) but these are hard to
find
too.
Now for the interesting point - Aircraft Spruce lists an equivalent to the
Heim HMX-5G as the Aurora XAM-5Z for only $18.75. However it does not
fit!
The threads are the same, and the hole in the ball is the same, but:
the distance between the head and the threads is longer, which makes the
retract rod too long
the head is larger and interferes with the down lock of the nose gear
CSOB1 Comments: If you are removing original
factory rod ends, you'll likely run into no grease fitting PNs coming out of
your airplane. With your mechanic's approval an identical PN rod end could be
sourced which may tend to have stronger load ratings than the ones with grease
fittings or "FG" fittings. By hand greasing them or applying Corrosion X
lubricant at each annual can keep them in good working order.
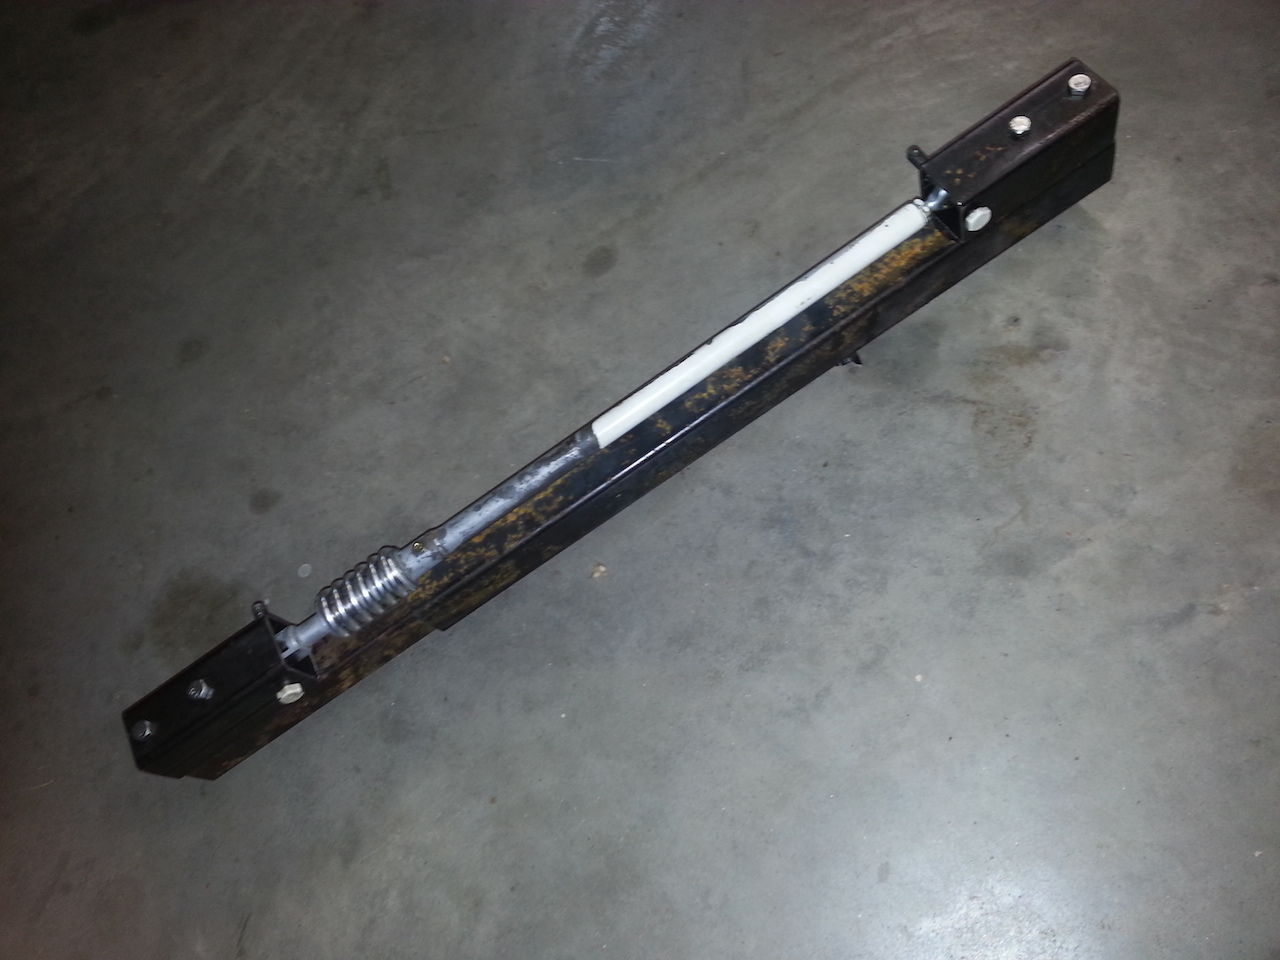
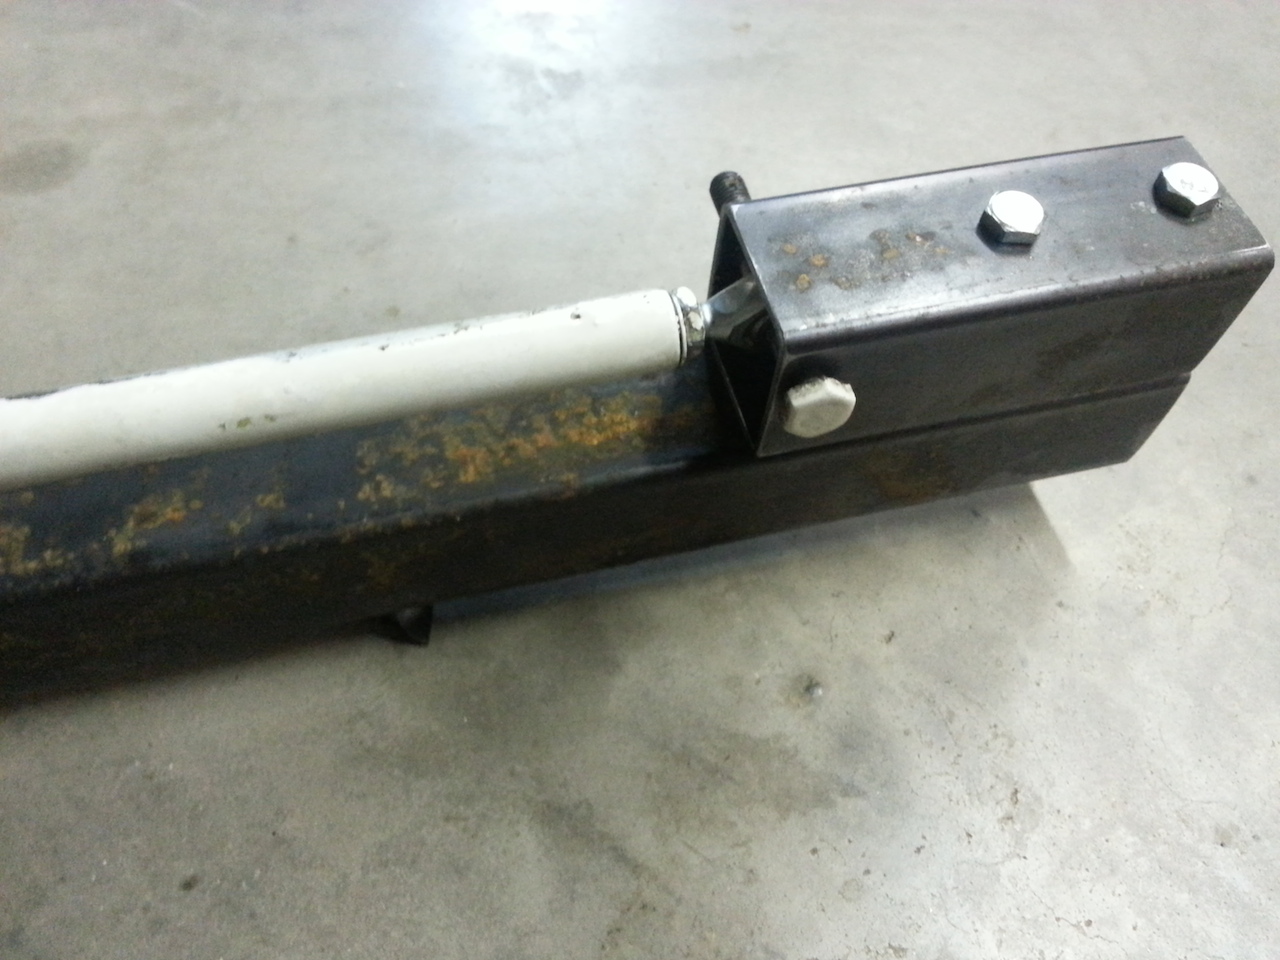
While you are changing the rod
ends get yourself the tensioning springs as well! There is one on the nose gear
rod (pictured above) P/N 35-825188 and one on each main gear push-pull tube that
are P/N 45-815091 for the B55.
RAPID has
these springs and new tensioning washers. My main gear springs were P/N
45-815091 and the washers are P/N 100951S063XP. Check YOUR parts catalog
to be sure you order the proper P/N for your model and serial number!
Here's a Beech Lister's method for compressing the nose gear spring:
Other methods include a vice to squeeze the ends and careful removal of the
shear pin. Be sure to lube the shaft liberally with CorrosionX or ACF50 or some
such lube before reassembly Here's another way to handle it from Beech owner
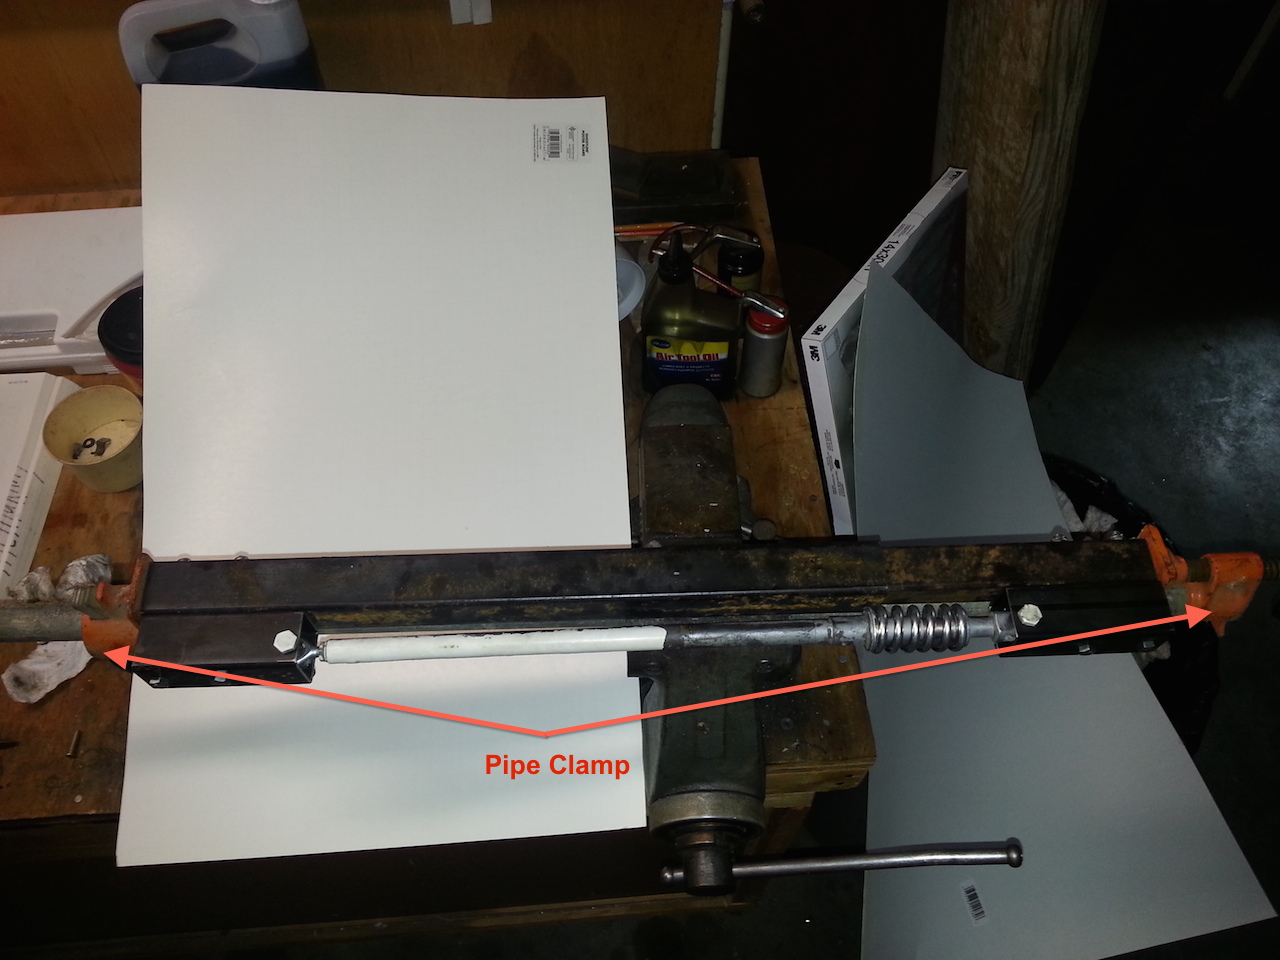
John McM.:
Here's how I compress the nose gear retract spring. The pictures show
the jig. It is made from 28 gauge (thin wall) square steel pipe. I
had a local steel yard cut the following pieces for me - cost was $13 including
tax and cutting charge:
1 1/2 in square steel tube, 19" long, 1 ea.
1 1/2 in square steel tube, 4" long, 2 ea.
1 1/4 in square steel tube, 19" long, 1 ea.
From the hardware store, I got four 1/4 x 3 1/2" bolts and nuts. Cost.
about $2.50.
I got two used AN5 bolts from the bolt box. Cost: free.
I had a 3-foot pipe clamp already but you can get the hardware and a piece of
pipe already threaded from any good hardware store.
I used a drill press to drill the holes and assemble the jig as shown in the
photos but a hand drill will work if you line up things carefully. I put
the pipe clamp in the vice, laid the jig in the clamp. put the retract rod in
the jig as shown and, viola', absolute control over the spring. The best
part is: total cost was less than $16, total time was about two hours including
running around finding the metal and, best of all, no exotic tools or welding
needed.
Another suggested method from Bo
owner Bill:
I clamped a long piece of metal in the vice, clamped some C clamps
strategically to it to act as a stop for one end of the rod, and then used a
furniture clamp to squeeze the overall rod enough to remove the pin that holds
it together. Worked great, and didn't send parts bouncing around the shop when
it slipped out of the vice.
Bill also reports that Arrell
Aircraft sells a cleaned up re-tempered spring for less than half the Beech
Factory price. So if that spring price bugs you give Arrell a call at the info
on this PAGE.
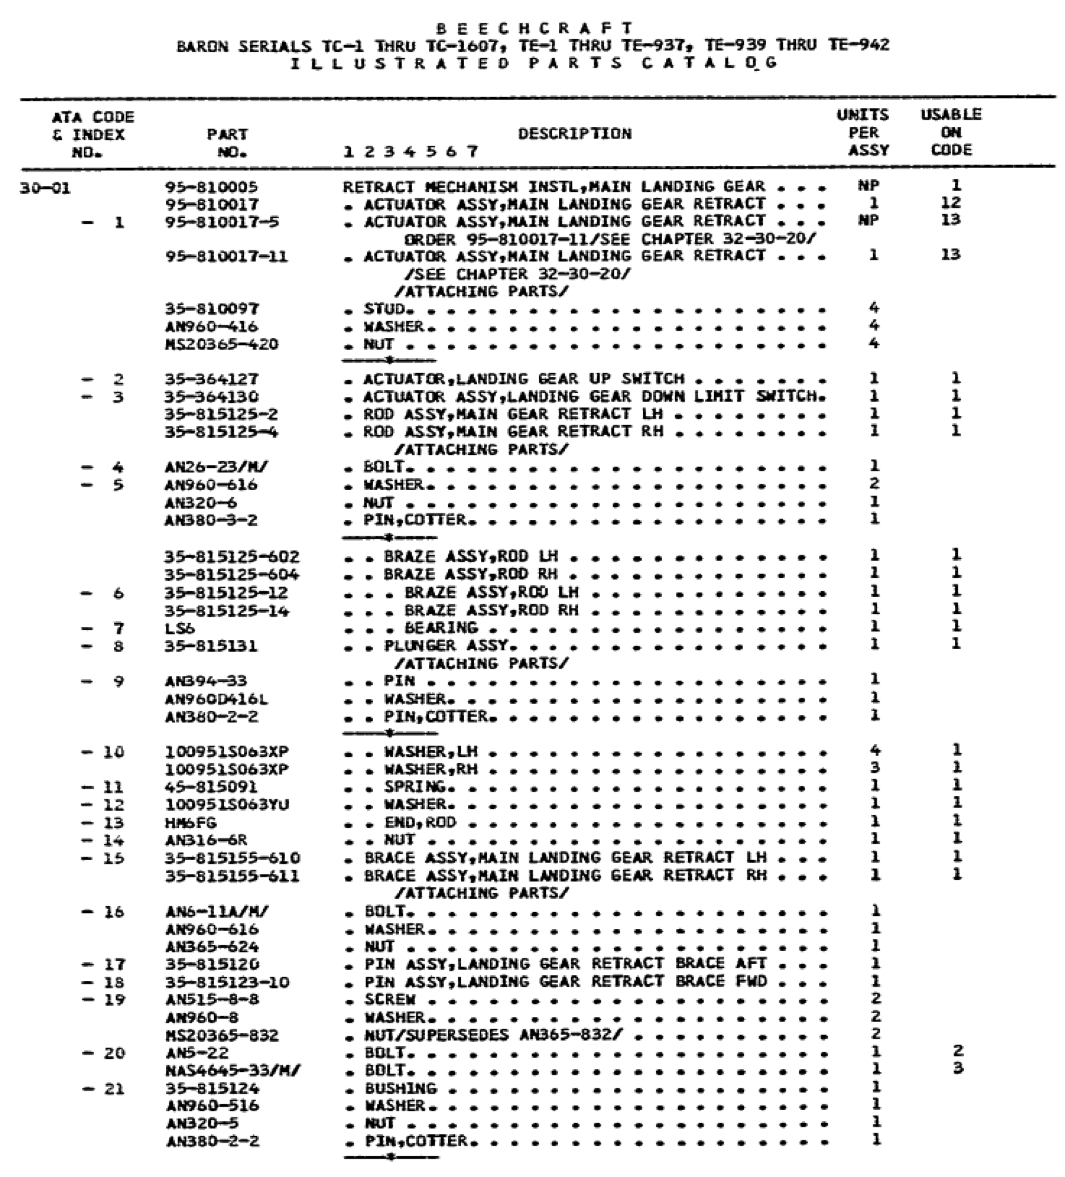
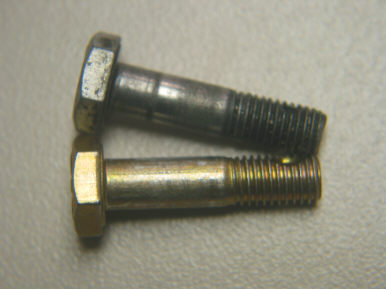
ALSO: Don't forget to consider putting new nut
and bolt hardware into your landing gear. For example part # 48 (Beechcraft P/N
5-825108 available only from Textron or
Arrell Aircraft)
in
the below parts catalog extract is the bolt that connects the V-brace
mechanism to the Nose Gear pushrod at the front end. It is a VIP
component, IMHO. Your parts catalog will list all the AN or MS
hardware for each rod end connection.
A great CSOB hardware source is
Haire
Aviation. See the page on Haire Aviation
HERE . Just call them
up and give them your list.
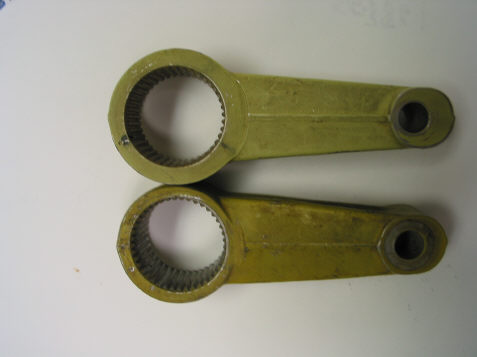
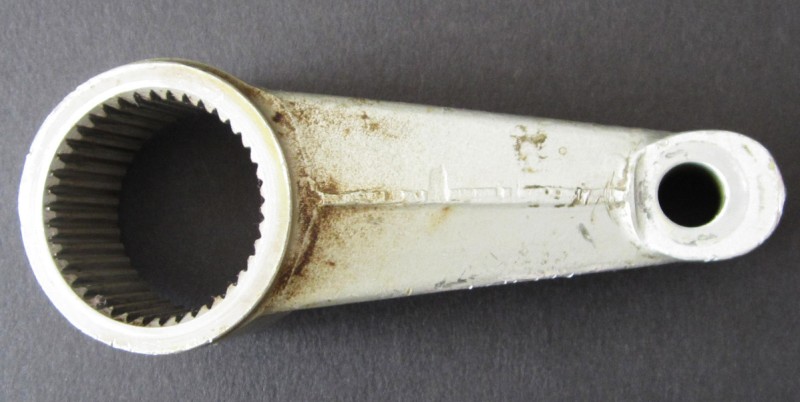
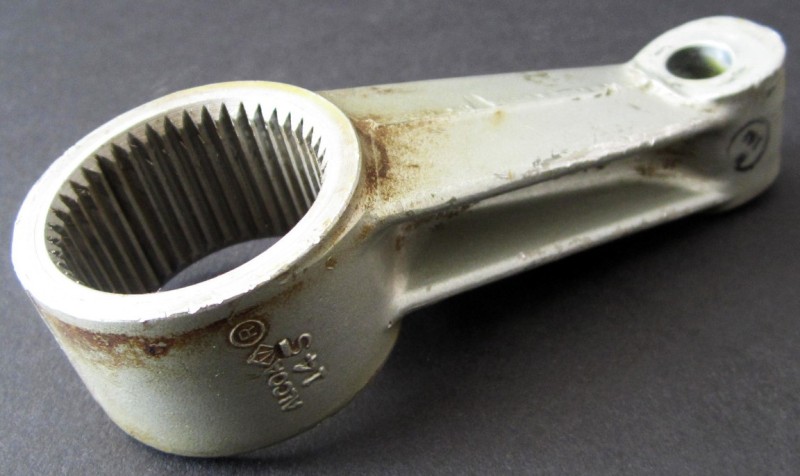
Here are the two versions of Nose
Gear Arms that are used at the landing gear transmission to actuate the nose
gear. Note the top "beefy" one is used on Barons and possibly later model
Bonanzas.
Picture Courtesy of Kevin O.
Per Kevin: Beech has gone through 3 generations of these
arms--the first couple of years the part number was 35-825172, it was made of
magnesium.
Beech had a AD , or maybe a SB to change it out to an aluminum
one ( part # 35-825172-2)--they used this part till the 80s--thats when they
switched over to the beefier one 35-825172-13
All Baron 58s used the 35-825172-13 until 1984. The Model 55 Barons got the
-13 with the 1974 model. Current p/n is 104-820050-3 for all replacements.
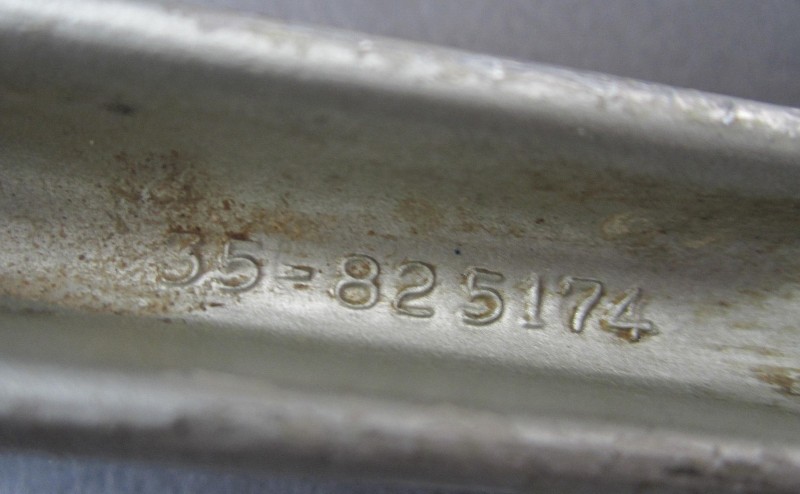
This PN: 35- 825174 (seen on eBay 2/2013) may have come after the mid-80's
and before the current 104-820050-3....not sure, but it looks quite "beefy"
Below is perhaps part of the reason that Beech went to a
beefier arm. All of the early Bonanzas and T34s are reported to have had the thinner arm depicted
below.
Below is a B58 nose gear arm fail. Unclear as to whether mis-assembly
of the components (clocking) after a repair led to this failure or what???
Here is another nose gear arm break!
Below is the nose gear retract arm and bolt. Notice the bolt has the slotted
head facing the pavement. The castellated nut is torqued using some thin washers
to get the proper hole placement for the cotter pin. Yeah, it's a PITA to
do.....
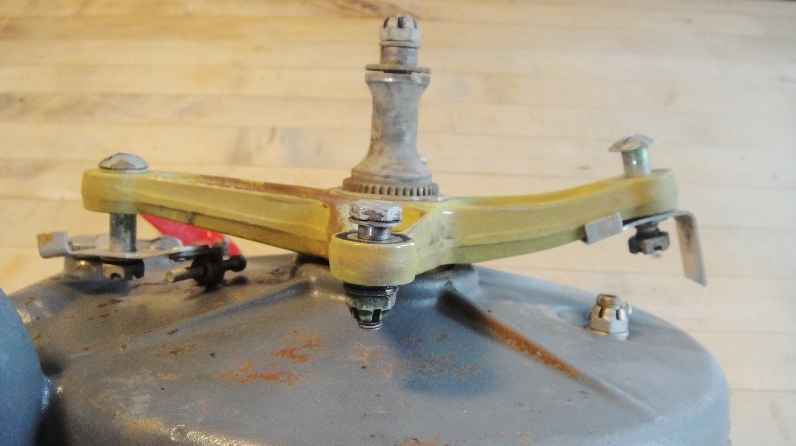
Below is the uplock section of the landing gear to help you identify the parts.
Be sure to check for good integrity and lack of corrosion of both the BIG spring
and the SMALL spring. These springs perform key roles in the operation of the
uplock system.
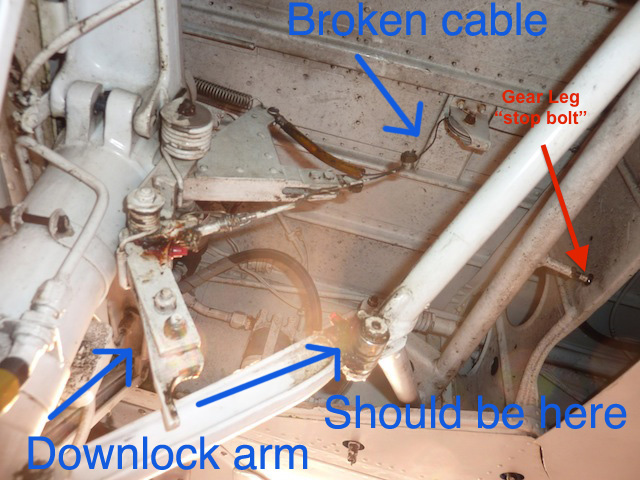
Here is an image of later model
Baron 55/58 landing gear that includes a DOWN LOCK as well. It is believed Beech
added this feature to guard against side loads of their heavier birds and this
can also be found on the Duke gear as well.
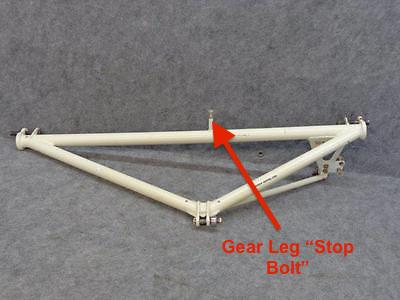
Of note in the above image is the
"Gear Leg Stop Bolt" which might be a bit of a unicorn to identify the PN which
is: 105982-4A10-002 and the jam nut is PN: AN316-4R. This "gear Leg Stop Bolt"
appears on many Beech landing gear configurations. You can see in the 1960
Bonanza IPC excerpt
HERE
that the stop bolt is not well identified. Always check your IPC to confirm the
PNs for your particular SN airframe. Big thanks to N35 Bonanza owner Paul S. for
sleuthing this PN down and making it available to CSOBeech.
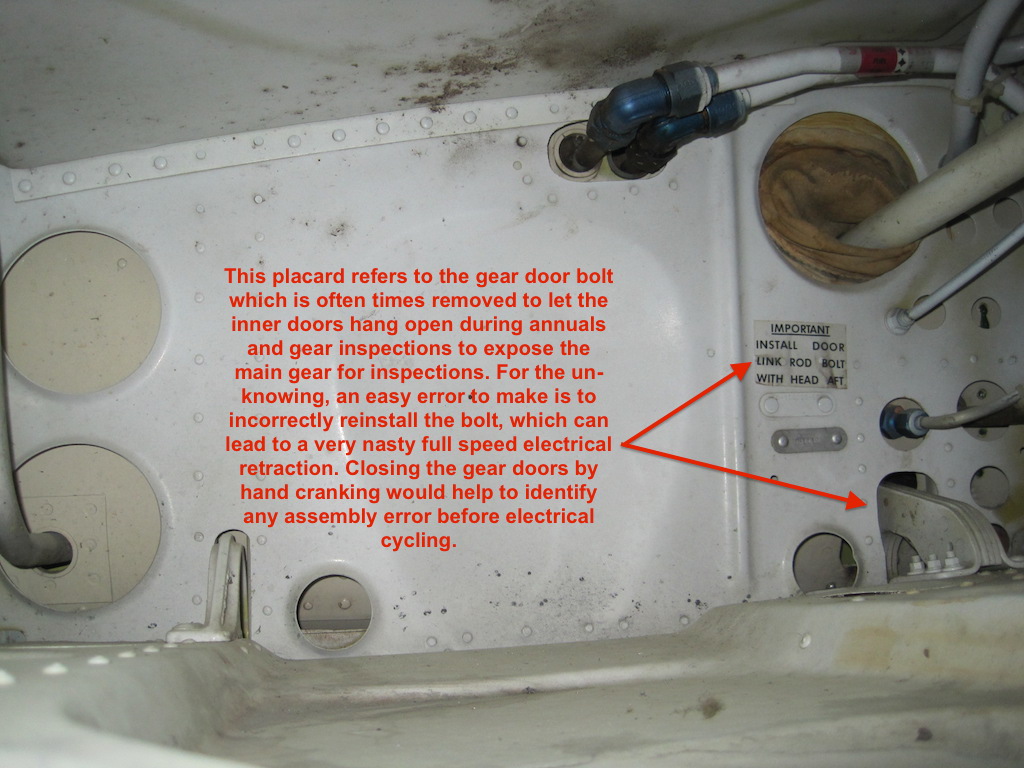
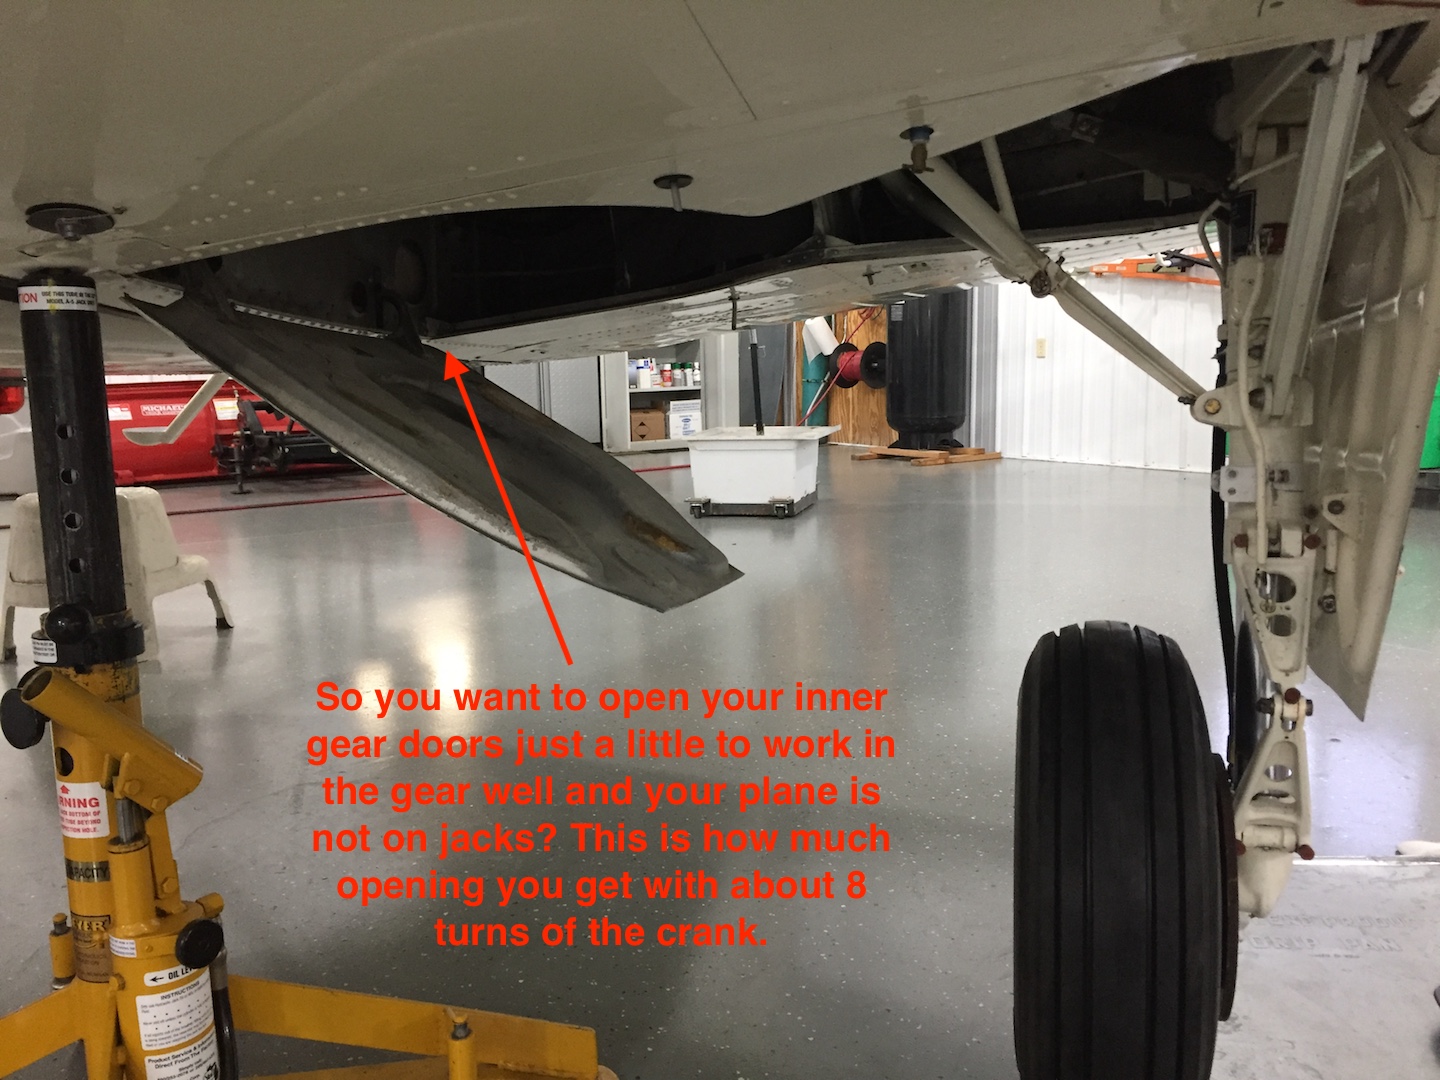
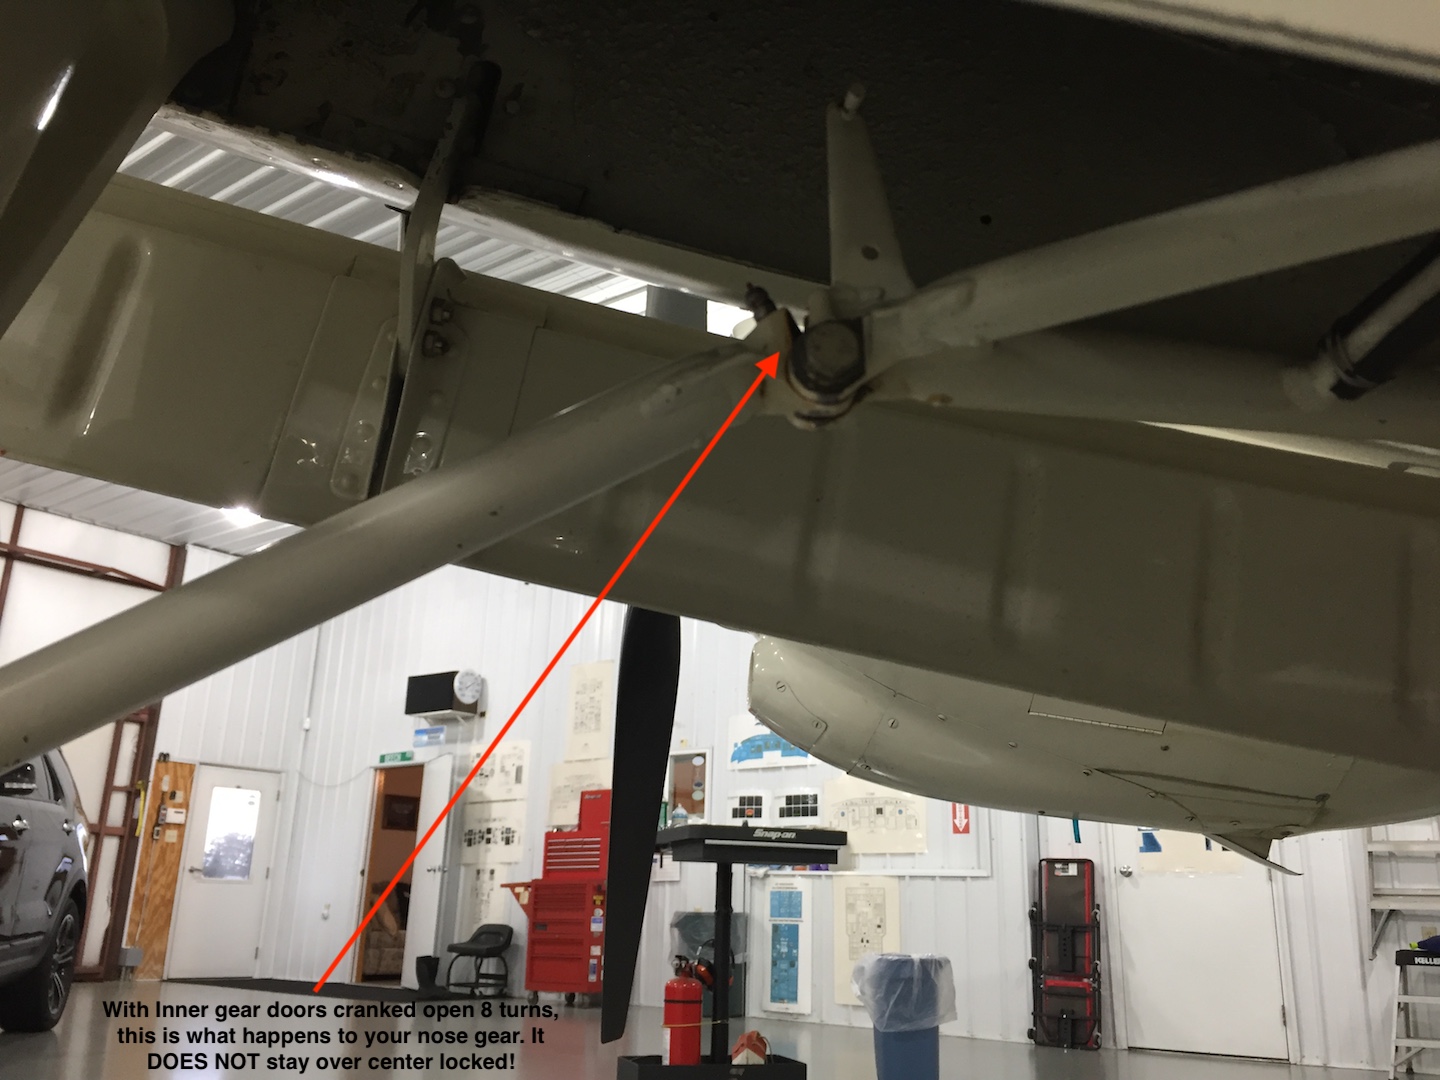
DON'T DO IT!
Sure, you want to work on
something in the inner gear well and think, I'll just open the inner gear doors
with the crank maybe 8 turns to get the room I need. DON'T DO IT!!!
Below are images which should
demonstrate to you why this is a dangerous thought and an even more dangerous
act without your plane safely supported on jacks.
In this condition with the nose
gear V-brace not locked over center, you could end up with a nose gear collapse
and/or personal injury if you or your body parts are under the plane if/when it
collapses.
While you are in the Main Landing
Gear area spiffing everything up like new, check out the main landing gear
sleeves info HERE
to put the finishing touches on your rod end and landing gear refurbishment.
Also, the nose gear retract rod
boot cover is PN: 35-825076-13 @ $47.74 on 02/02/2009. A bit steep IMHO for a
little fabric cover that fits over this area:
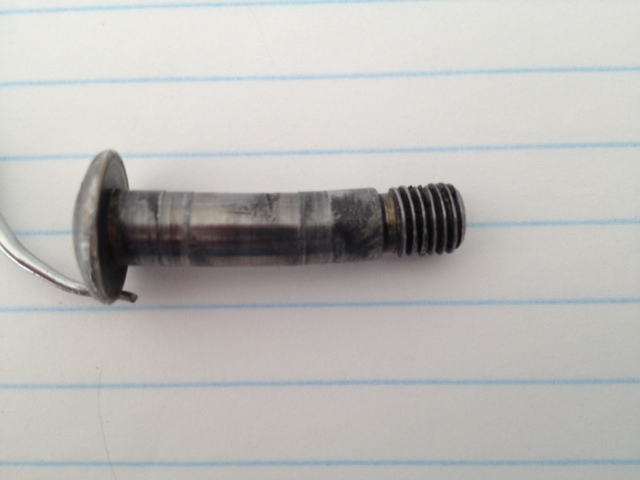
Here is the bolt that came out of
one savvy inspectors landing gear refurb mission. I believe this is the bolt
that holds the two nose gear rods together at the idler arm pictured above. Part
total time ~5,300 hrs.
Folks, this page just begs you to
have a thorough refurb/inspection/rework of your landing gear system at some
time! Take your pick, 2,000 hours, 4,000 hours? Much more and it seems like you
are asking for a problem, but that's just my humble opinion.
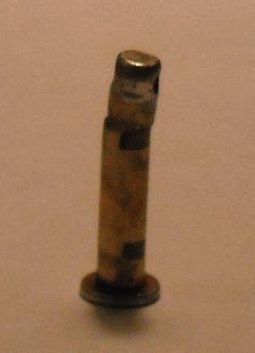
Here is another JUST IN THE NICK
OF TIME save by Paul S. on his N35 Bonanza. The below pic is of the shear
pin in
the nose gear rod assembly (see pic above - it is to the left of the spring) of his N35. Just goes to show you that it's a good
idea to disassemble and look at these components that have been in service for
so many years:
Paul being the avid Beech Lister
that he is, has been listening to all the posts on the Beech
List about high time landing gear
parts and in his annual on his 5,000 hr TT airframe got his rod end project
going with his IA. The picture above is of the pin that maintains the two pieces
of nose gear pushrod together against the tension of the spring. This would be a
really good time to inspect the braze and inner rod section.
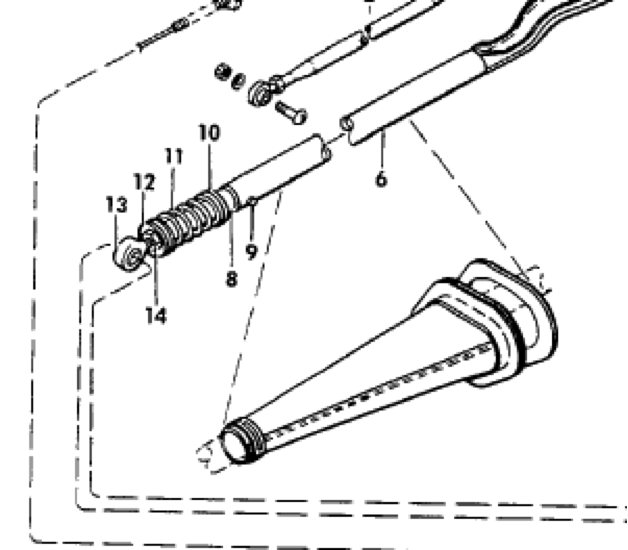
Per Paul, in the down position
this pin floats in the slot of rod #50 in the below picture and your spring
(part #51 in the below diagram) provides the downlock tension pressure. In the
up position, this pin takes the brunt of your UPLOCK TENSION. It would stand to
reason that is this pin is mangled (or worst case, shears, then the uplock
tension adjustment was probably massive), just a hypothesis mind you.
Here is what this problem might
look like in the air
:
The latest info from Beechcraft
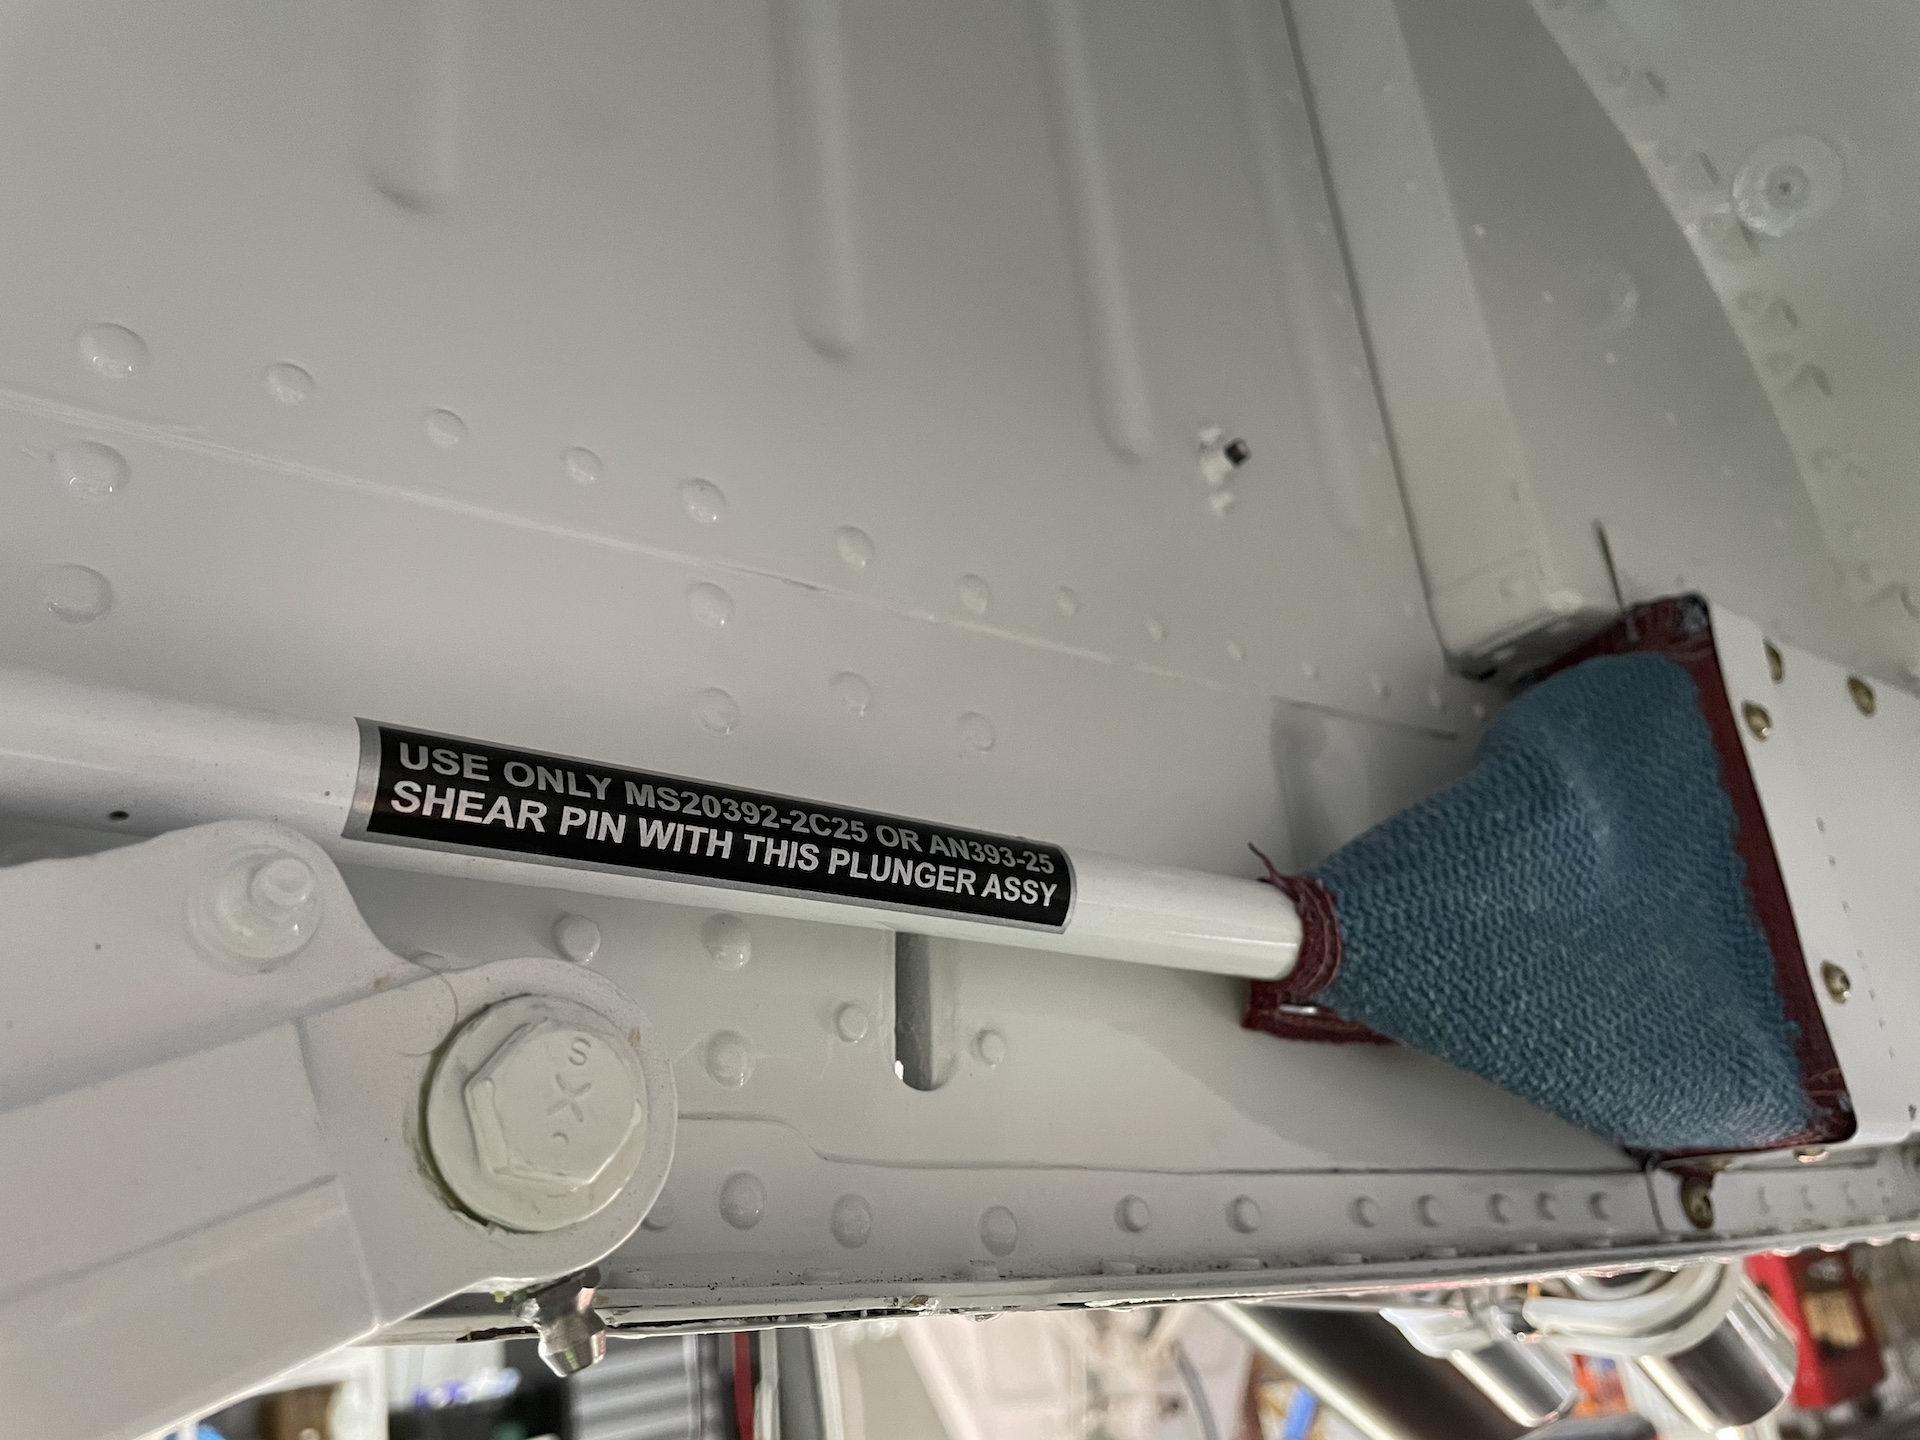
parts guru Kevin O. is that this shear pin used to be Beech PN: 45-824014 BUT it's no
longer available. Kevin reports later model parts books call out AN393-25
or a MS20392-2C25, available at Aircraft Spruce for about $0.30. Kevin suggests
changing this pin about every 1,000 hours and lube and inspect the inner shaft.
Click
HERE for a Clevis Pin
Cross Reference Sheet from Aviall
On early model Bonanzas rod #50
had a short nose, so when your pin sheared, you had a very bad day. Beech
engineering got wise to this flaw and made later model Bonanza/Baron shafts
longer, so when the pin sheared, your nose gear stayed down AND the shafts
stayed together, so on your recycle of the gear you were down and locked again.
Great save by Paul in finding his
nearly sheared pin!
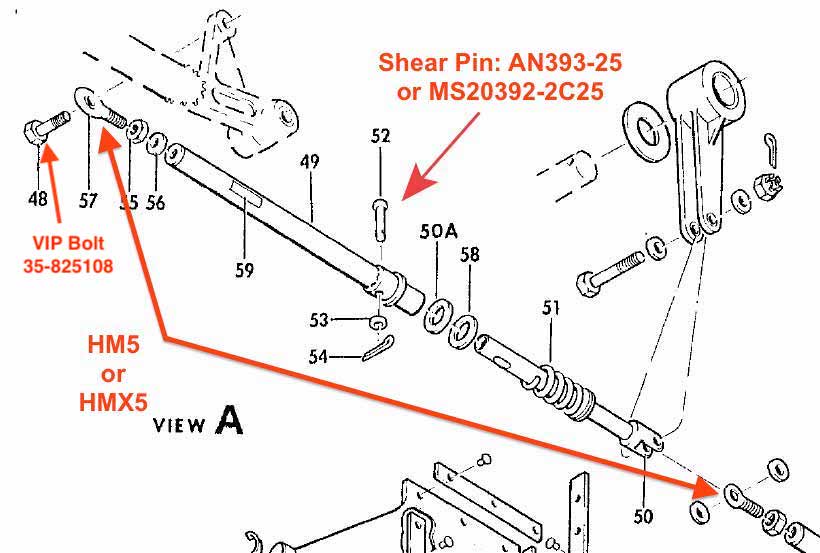
A
critical/VIP Bolt, IMHO, is #48 in the below diagram, Beech PN:
35-825108. This bolt connects the V-Brace arm to the front of the nose
gear pushrod. I don't know about other owners, but I sure replaced this
50 year old bolt when I did my landing gear rod end change outs.
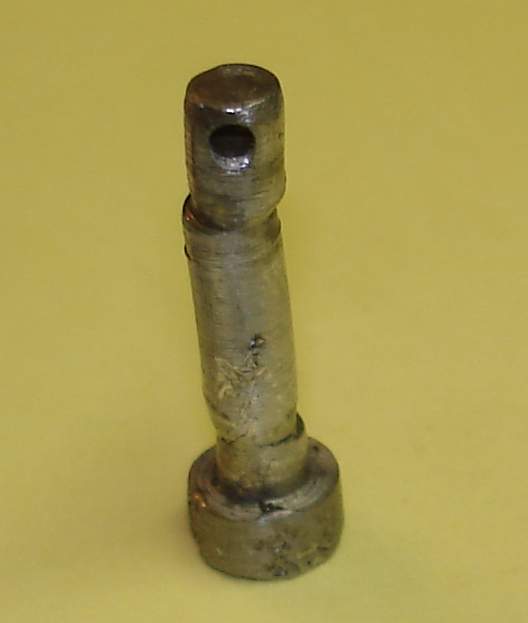
The shear pin is #52 in the below
Diagram:
Here is another near-miss shear
pin find by A36 owner and Beech Talker Mike S.
Check out this vintage Beechcraft
Service Bulletin HERE
issued in February 1957 when they changed to a longer plunger rod and a shear
pin that replaced a shorter plunger rod and a clevis pin.
The newly specified shear pin at
that time was PN: 45-824014
The newly specified longer
plunger at that time was PN: 35-825094-4
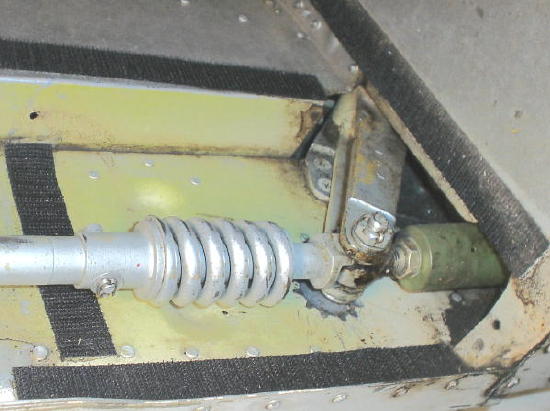
Below is a picture of the new Textron nose gear rod boot as installed on a 1975 F33.
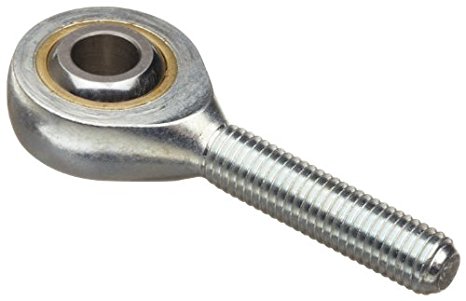
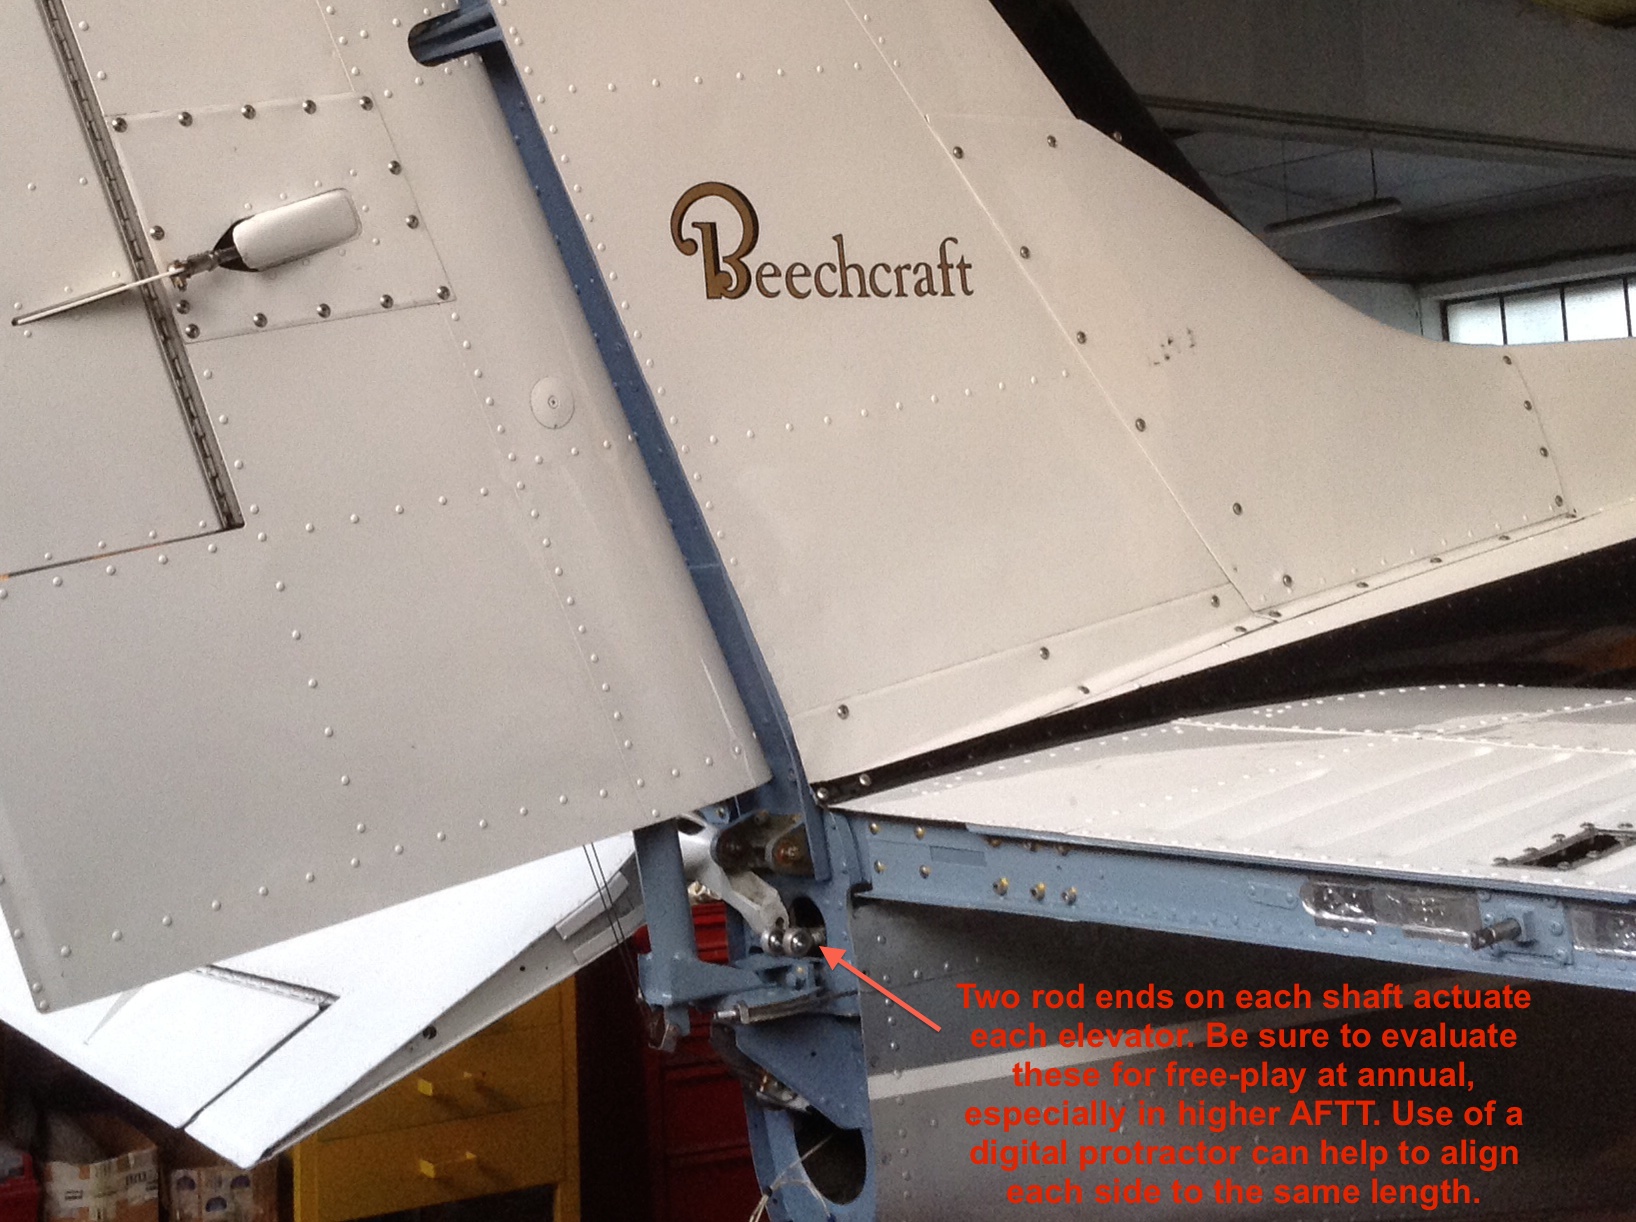
HEIM HM6 Rod Ends are also very likely in the elevator
push pull rods. Give them a check for free-play at annual. More photos on these
rod ends at this web album
HERE
Here are the HEIM HM6 rod ends in
the main gear push-pull rods.
Here is a contribution from Jim C. regarding his find
of the main gear spring being distorted (below picture) from years of spring
tension:
"This is part of the retract rod (on the bottom of the
"Parts of the Beech landing gear system" on the third page of the ABS rigging
guide). The jam nut (AN316-6R) had backed off by a few threads from the washer
(10D951S063YU) and that greatly reduced the preload in my plunger assembly. The
down tension spec is 45-65lbs and mine was about 30. This was with three of
those preload washers (100951S063XP) already installed (max five). What's more,
that washer (10D951S063YU) was bent, and that reduced the preload some more.
Knowing what I know now, I would be able to see this discrepancy on a pilot
preflight inspection, although it would be very subtle- the bent washer would be
subtly noticeable but to be able to see that the washer was not seated against
the plunger, I don't think you would be able to tell that because it is hidden
behind the spring. Good thing we measure the down tension or I never would have
noticed! With the retract rod out of the plane there was actually no preload on
the spring at all- I could rotate the spring in my hands with only a bit of
effort.
I used the "rawrrrrrr" method (push really hard) to disassemble and
reassemble the assembly and the shear pin slid in and out fairly easily by hand.
The good news is that after putting everything back together properly my down
tension is 52lbs, using the three preload washers that were already in there. I
suspect each additional preload washer increases that by about 5lbs but I don't
see a benefit of adding more, not right now. I slip-marked that jam nut. One
more thing to check on preflight."
Here is another near miss catch
by Beech Lister Jim H. on his 1955 F-35 Bonanza. During the process of changing
out his nose gear rod ends, he found the gear door actuator pin almost severed
in half!
Here is Jim's pic of the before
and after a welding repair. Jim reports 5,400TT hrs on his Bonanza. A near miss
of his nose gear door actuation averted!
Nice save Jim!
This is the slotted tab that the pin goes into to actuate the
nose gear doors.
OK, so you need to see more
"shock & awe" pics of what's lurking in that airframe-saving system we call the
landing gear before you make the commitment to check yours out?
Well here you go, courtesy of
BeechTalker Ron H. His BeechTalk thread is
HERE. His synapses and pics of his nose gear retract rod shaft are below:
In taking the recommendations of the ABS and others about
replacing the nose gear rod-end bearings, I took these to heart and did mine
during the annual inspection on my bird which is just wrapping up. All of the
nose gear rod-end bearings, bushings, and hardware have now been replaced.
We found an anomaly in the rod assembly, fwd nose gear retract link as shown in
the attached pictures. What caused it, I have no idea, but can only surmise that
the previous owner who was learning to fly in the plane must have had a nose
wheel first hard landing. Again, I just don't know, and can only speculate as to
what might have caused the sleeve to split like this.
I also found one rod-end bearing that had a crack across the crown, and down one
side towards the bolt hole. I know that it would have eventually failed, but
when is the question.
Thanks to the ABS and the others preaching on the need to replace the rod-end
bearings, I found these two potential failure points before they did fail and
result in unpleasant results to our pride and joy as well as ourselves and/or
potentially others.
Here is what the damaged retract rod shaft looks
like with the spring on it. This is a good example of why these things should be
completely disassembled, inspected, lubed and put back together if all is well:
Note the damaged portion of the shaft that is
barely visible through the spring!
Paul S. adds the following comment: the inner shaft (forward section) extends far enough down the
tube so that if the pin shears, the nose wheel will hang in the wind, but the
rods will still interface enough to extend gear properly. This was changed with
s/n D-4547.
Great CSOB save Ron!
Here is Beech Service Bulletin
SB32-4125 that describes
an inspection of a 2012/2013 plunger assembly for
Here is another disaster waiting to happen to
older airframes. Check your drag link for any evidence of stress cracks or
casting anomalies:
Remember, a gear up or nose gear collapse will
likely total most anything but the latest of airframes. Between the prop strike
teardown/inspection and the sheet metal repair you're looking at quite an
expense. This was a bad day for this Bonanza owner!
Here is what happens when you don't check the
clearance of your doors before doing a full blast retraction test. Hey, it's on
jacks, so what I like to do is use the crank, turn it CLOCKWISE just enough turns to get the inner gear
doors to open up while you or your buddy checks the clearance to your jacks.
There should be very little resistance in turning the crank for the amount of
turns to open the inner gear doors. STOP when the inner gear doors open up or
the cranking resistance begins to get noticeably harder (this indicates you are
beginning to lift the main gear and you do not want to do this with the little
worm gear and crank).
Picture Courtesy of Kevin O.
Oh yeah, and the same thing can happen if you have
your inner gear doors disconnected and the rod hanging in the breeze. When you
go full blast with the gear motor the rod is going to go in and out of the side
of the plane - at full speed! Yup, you guessed it, it can get hung up in there and things are
going to get bent. Consider that 24V gear will cycle in about 4 seconds and 12V
gear in about 8 seconds. What I like to do is put a piece of tubing or rubber hose
over the rod end and make sure that it extends past the fuselage, and is really
secure.
Here is some more inner gear door rod abuse
contributed by Bonanza owner & IA, Bob B.:
"These inner main gear door
rods have similar wear from improper installation. The spacer on the inboard end
was missing. The nut was tublocked on the bolt and the rod end could slide fore
and aft. They were rubbing on the aft side of the fuselage opening. Logbook
entry for complete rigging per service manual after bushing and motor
replacement. The uplock cables were catching on the gear and there was no
turning the emergency gear handle after retraction or lowering of the gear." -
Bob B.
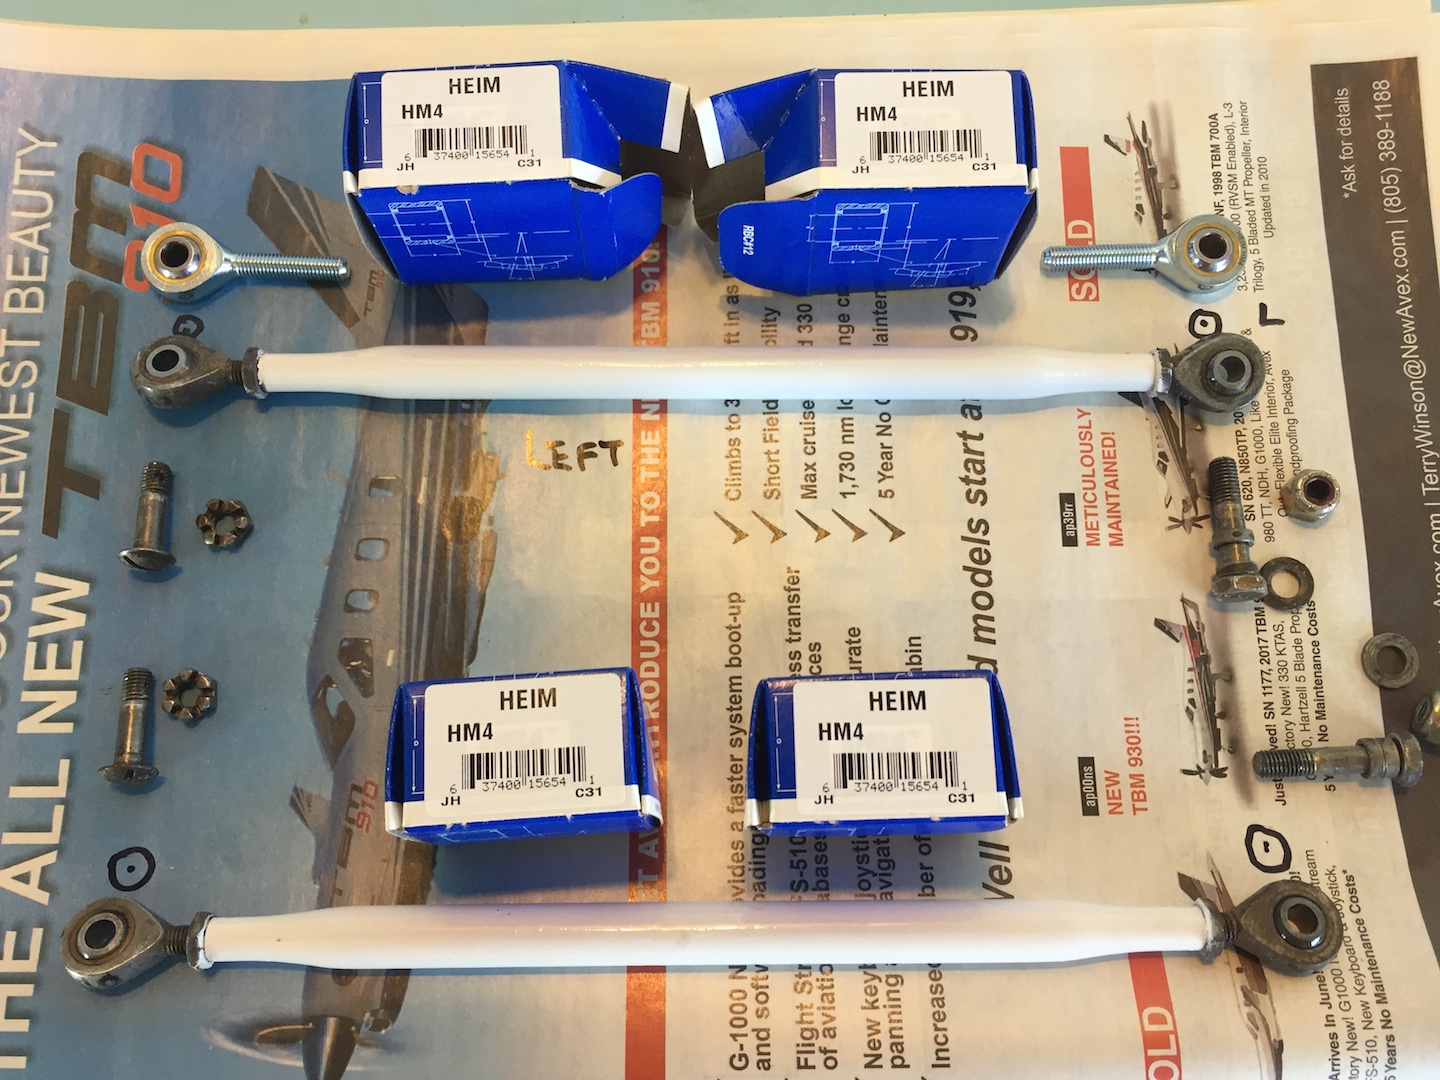
Here are my inner gear door rod ends all
cleaned up and fitted with four new HEIM HM4 rod ends. These rod ends take a lot
of pull tension since they are hard rod connected to the gear transmission. I
laid the rods out on a large piece of paper and marked the center point of each
rod end and used that as my way of getting the length close to the removed
length. I'm not going to leave 50 year old rod ends in that area of my gear.
Need some HM4 rod ends for your gear maintenance? Get them
HERE and support CSOBeech.com with your purchase.
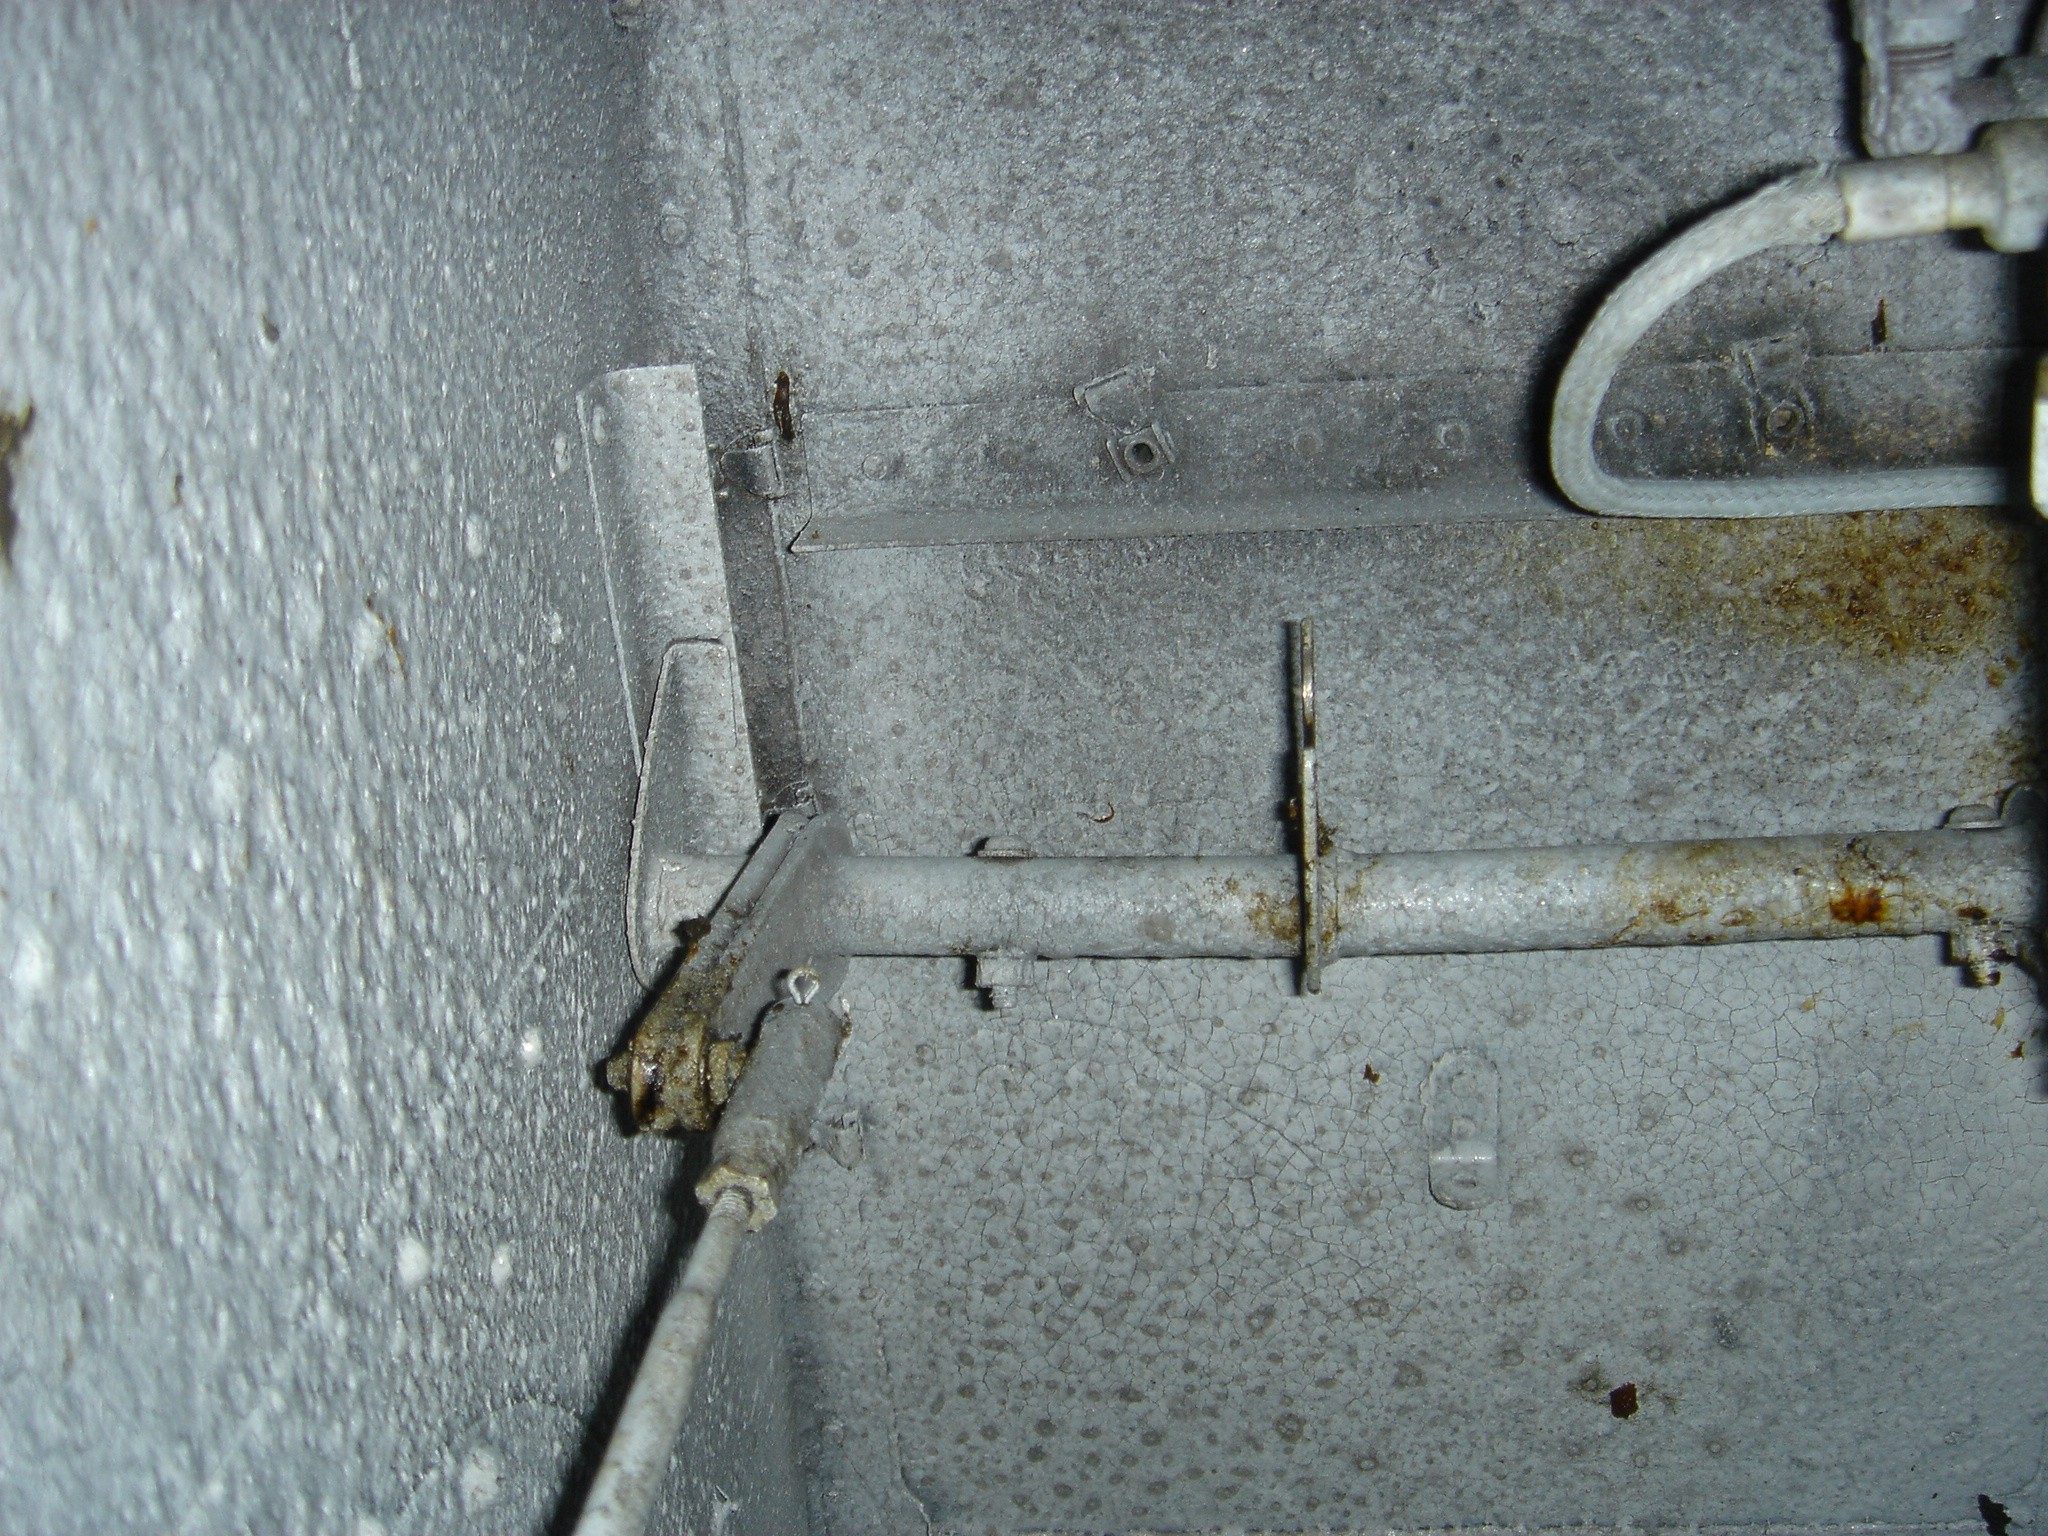
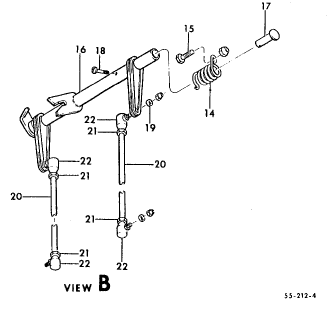
This is the nose gear
door rod and actuator cam/pickup fork. That flat end on the left side of the cam must be
firmly planted on the "L" shaped piece that is on the left side (of
this picture view, right side of the aircraft fuselage) of the
inner wall when the gear is down and locked. If your gear door rods are ever
removed it is easy to reassemble them to the gear doors in such a way that the
cam/pickup fork is slightly turned counter clockwise and the flat part of the cam will not be flush with the "L"
piece on the wall of the well. You will then have nose gear doors that do not close properly. Don't ask
me how I know!
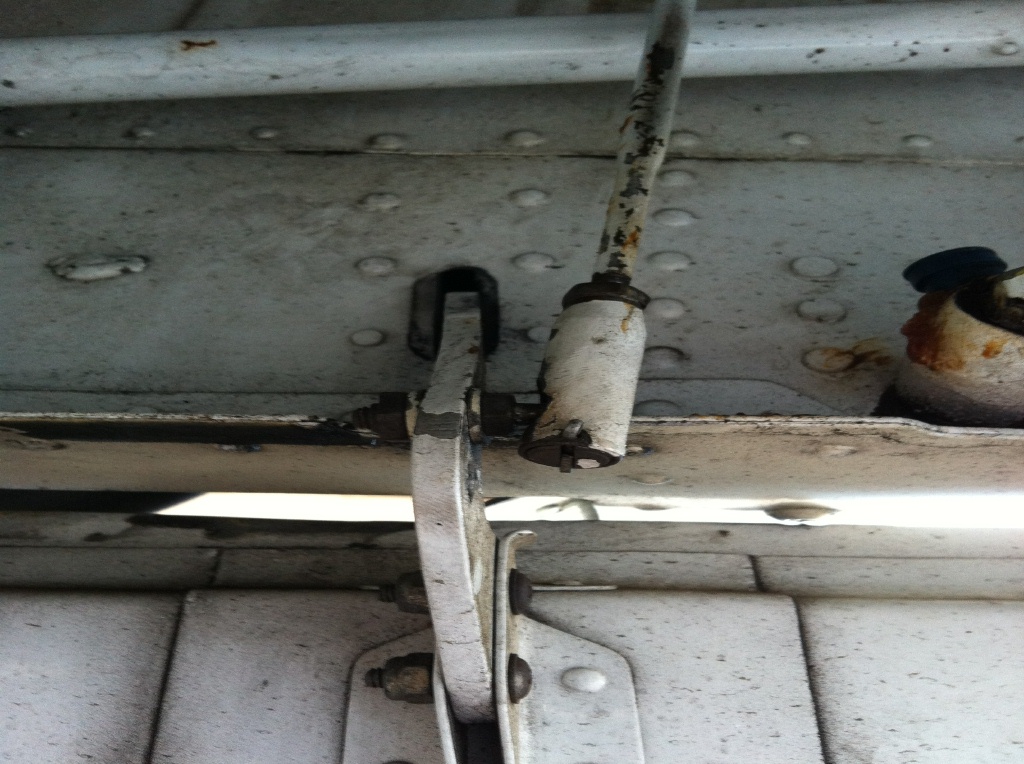
Below is a picture of the Nose
Gear Door rod end (not my airplane) showing the ball stud that attaches to the
door. Over the years, slop can be created from the wear of these parts - you
do lube/grease them each year right? That will help, but sadly, many folks
overlook these little details.
Below is a picture of the rod end
receptacle and the little parts that are inside of it (part # 22 in the above
parts diagram).
B40-1 ball socket rod end, superseded by, R5453-1 and
superseded by, SP1106
Kevin advises the following with
regard to the nose gear door rod ends and hinges:
A-- you can take those rod ends apart--clean and lube them
--then put them back together and take out the slop with the end adjuster.
B-- I make a kit to put in oversize bushings in the hinge
point of the hinge where it wears--keeps you from having to buy new hinges
C-- if you DO need hinges ( I have those also)--DO NOT just
lay the old ones over the new ones and drill the holes the same---you will not
get a good fit doing it that way
Email Kevin
HERE
for parts info on his Beechcraft parts
Here are pics of Beechcraft Maven,
Kevin O's. "owner produced parts" for the nose gear door actuation:
Per Kevin:
"The first picture shows
owner produced new cross shaft for my deb--also the end plugs and new
gussets--also pictured is a factory made pin that attaches to the lift legs.
Kevin O.
Thesecond
picture shows difference in gussets---the original is made out of aluminum--the
steel shaft rotates on it and it gets play--screws up the rigging on the gear
doors and the cowl flaps---the one I made has a bronze bushing installed---it
has over twice the surface area for the shaft to ride on---we had to make the
plug that goes in the end of the cross shaft (only found on debs without cowl
flaps and barons) 1/8 " longer to give room for the added thickness of the
bushing.
THIS is the way
the factory should have made them !"
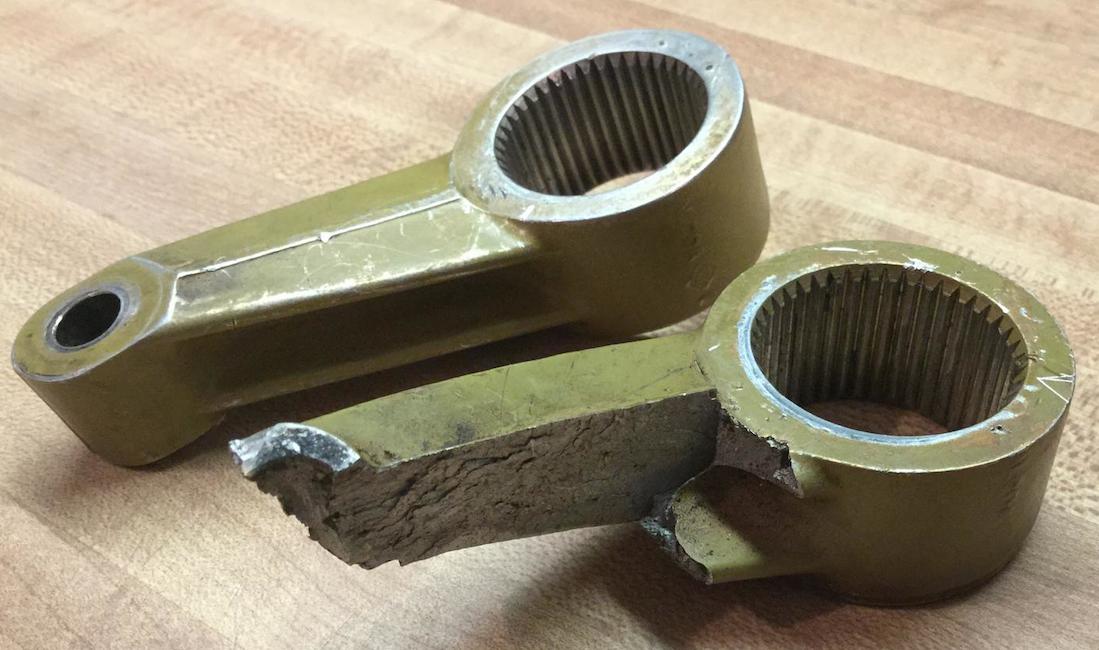
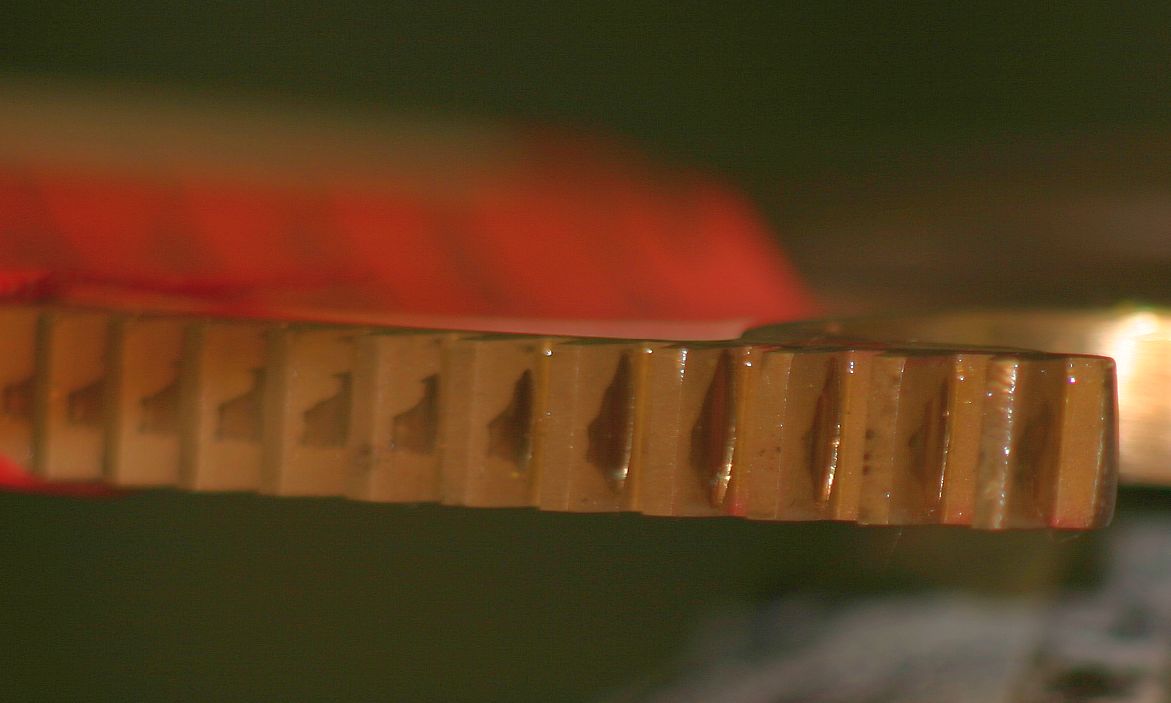
Bad Landing Gear
Transmission Sector Gear
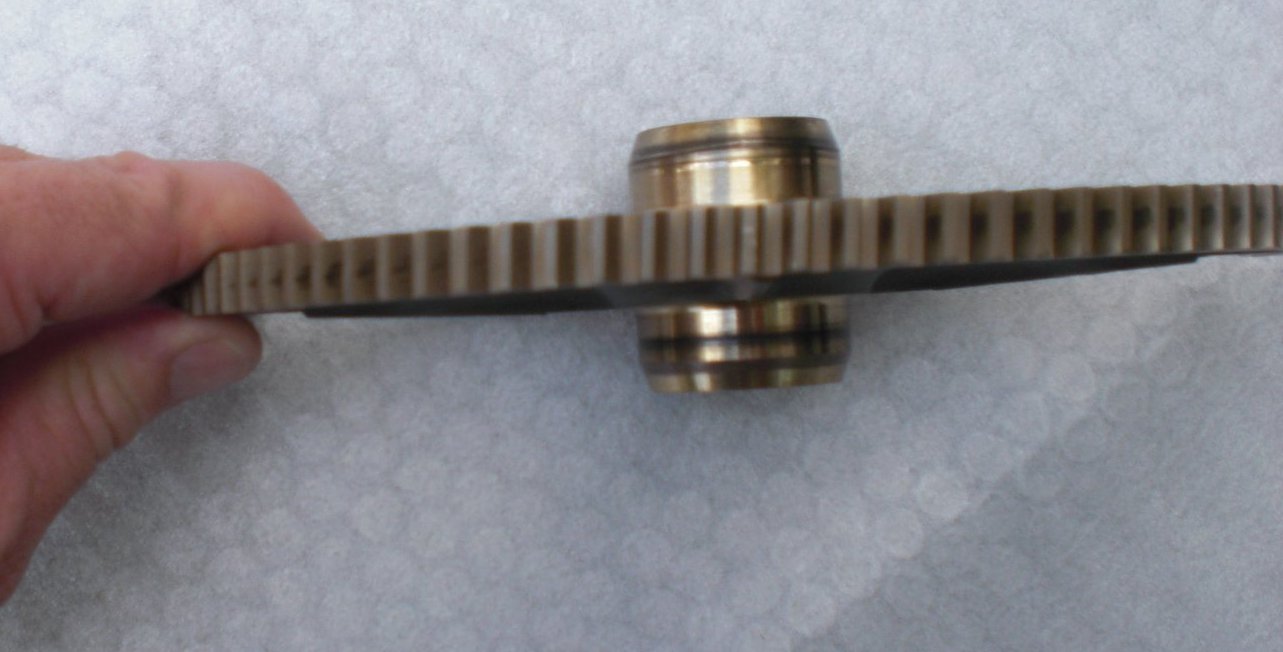
The above picture
is courtesy of Beech Lister and B55 owner Derek D:
Above is a fuzzy picture of one end of a bad gear with an even
fuzzier view of the red tag attached to it. It was deemed unserviceable because
of the tooth wear seen in the photo, particularly on teeth 2 through 6 (starting
end-right and counting left). I was told this probably occurred over time due to
a improperly adjusted dynamic relay.
These worn teeth, and similarly worn teeth on the other travel
end of the gear, were the only two spots highlighted in red marker as "bad". I
don't know if this was all that was wrong or if they stopped inspecting once
they found something egregious. I am also unable to tell if the wear in the rest
of the teeth going left is acceptable or not.
Thanks for the contribution Derek!
Here is a picture of a sector
gear that seemed to have been mangled by the worm gear getting forced into it by
the motor torqueing the sector gear into the stop.
Here is a picture of the Beech
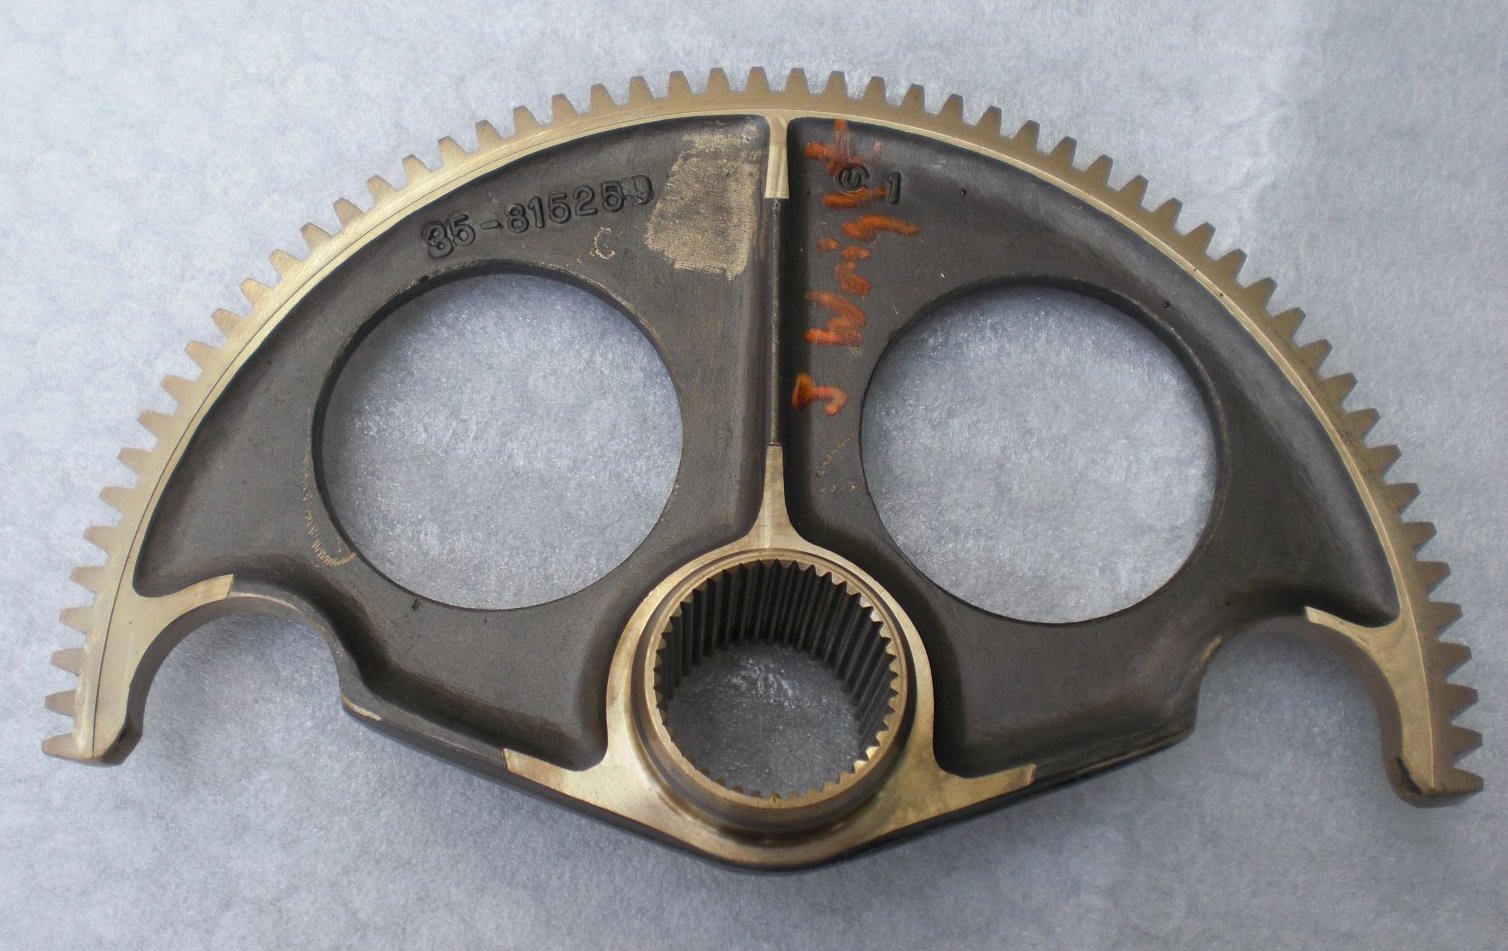
sector gear, courtesy of Travel Air owner Jeff W:
Jeff's comments:
If you see the shiny marks in the middle of the teeth, the ones that you can
see in the middle are normal, but at the end, maybe last 8-10 teeth on either
end, those marks deepen into a gouge that you can lay a razor blade across and
get a feeler gage under. I forget the limit of that depth, at the time i was
talking to Jeff at Aircraft Systems in Rockford, he coached me through sorting
the gears so that I could only send him ones that were likely candidates. My
gearbox was overrunning the stops, and judging by the junkyard gearboxes I was
getting, so were lots of others.
It is widely believed that
Boston Gear has
been the supplier of this part, but who really knows?
HERE is
a primer on gear design/theory.
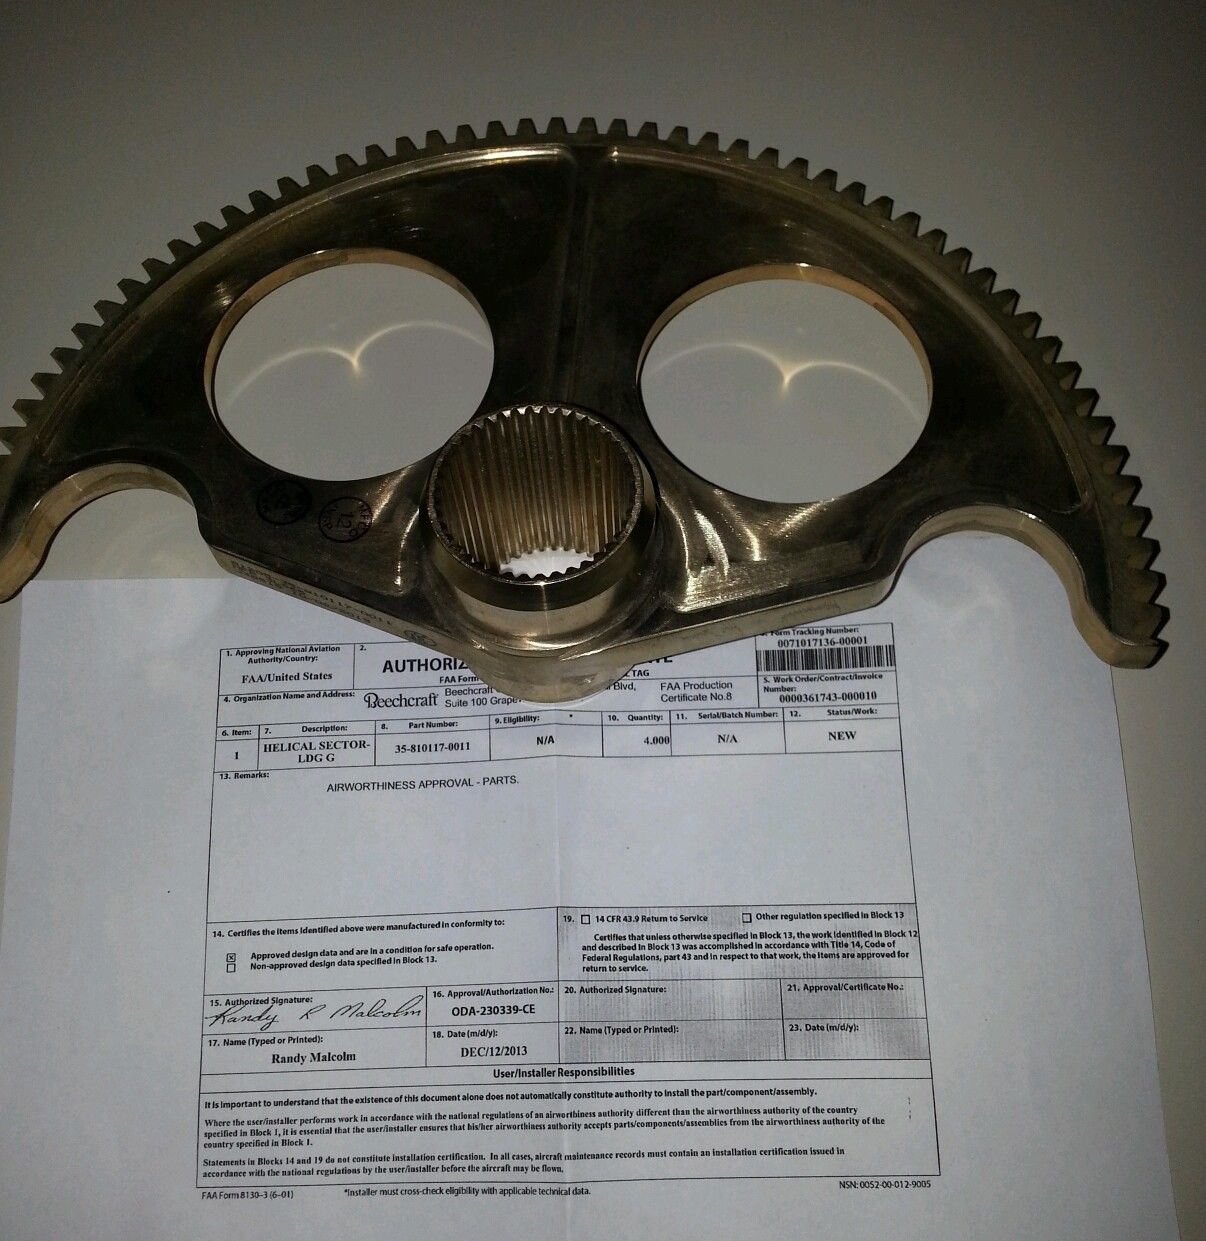
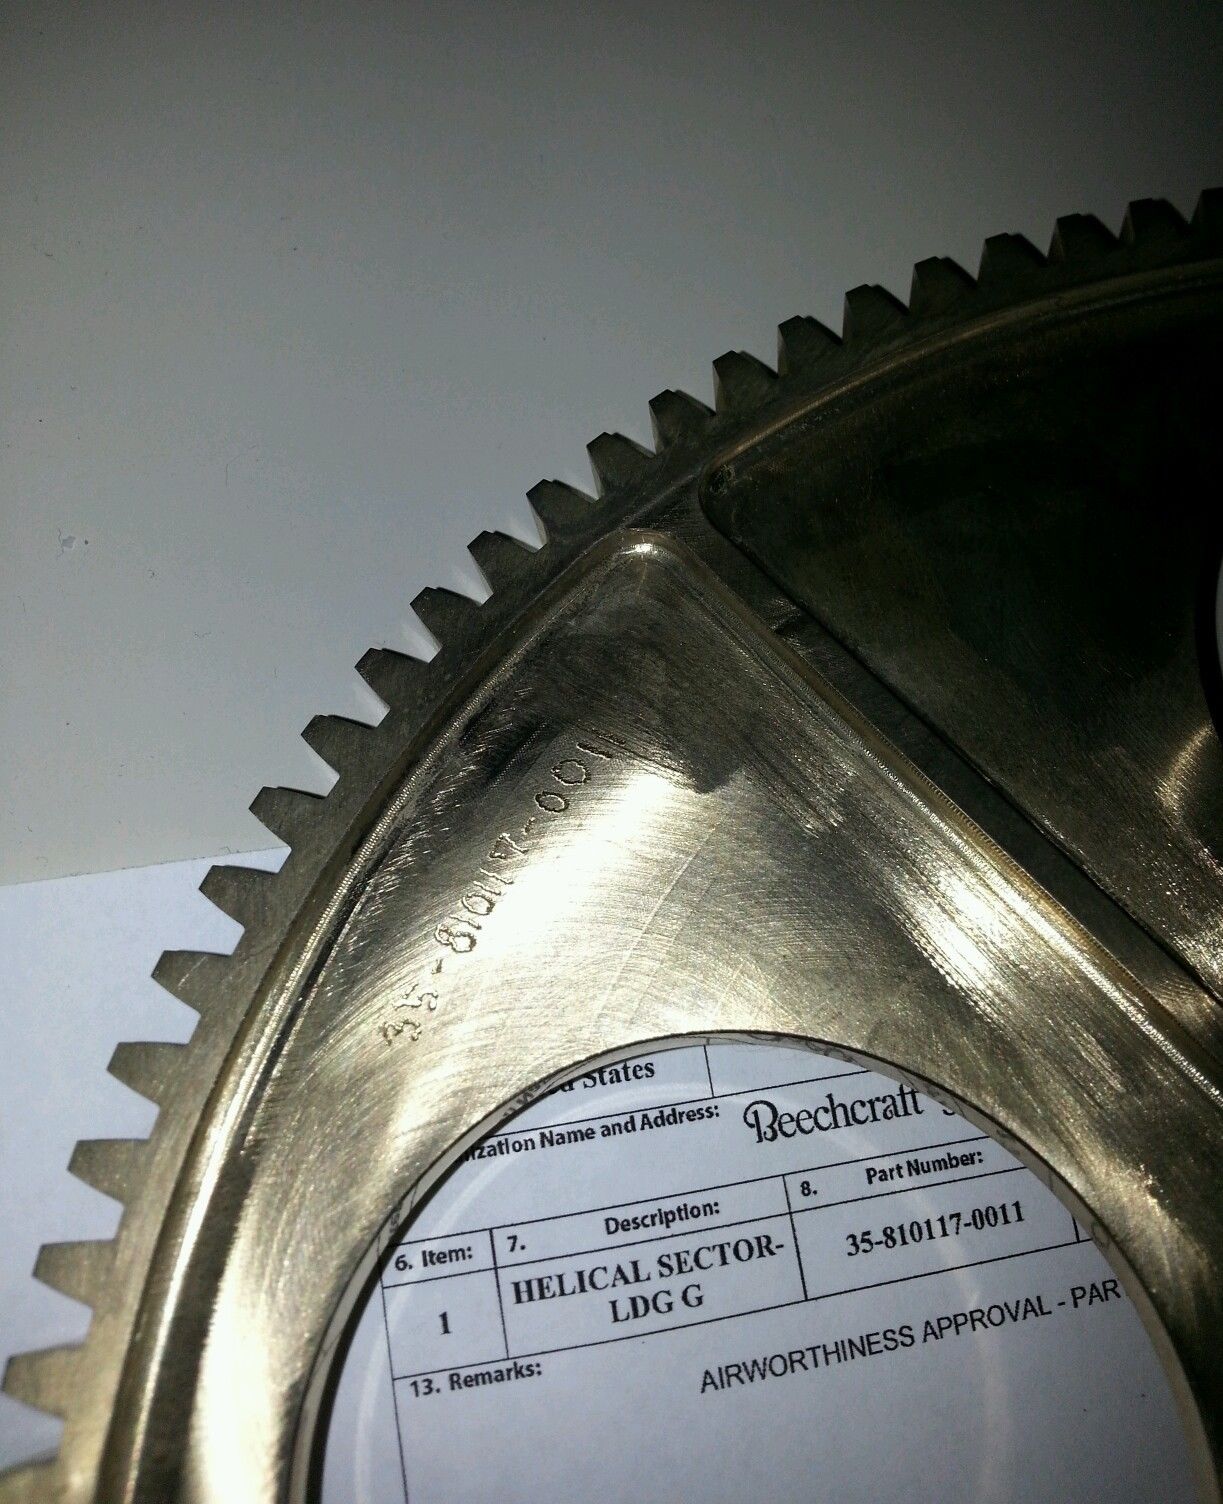
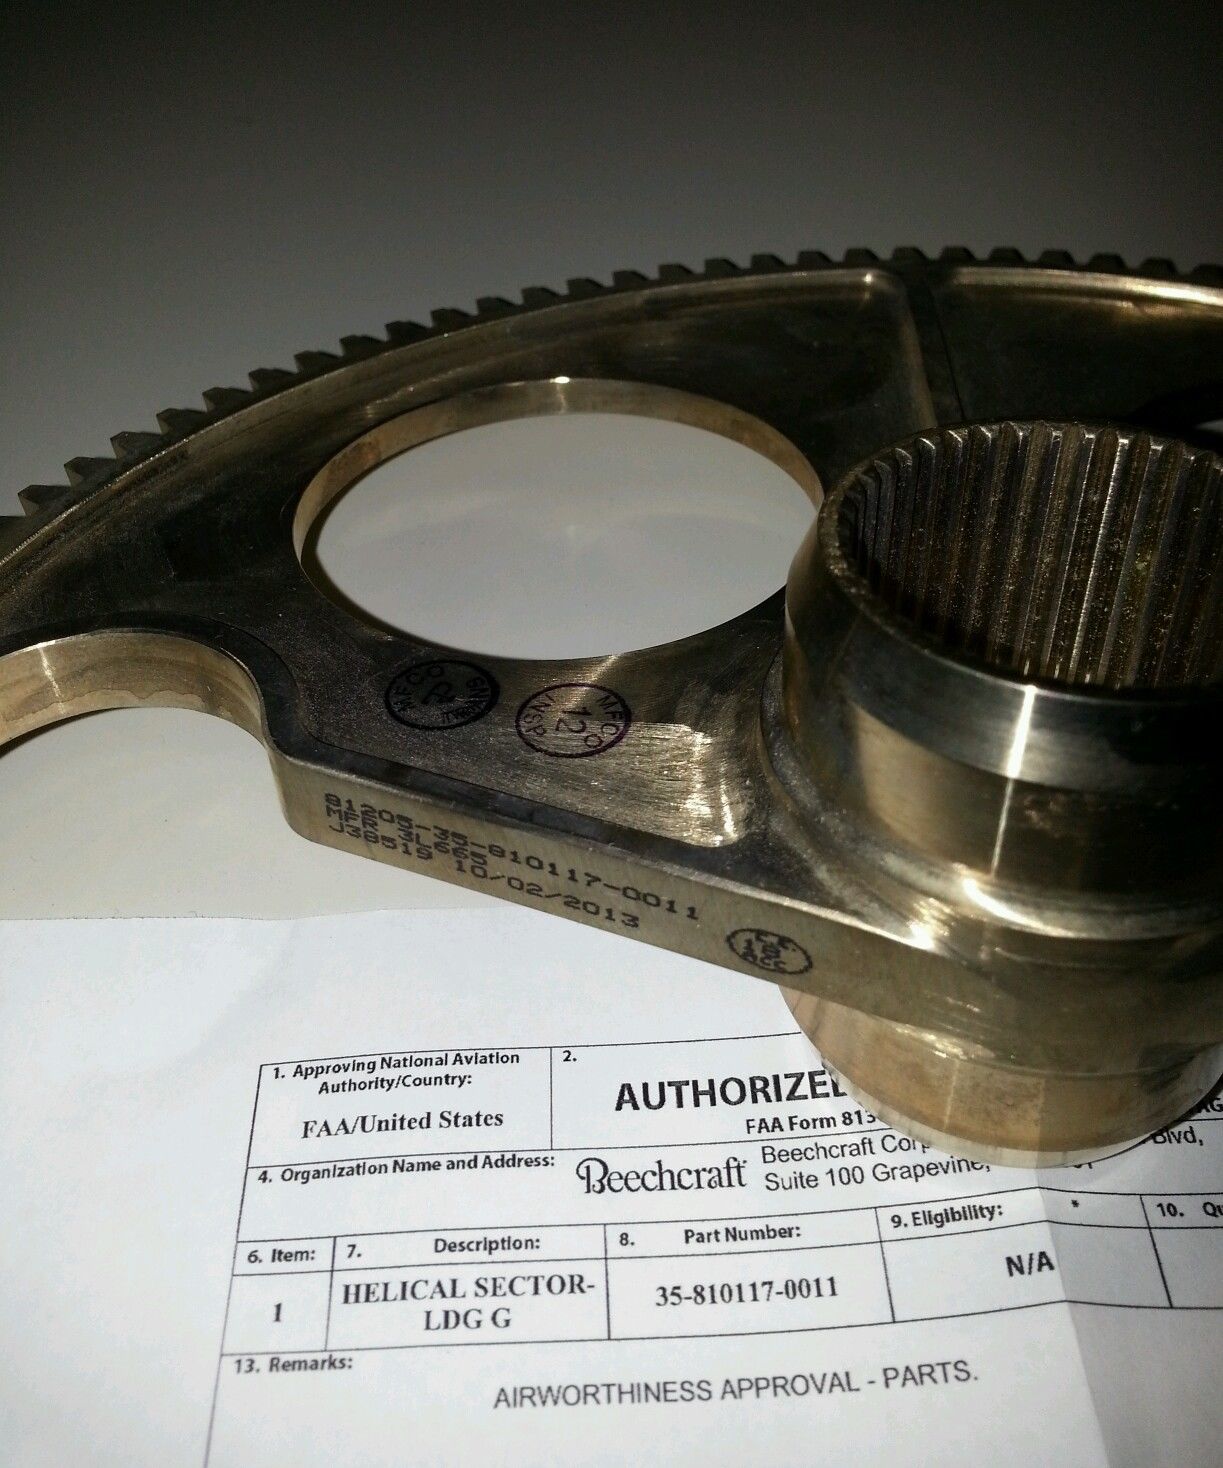
Below are pictures of a NEW
sector gear PN:35-810117-0011 listed on eBay for $2,200! I don't even want to
know what Beech wants for this part factory new
Landing Gear Transmission
Secrets Revealed
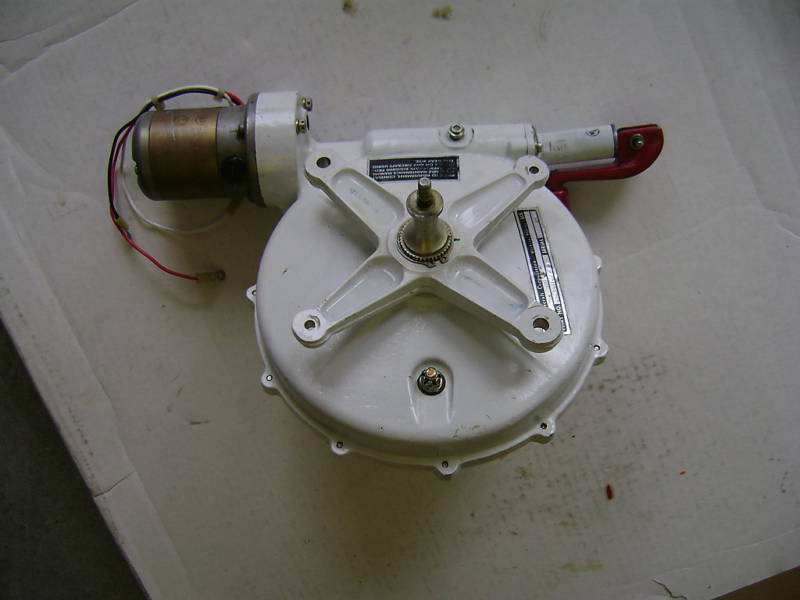
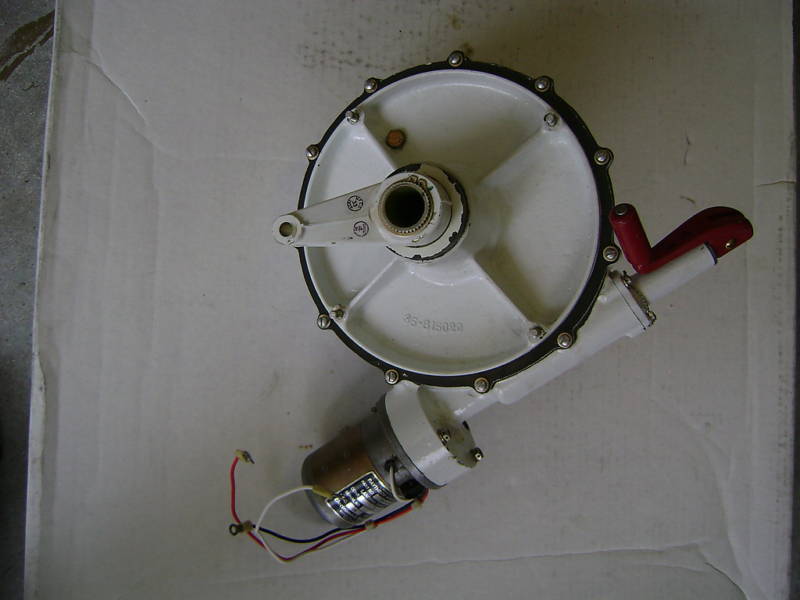
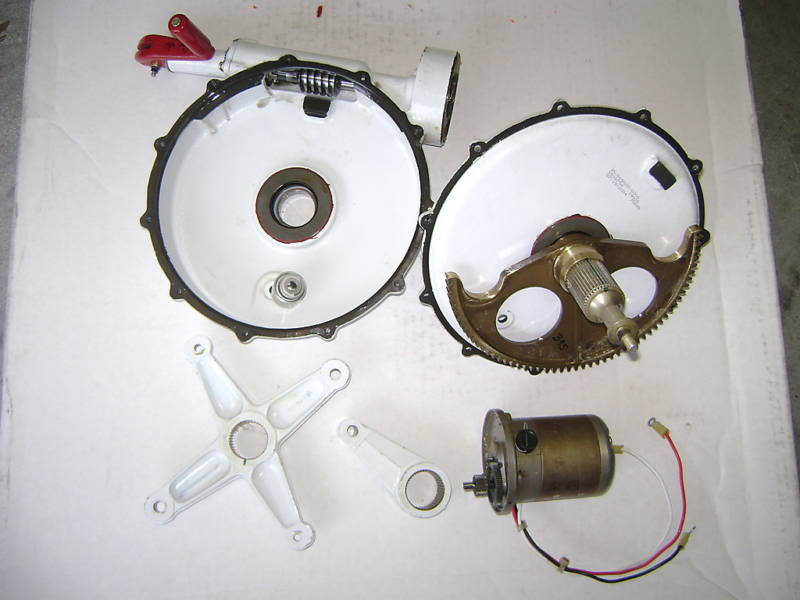
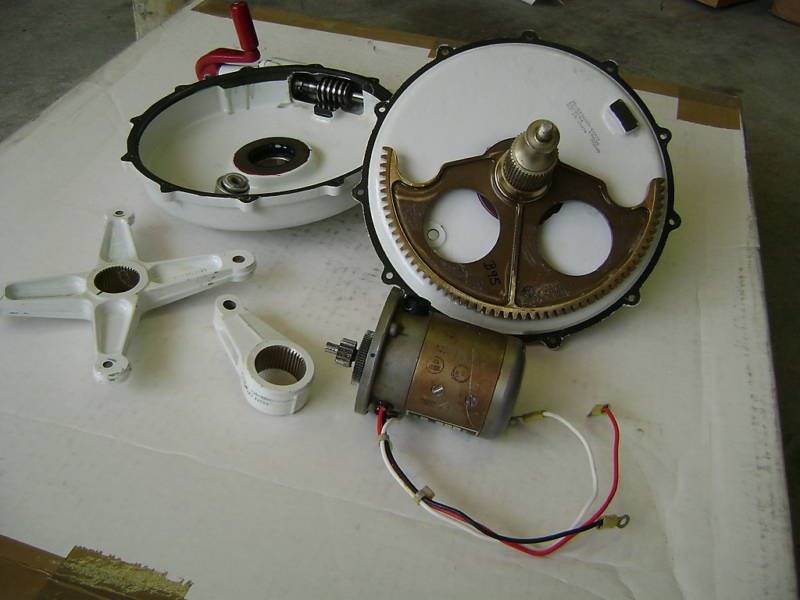
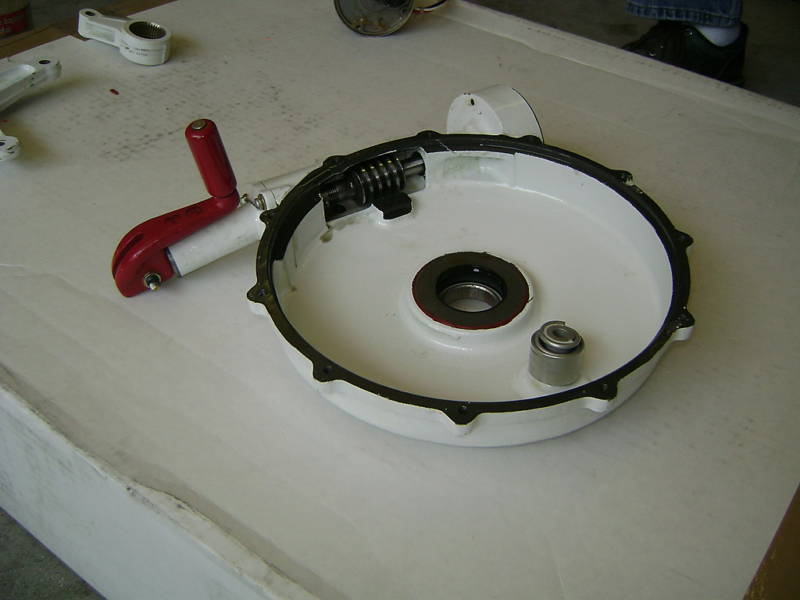
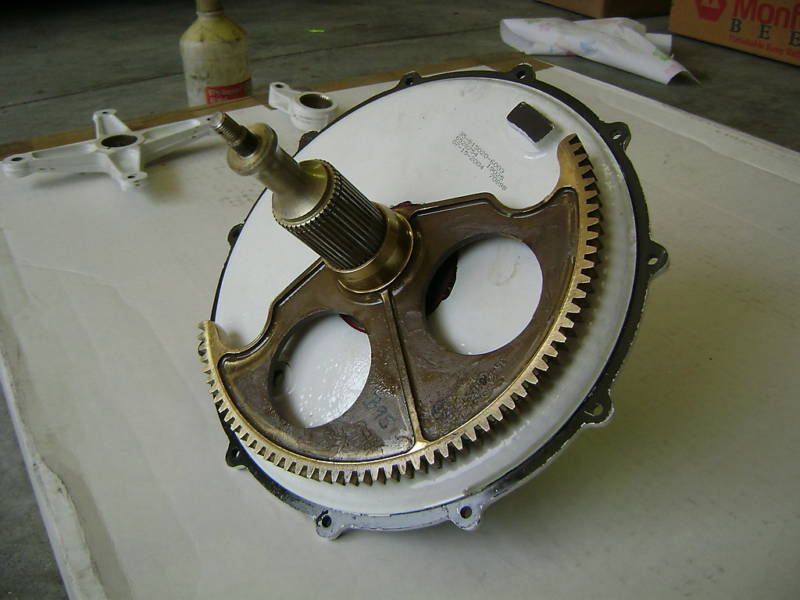
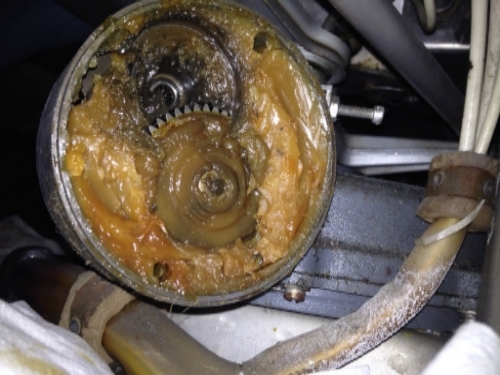
Here are pictures of the
landing gear transmission box that lurks beneath your seats!
Pretty simple mechanism huh? You can see
how the sector gear is the real business end of this thing.
See the
CSOBeech extensive Gear Transmission removal and disassembly expose
HERE
Below is a simple but effective
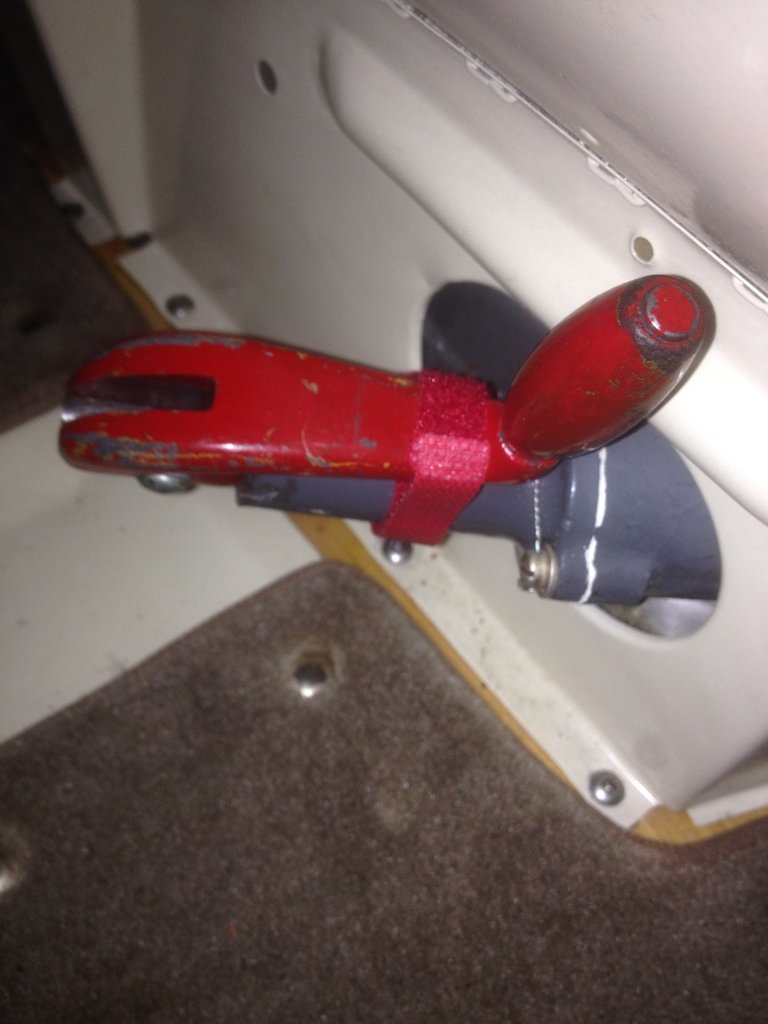
Velcro strap to secure your manual gear crank!
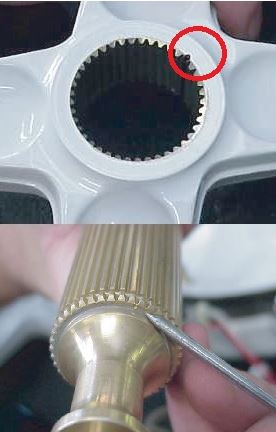
Click HERE if your landing gear crank handle leaks oil onto your carpet/floor.
Here are some thoughts on gear
transmission removal per Michael T.:
"The lower part of the housing fits into a mag casting riveted to the attach
pan; this is an area subject to corrosion. Spray it down with a good penetrating
oil. I also use a section of pipe, 2.375" OD with jack pressure from below, not
a lot, but pressure. A little heat gun on the casting to expand a bit and it
also helps the penetrating oil creep in. (Be aware of the penetrant flash
point!)
Take your time, maybe oil and preload with the pipe/jack, go enjoy an adult
beverage, and come back next week and it will be loose. There are times I have
preloaded them and went to work another area; sometimes 45 minutes, a couple
times it is hours and you will hear it come loose. Once free, you need to hold
your mouth 'just right' to wiggle it out of its cavity.
On reassembly, a good smear of anti-seize is recommended."
Here are pictures of the sector
gear and transmission spider arm match marks that need to be aligned for
reassembly.
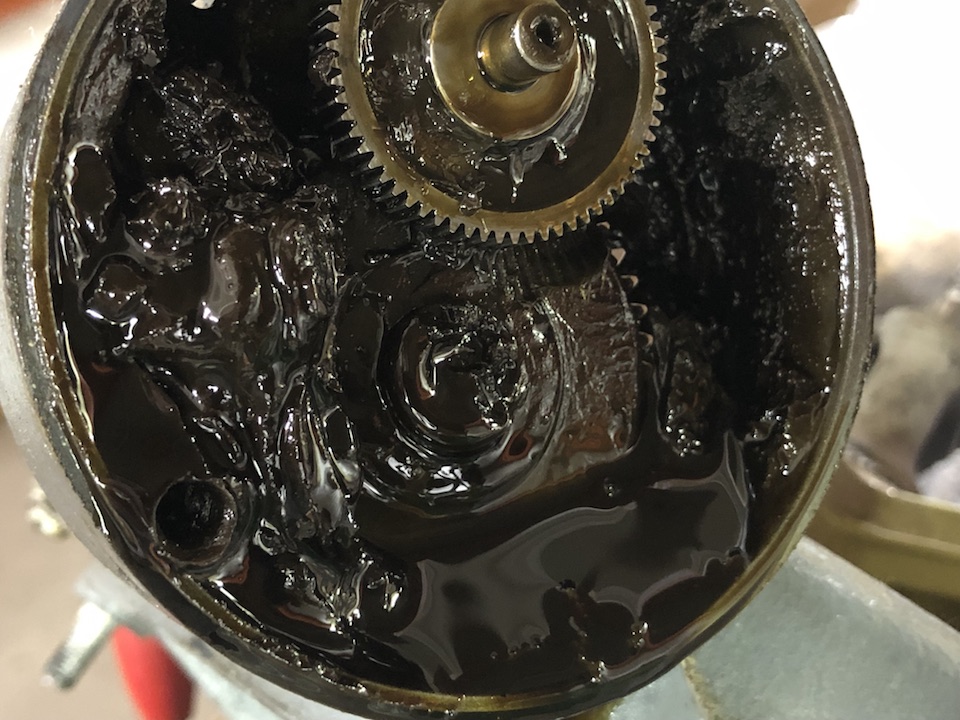
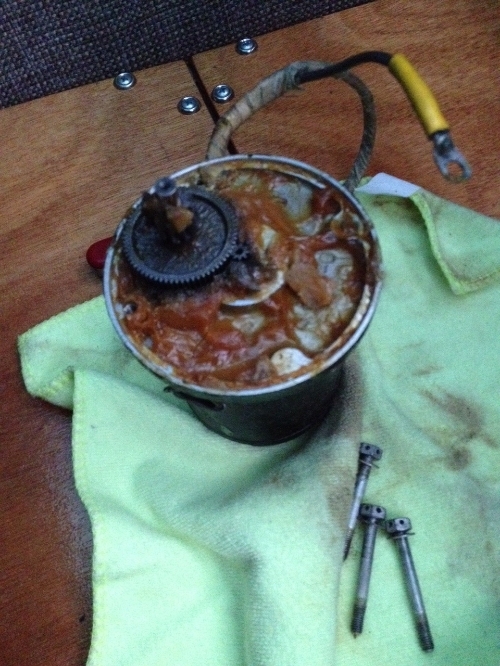
Here is what 65 year old
transmission gear lube might look like
If you or your
mechanic insist on overfilling the transmission, you run the risk of trashing
your gear motor by having the gear lube enter the motor and then BAM, your fresh
overhaul landing gear motor is fouled and then fails because your motor mounting
flange looks like the one below.
The red arrow points to the internal "stop" that will "prang"
your sector gear if your dynamic brake is fouled up or mis-adjusted.
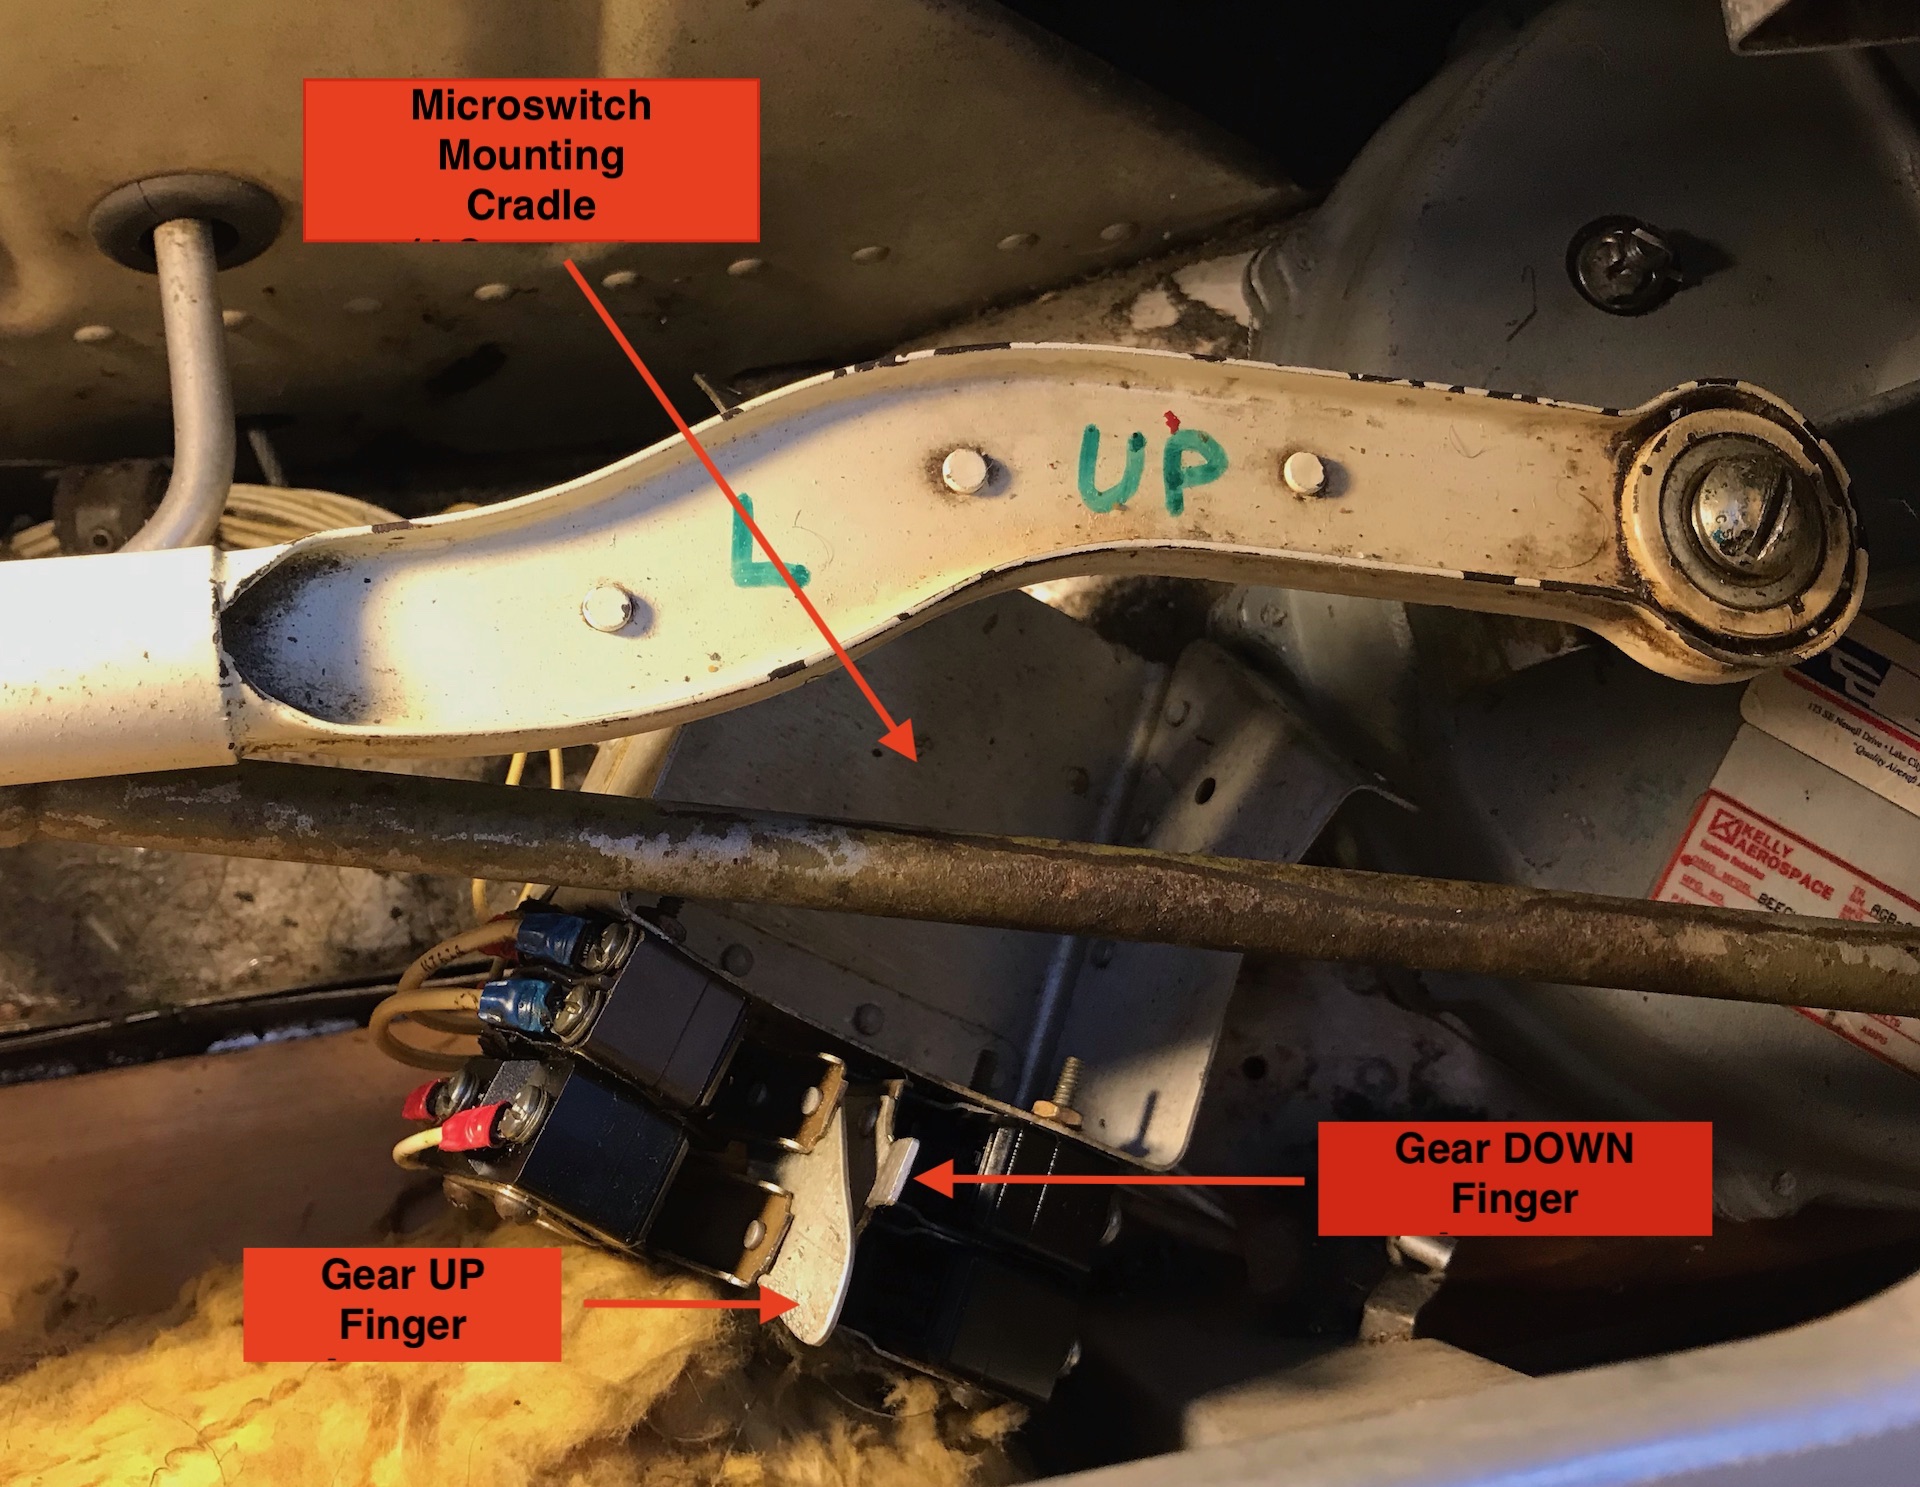
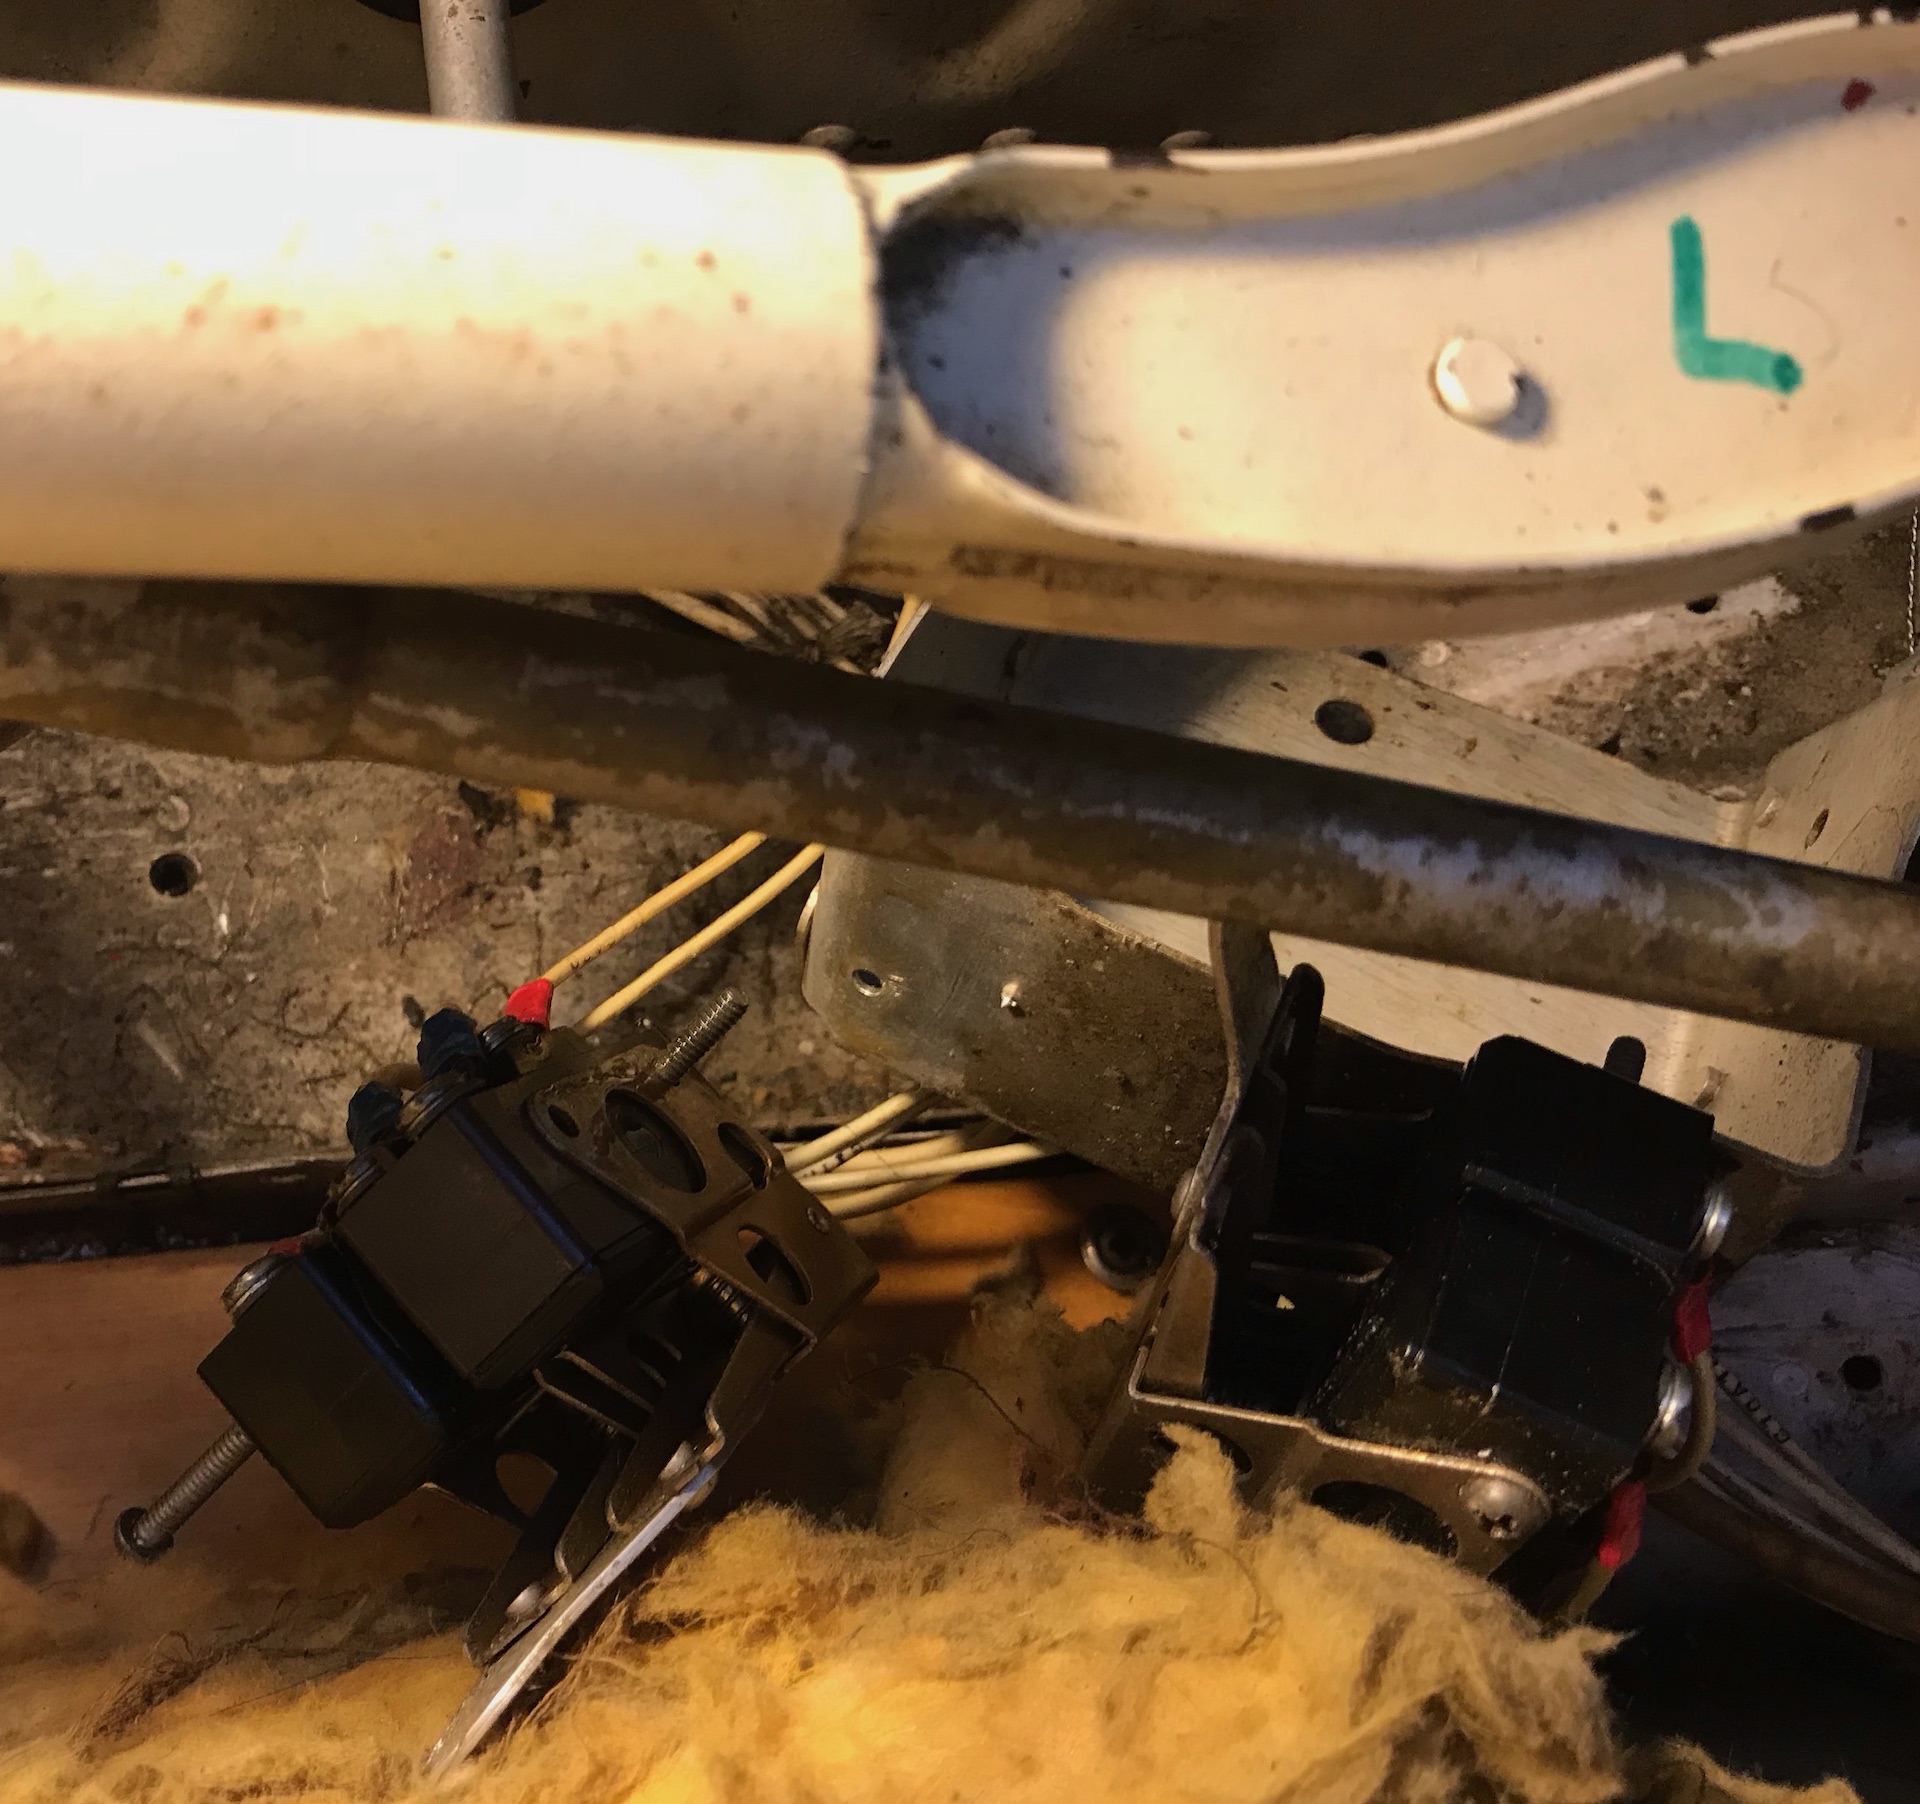
This shows the adjusting screw for the UP limit switch.
The switch on the left is the UP limit switch and the
switches on the right are in the DOWN system.
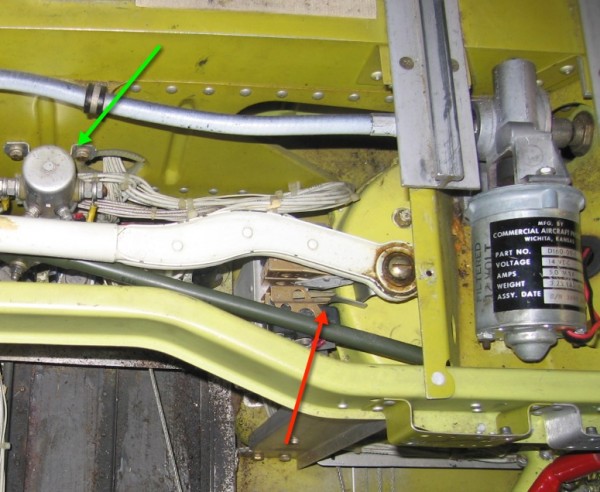
The green arrow points to the "Magic Hand" system solenoid (if your plane is so
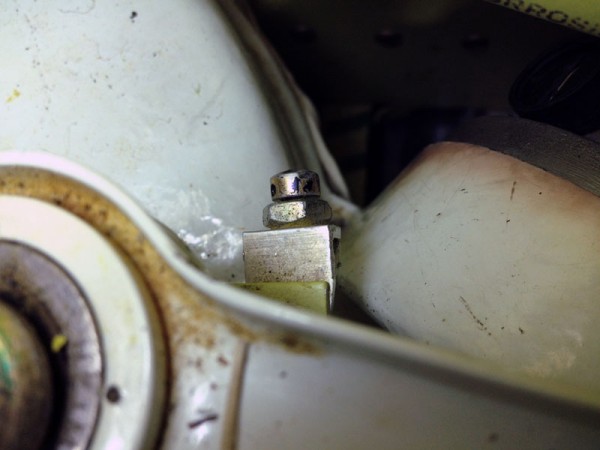
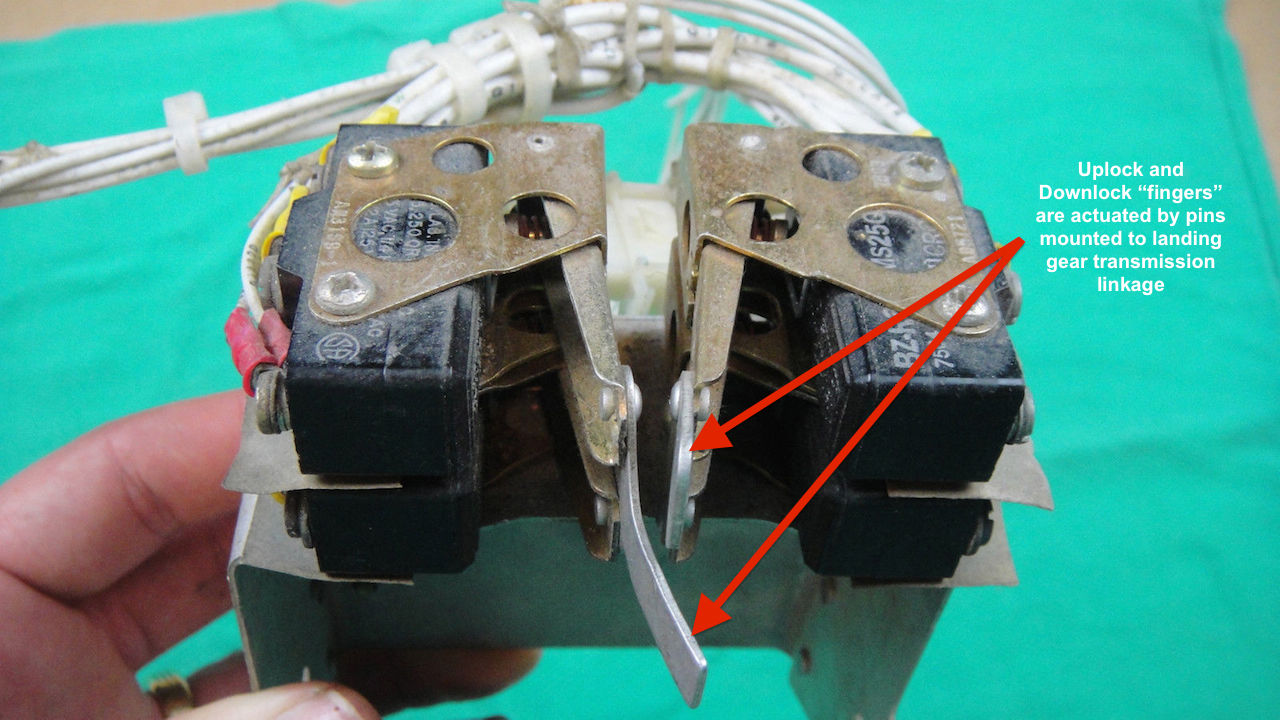
equipped). The red arrow points to the down lock microswitch "finger".
You can see above that the limit
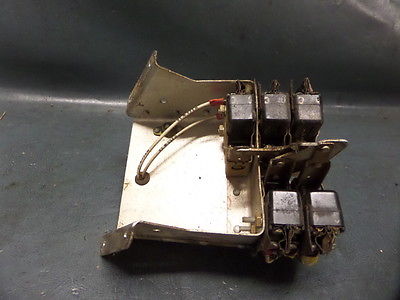
switch mounting cage is best removed from the airframe if you have to replace
any of the BZ-R31 limit switches. Not to
worry, there are nut plates in the bottom of the floor for mounting the cage.
Then be really careful about setting up the down limit and up limit switch
fingers. The
ABS Landing Gear Rigging Guide is the best guide for rigging your Beechcraft
landing gear.
If you think you need BZ-R31 Micro switches, support CSOBeech.com by buying them below.
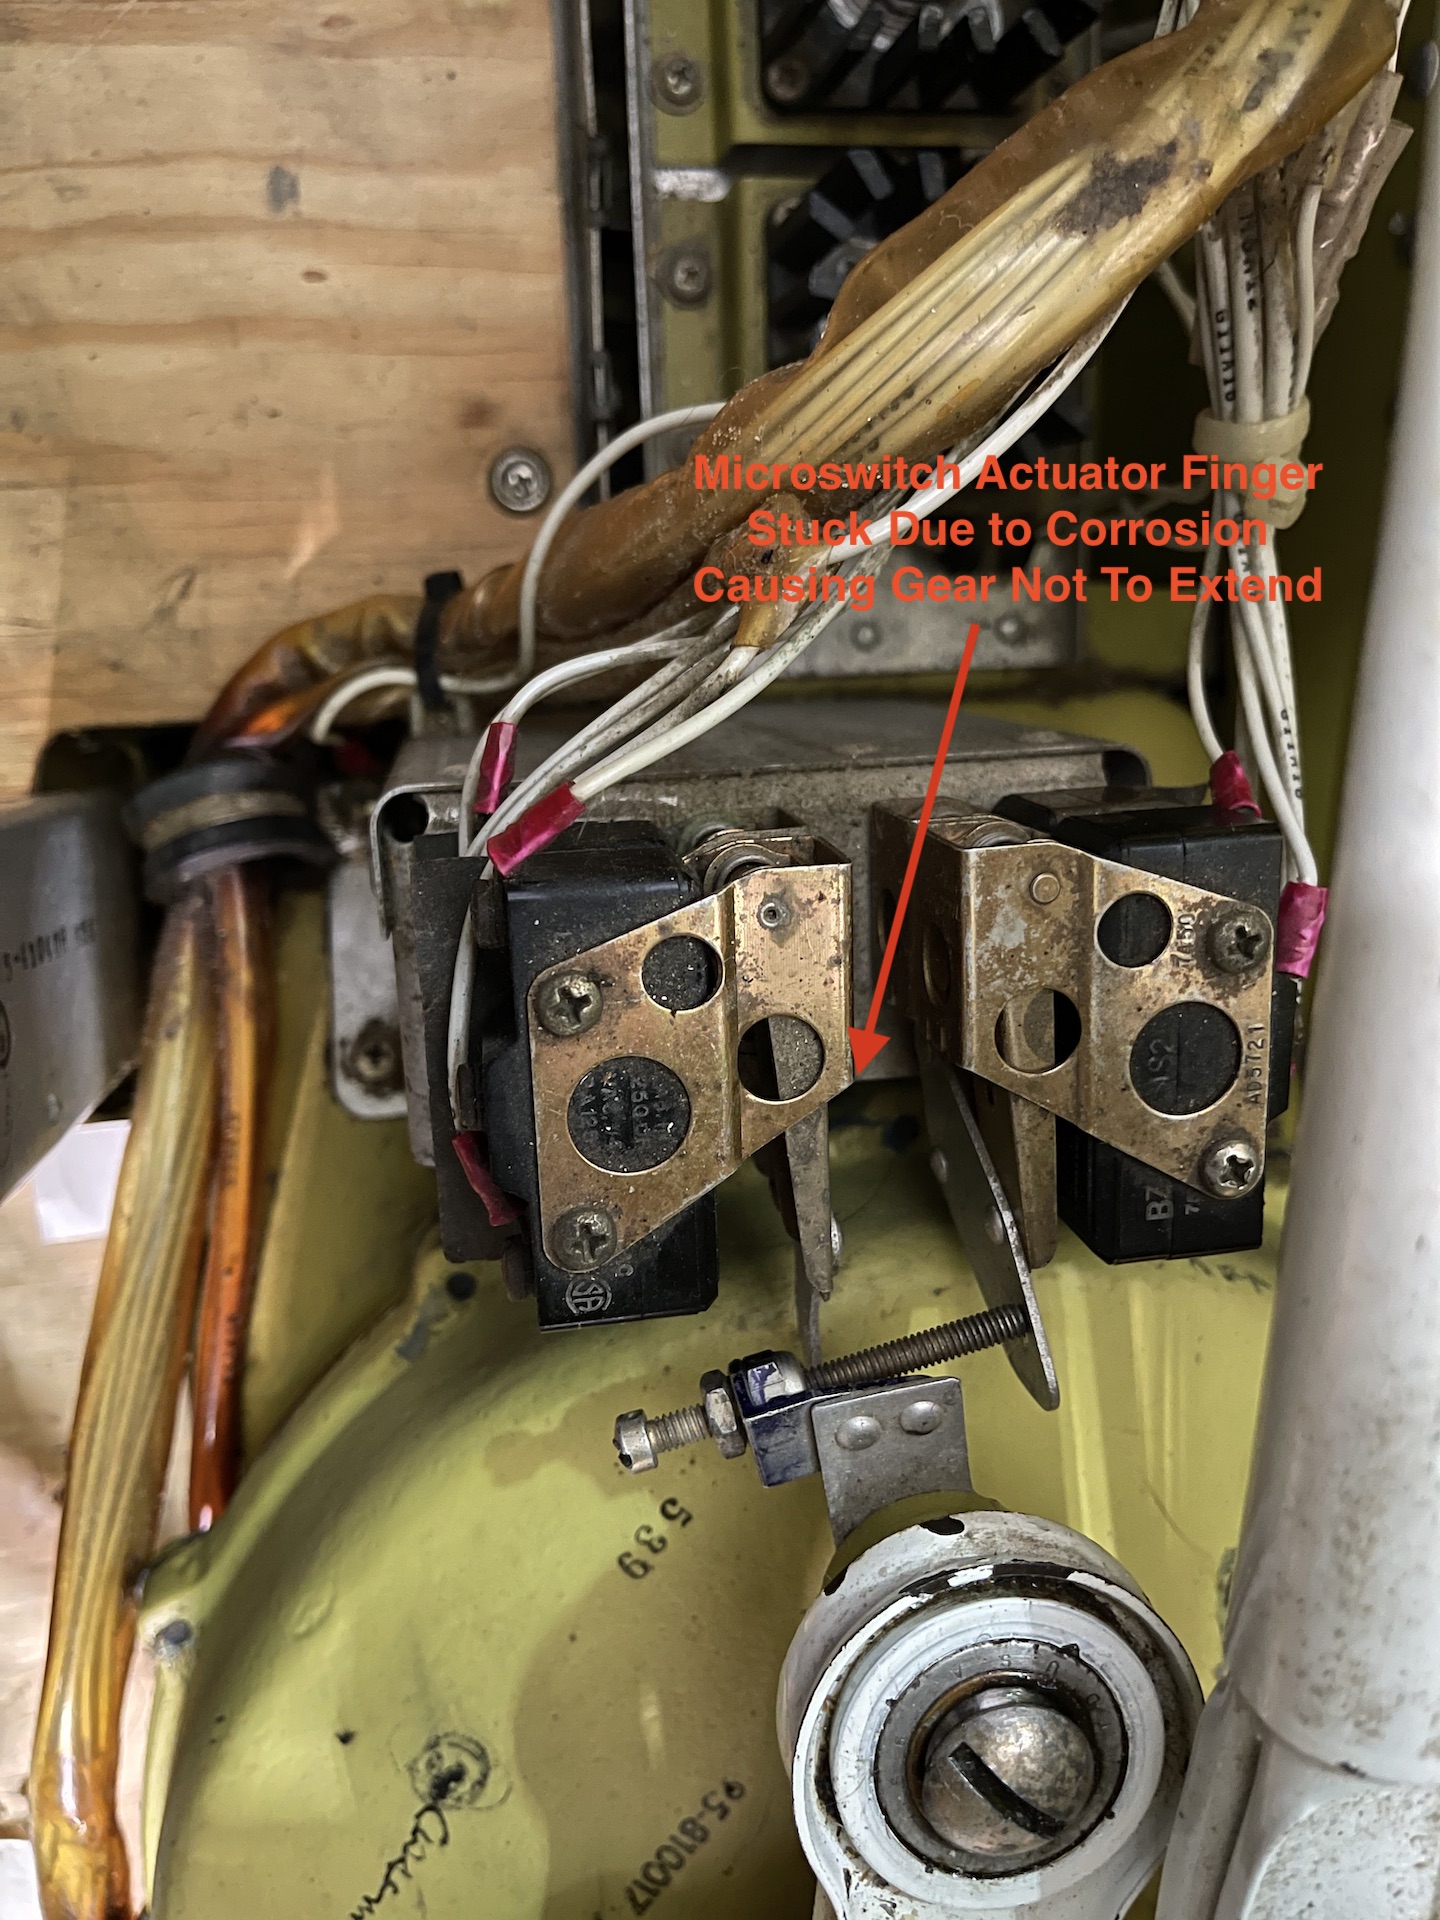
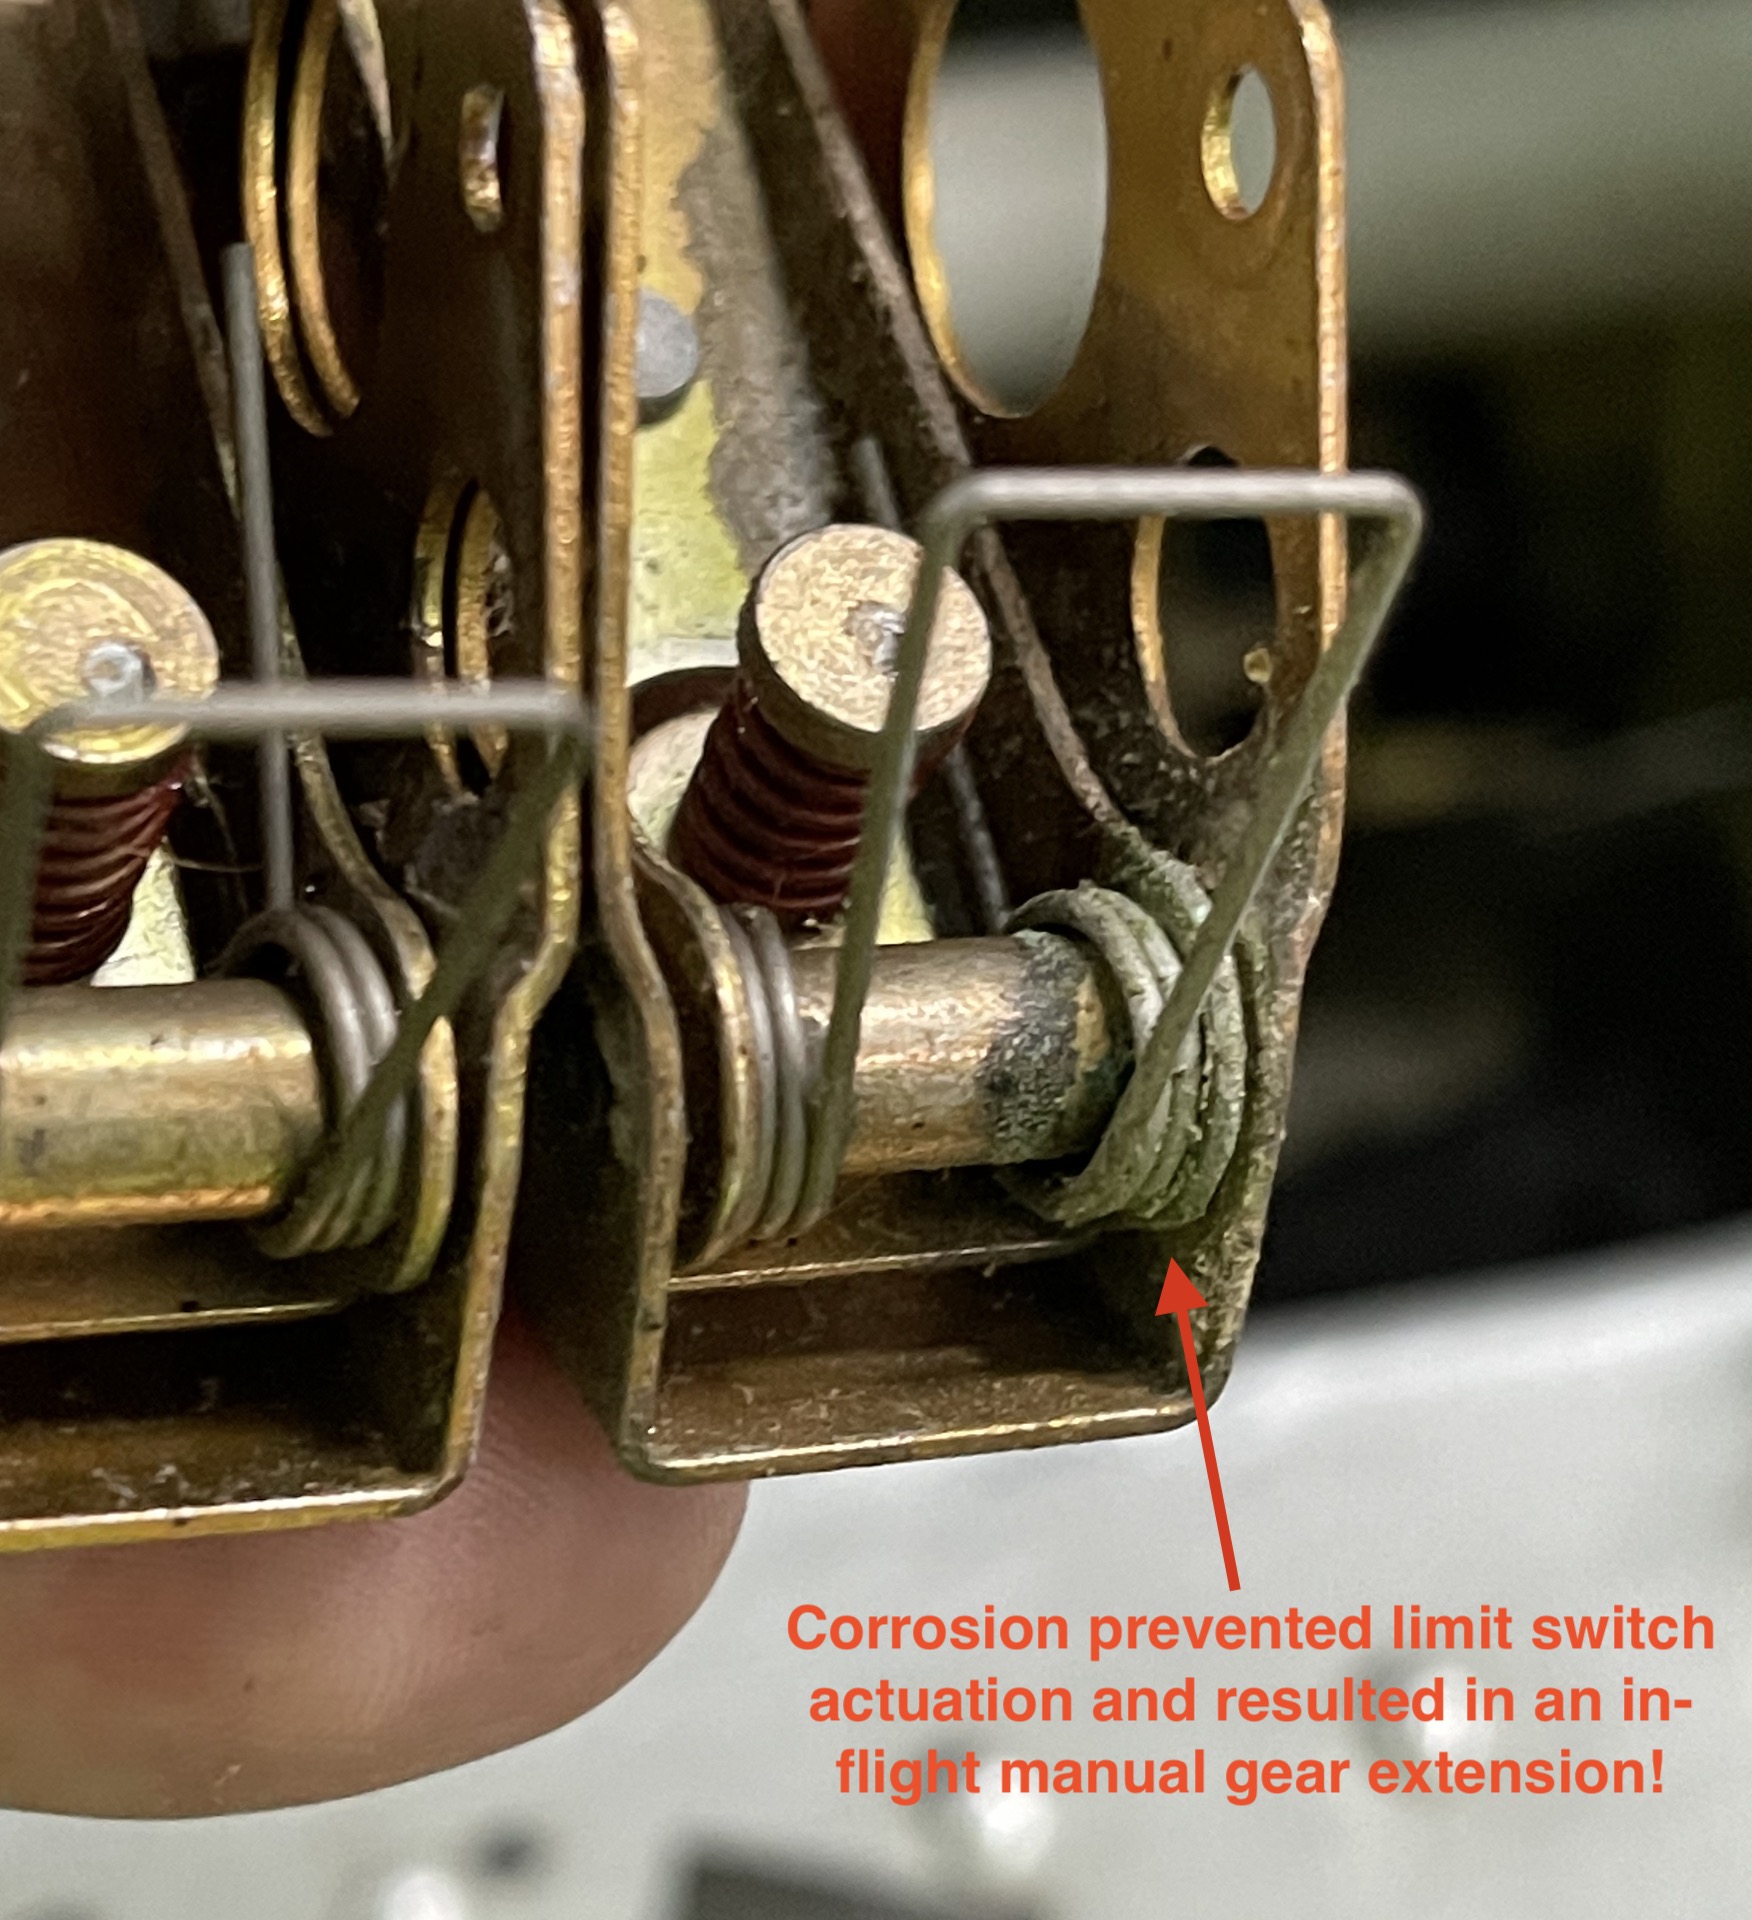
Don't
ignore inspecting and lubricating the limit switch Actuator Finger
springs. They have been doing their job for decades and could really use
some love once in a while! See below for this gear stopping corrosion
event that created an in-flight manual gear extension for this Baron B55
Colemill President II owner, Scott L.
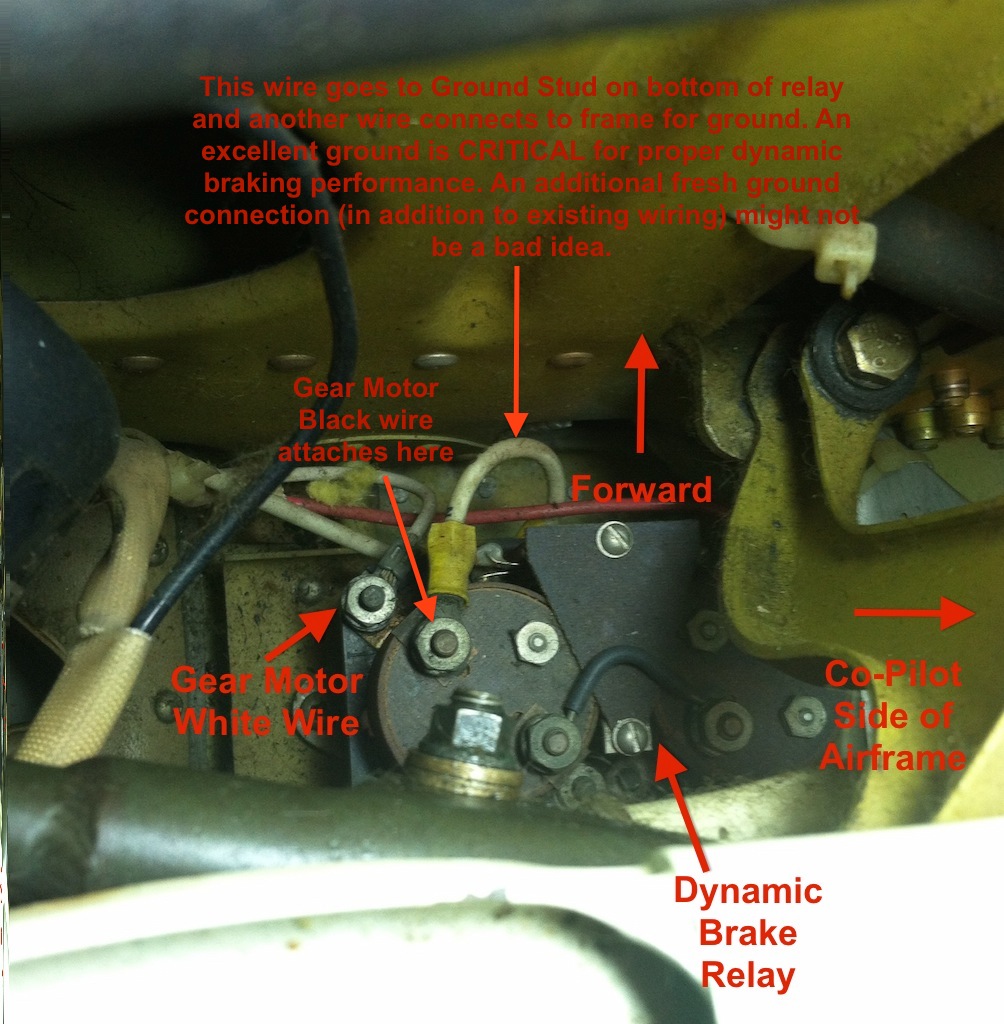
Importance of Good
Dynamic Relay Ground
Here is a success story told by
Texas A36 Bonanza owner, John W., who started his journey replacing an uplock
cable (not exactly a fun job in itself), which morphed into a full blown gear
rigging and chase of proper hand crank free play:
To review, I had trouble rigging my landing gear.
There are two screws that can be extended/retracted so as to hit up/down limit
switches earlier or later in the cycle. Those screws were all the way IN (to hit
the limit switch tabs as early as possible) yet I was not getting the book value
turn on the hand crank after the motor stopped. And all gear tensions/clearances
were just at the ragged edge of book value. I was out of further adjustment.
Additionally, in trying to address a possible bad ground I would remove the
relay ground wire, clean it, reinstall and things would change .. sometimes
better/sometimes not. This consistent changing was taking up time and driving me
nuts. I sent both the overhauled motor and the original relay to the overhauler
for a bench check. They were returned with an A-OK but a comment that the ground
stud on the relay was loose so it was tightened.
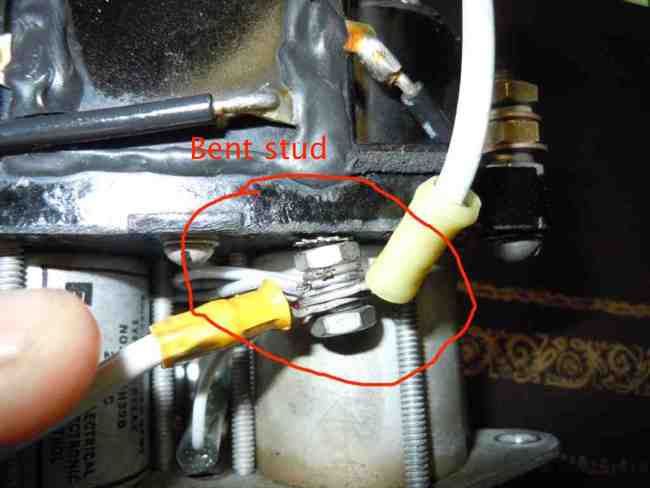
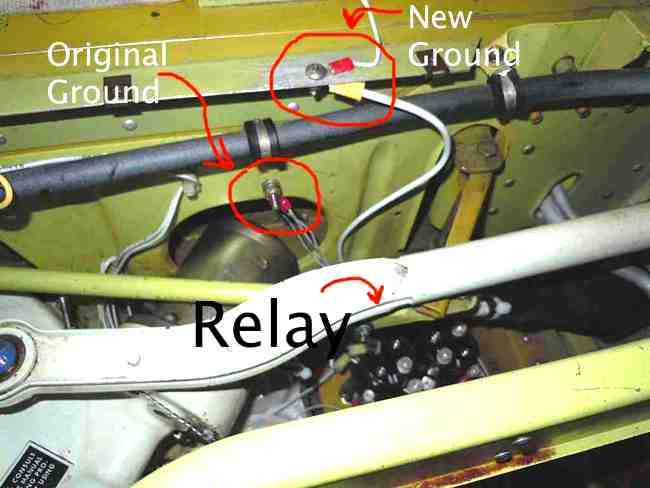
Upon return of these items I noted the relay ground
stud not only loose but it could wobble from side to side (see attached photo).
I ended up buying a new relay. Once installed this helped in that it gave me a
very small amount of latitude in adjustments but things still weren't right. I
spoke with Bob Ripley on several occasions and, every time, he said "you've got
a bad ground". I had a new motor and new relay so what could it be? I even
replaced the limit/micro switches. I removed the original relay-to-airframe
ground wire for a check. It had low resistance so that wasn't it. I then decided
to make a new ground wire and attach it to the airframe somewhere else (see
attached photo). BINGO. The difference was unbelievable. The adjustment screws
are now backed waaaay out. The motor stops in exactly the same spot every time.
Exact spot. Once the motor could be adjusted to stop anywhere .. and do so on a
dime, I was able to bring the main gear up to within .062 skin clearance (run
the motor a tad longer than before) which allows proper adjustment of the uplock
cable tension, the gear leg clearance of the inboard door, etc. Essentially I
had to adjust a lot of things because I was now able to get tighter tolerances
(where the book called them to be).
Early on, when I would come close to getting things
in order, they would then change for no apparent reason. I think the wobbly
ground stud on the relay would relax or move (remember I removed it to clean the
terminal several times) and the ground would go bad. That explains why things
kept changing and I could never seem to figure out why.
And a P.S. .. the relay has been modified in recent
years to a new part number. The only change I can see is a better ground stud.
The dynamic relay ground circuit
is key to consistently stopping the motor in the same place during each cycle.
My personal practice each year has been to generously squirt the relay terminals
and it's ground lug with CorrosionX to give the connections a good clean
corrosion free contact.
Below is a video
of Kevin testing dynamic braking of one of his refurbished 12V motors. Notice
the torque his hand experiences when the motor is stopped. Don't even think
about holding a 24V landing gear motor in your hand while testing dynamic
braking!
LANDING GEAR MOTOR
DYNAMIC RELAY WIRING
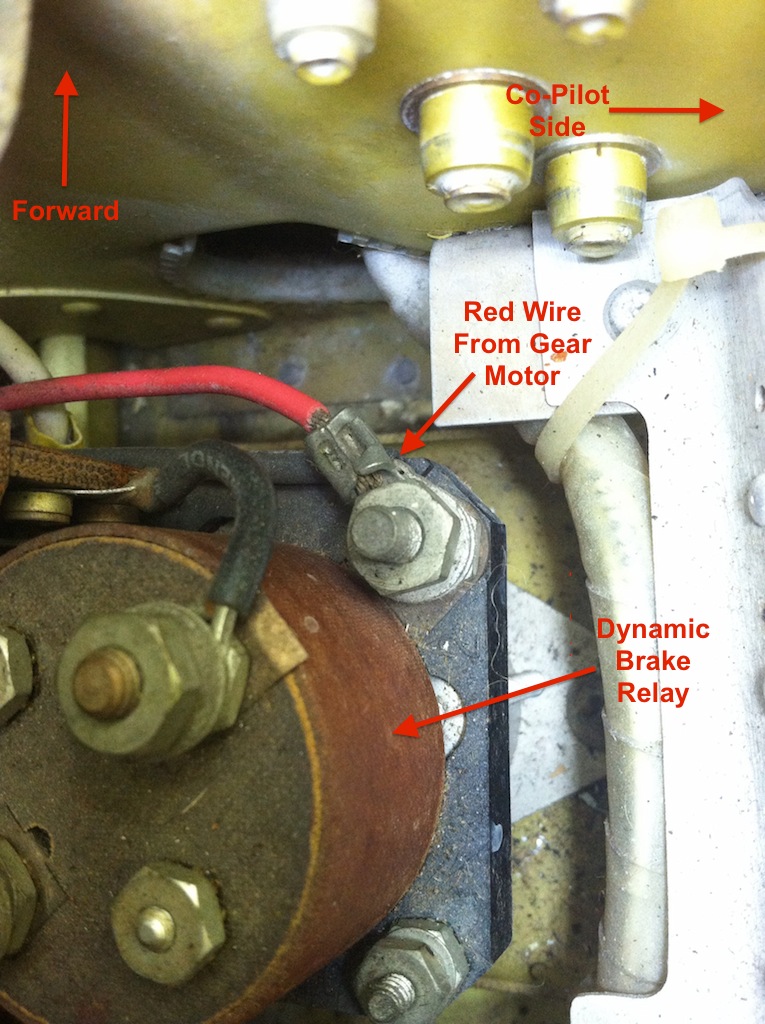
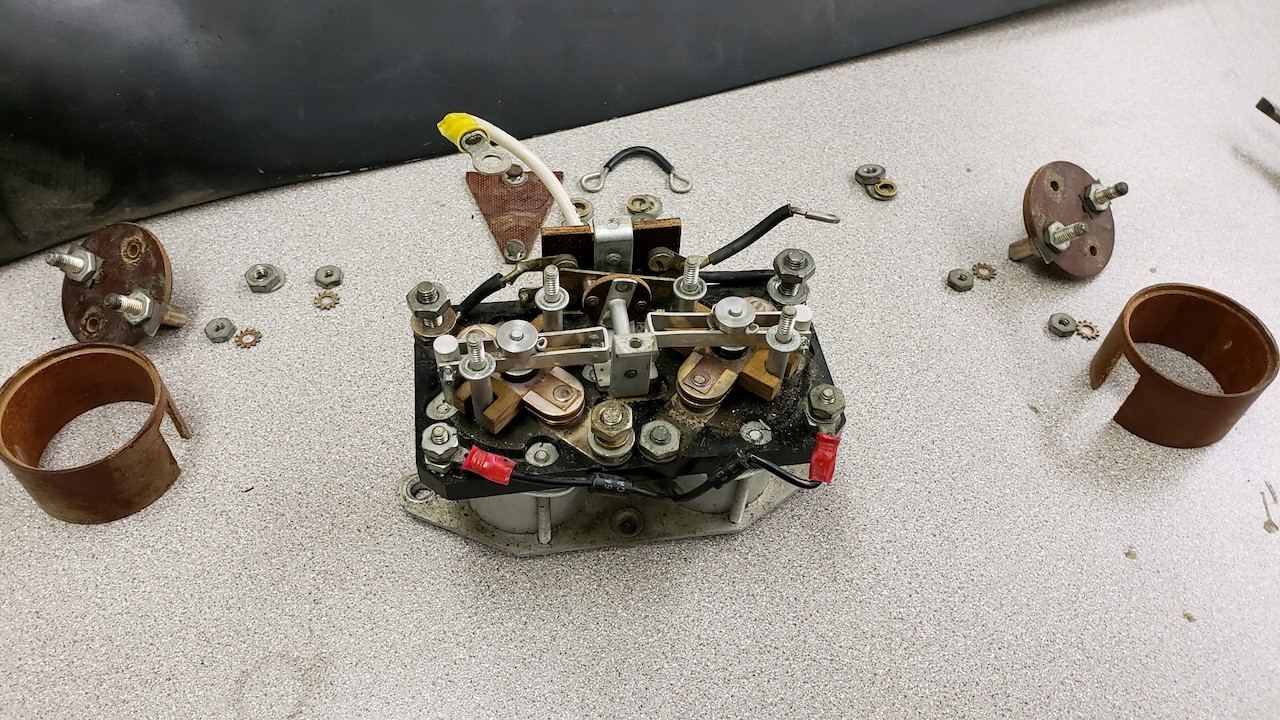
Below are pictures of a 24V Cutler Hammer Dynamic Brake Relay PN: 6046H39A
from a 1981 F33 which had about 6,000 hrs TIS on the part and the owner was
experiencing poor dynamic braking to the point where the sector gear was hitting
the stop. He confirmed his gear motor was in great shape by having it inspected
and repaired by George's Electrical in Sacramento, CA (916-922-4277) and still
the motor exhibited coasting.
You may find that this is the same PN for Barons, Travel Airs and other 24V
Bonanzas. However, as with all things Beech, check your IPC for your SN to
confirm!
His deconstruction pictures are below. Note the nasty arcing buildup on the
contacts that are carrying the current load! If you are patient and mechanically
inclined (and A&P supervised) you might consider downloading this repair
narrative HERE
to open up the relay to access and clean the contacts.
Caution, you are entering brain surgery territory. LOL!
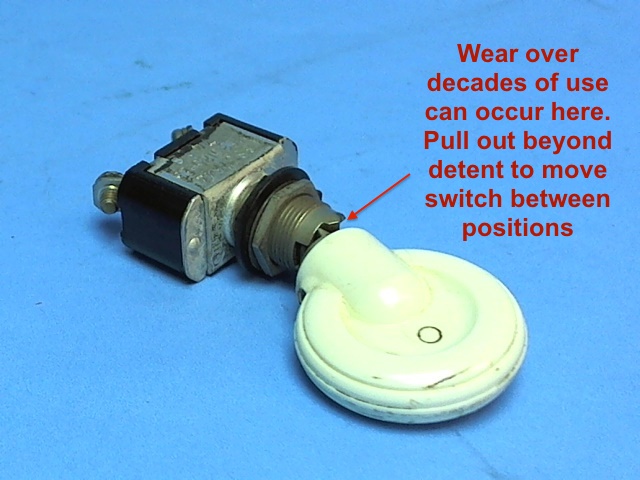
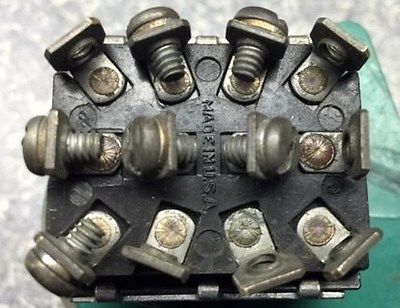
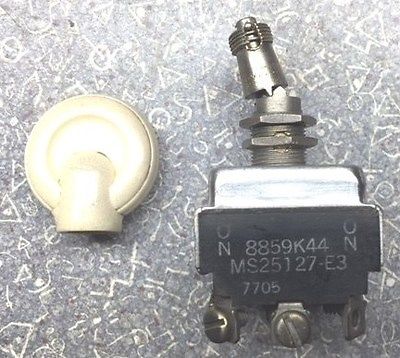
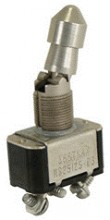
Below are pictures of the typical
landing gear switch. It is a Cutler Hammer mil-spec switch Beech
PN:MS25125-E3.
The Beech price on 1/23/2015 was
cited at $115. An enterprising Baron owner and
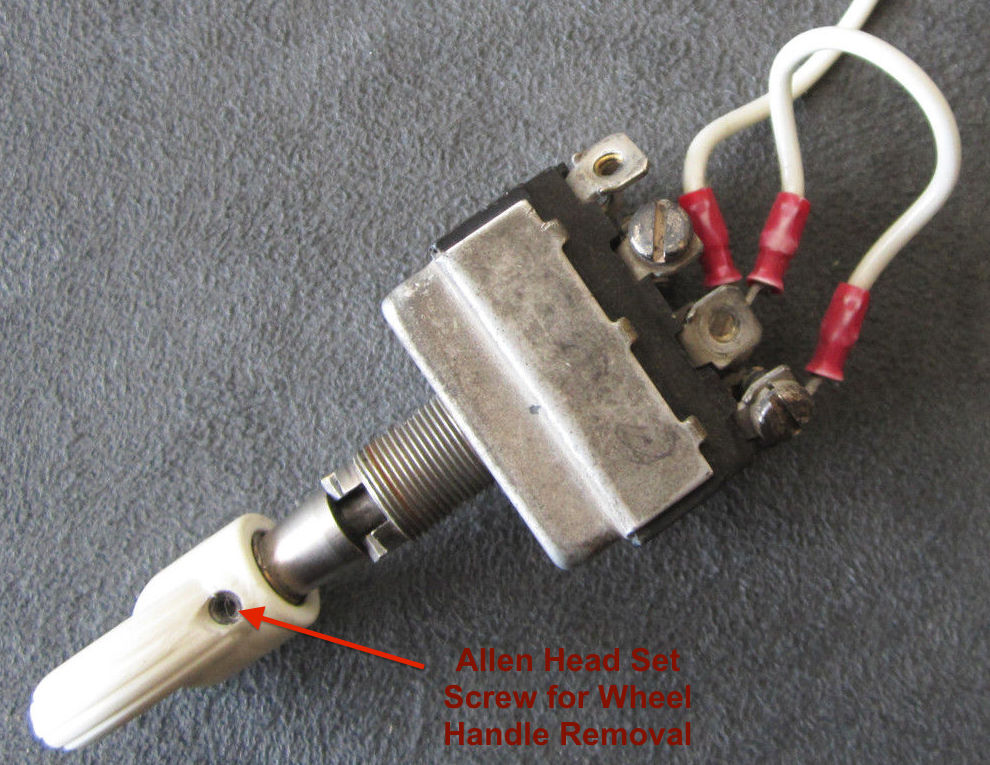
Of course, you're going to have to
figure out how to get the wheel off your old switch. There is an allen screw in the base and I also
think there may be an epoxy
adhesive of some sort. The wheel handle PN for an S35 Bonanza (and presumable
all similar Beech gear switches) is reported by Bob S. to be: 118665-5 at $17.33
on 8/15/2015. Bob provides additional insight on installing the wheel handle
below:
Replacing this is not difficult, but there are some
things to be considered. It can be
screwed on too far, which may interfere with the
locking action of the gear switch. Also, if
you have the Magic Hand system, there is a spacer that
goes inside the plastic handle
("lever") that allows a solenoid in the gear switch to
move the handle out and allow a
spring to move the switch to the gear down position.
You want to be sure that spacer is
properly positioned in the new plastic handle. Even
seemingly trivial things in the landing
gear system should not be taken lightly.
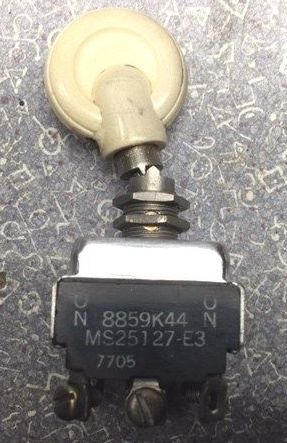
Joe L. expands on the gear switch
even further:
When installing the handle, be careful not to screw it
on too far -- it threads onto a spring-loaded barrel that incorporates two
protrusions/teeth that provide the lockout function to the switch. Take a good
look at the switch without the handle installed to fully understand the function
of the threaded barrel. Inside the switch's threaded barrel is a main center
shaft that projects out past the end of the the threaded barrel in its normal
condition. The switch cannot be cycled without pulling the barrel away from the
switch base. When the inside bore of the handle encounters this extended center
shaft due to over-threading onto the barrel, further threading of the handle
pulls the barrel further away from the switch base thereby negating the lockout
function -- just like the pilot pulling the handle aft to unlock it in order to
select the other position.
If the handle is sufficiently over-threaded onto the
barrel, like screwing the handle on until it stops,
the switch remains unlocked
100% of the time.
Properly installed, the switch requires the handle be pulled aft to allow the
opposing teeth to clear each other. I've encountered two aircraft that had the
handle excessively threaded onto the switch barrel. Both aircraft had previously
experienced retraction of the gear on the ground; both aircraft were repaired
years prior and actively flying without this causal issue being corrected
-- and neither owner realized that their switch was not functioning properly. In
both cases, a passenger bumped the switch on the ground and the switch moved to
the retracted position without resistance.
Loose fit?? JB Weld
is a wonderful thing. YMMV.
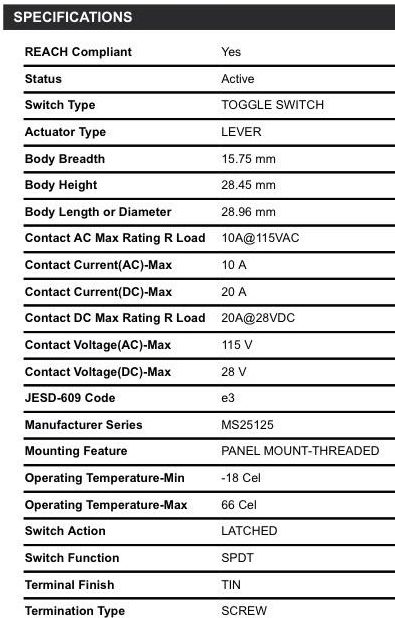
Gear Switch Specs
Transmission Gear Lube
Info
Here is some transmission gear
lube info posted by A&P & Beech Owner Bob B. of Texas:
From Beechcraft Communique #102
June, 2003
"The motor gear box should be packed with grease conforming to
Mil-G-81322 = Mobilgrease 28 (Shell Grease 22) The landing gear actuator itself
should be filled with approximately 1/2 pint of 75 weight gear oil conforming to
Mil-PRF-2105 (supersedes Mil-L-2105)." This lube goes between the gear motor
drive gear and the transmission housing - a little bit will do! Do NOT over pack
or you will end up with a gear motor that ingests the grease and will
prematurely fail to function properly!
Initially, Mobil Compound GG was specified to meet this
requirement. *This* lubricant is no longer available and was replaced by a
synthetic lubricant. In addition to Mobil 636 another Mobil product
has also been approved by the factory for servicing landing gear actuators.
Mobil SHC ..........available through our spares system under our part number of
101-380016- 1 (5 gal)"
Note the GG was the lead product! Only Performance Aero seems
to have a smaller than 5 gal quantity that i know of. However there may be
another newer Communique. Any lube meeting the Mil Spec is adequate in my
opinion.
Another pirep states:
Beech specifies Mobil Delvac 75W-90 gear oil, "which meets
the same MIL-PRF-2105 specification as Mobilube SHC."
Here is some additional lubrication research regarding the Mil
Spec and the current day lubricants that will meet the spec:
It would appear that automotive gear lubes of API GL-5 will meet the Mil spec
for our gear transmission.
API Category GL-5 designates the type of service characteristic of gears,
particularly
hypoids in automotive axles under high-speed and/or low-speed, high-torque
conditions
Lubricants qualified under U.S. Military specification MIL-L-2105D (formerly
MIL-L-2015C), MIL-PRF-2105E and SAE J2360 satisfy the requirements of the API GL-5 service designation.
Check this
HERE from Lubrizol regarding the Mil Spec and
THIS spec document from
AMSOIL.
I've been a fan of AMSOIL Synthetic lubricants for over 20 years. These look
like my candidates:
PLEASE NOTE: As with all things on CSOBeech,
be sure that YOU independently confirm all information with your A&P/IA before
relying on this posted information. Remember, you, the owner/operator are
responsible for the airworthiness of your aircraft.
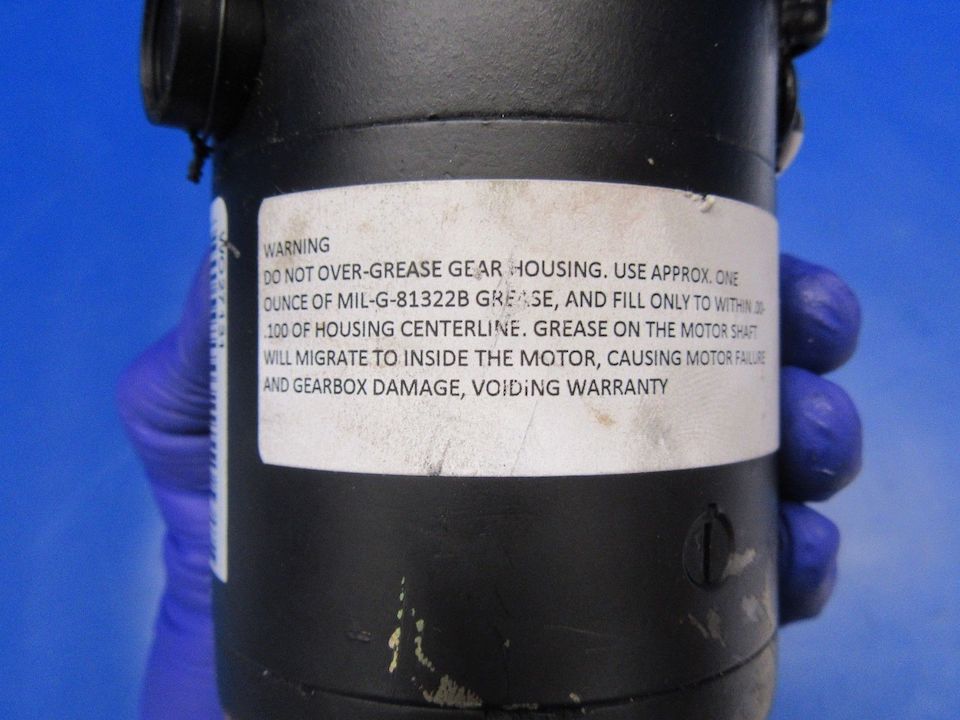
Here is a gear box that took a
pounding. A hypothesis is that after the gear up landing, the operator placed
the switch in the down position. Like that was going to lift the plane off the
ground and allow the plane to be rolled off the runway
.
Wonder what shape that sector
gear is in?
Here is what NOT
to do when placing your repaired or overhauled landing gear motor back in
service - Don't pack it with so much grease that you get grease all inside the
armature. Pics and below narrative courtesy of Kevin O:
A guy called me a couple of weeks ago bitching about his second gear motor
going bad in 3 years--asked me to look at it--said OK when I received it and
opened it up--the first picture is what I found. In the shop manual it states to
use one ounce of grease in the area between the motor and the landing gear
trans--placed below the mid point.
Whoever was installing the motor was packing it full--over a few months the
grease would leak over into the motor--coating the brushes and armature and
windings--causing the loss of dynamic brake and making the gear retraction times
slow. Below are two additional pictures of a gear motor that was waaaaaay
OVER-packed with grease (they are both the same motor just the flash made the
grease color look different). DON'T OVERGREASE THE GEAR MOTOR!
Below is the caution instruction from a rebuilder regarding gear motor grease
Picture below is of a gear motor with 2000 hours on it--the black stuff is
just carbon dust from the gear brushes (normal) To save you guys time and money
( and maybe the loss of plane and injury )--use the correct amount and type of
grease
Read the spec for
lubricating the gear motor before install
HERE
Comments from
Kevin O. regarding install of the gear motor:
The space between the motor and
the trans should be LESS than half full ( more like 1/3--any more and it will
leak into the motor as seen above. Also make sure that there is a washer on the
reduction gear that inserts into the motor ( they tend to get lost and then the
gear starts eating into the housing of the motor ALSO---have the plane on
jacks---retract the gear 1/2 way up--remove old motor and replace with the new
motor---then with the gear switch in the up position---hit the master switch for
just a second--make sure the motor is connected in the correct way ( its
retracting)--then cycle the gear both up and down and make sure you have the
correct 1/8th to a 1/2 turn on the trans to get it to hit the stops.
Do NOT cycle the gear a bunch of
times without letting it sit for awhile and cool down--you do not want it to get
hot--can screw up the windings.
Click
HERE for the 24V
Baron Landing Gear Motor IPC and Maintenance Manual
Click
HERE for the 12V
Bonanza Landing Gear Motor IPC and Maintenance Manual
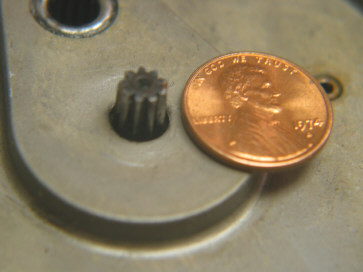
Here is a picture
of the Landing Gear Motor Drive Gear. That little gear drives the whole landing
gear system! Rumor has it this motor is a descendant of the motor that rotated
the gun turrets in WWII vintage bombers.
No longer a "rumor", this sure looks like the ancestor of
our flap motors on this B26 Martin gun turret!
Now what are the rest of you
Beechcraft owners with original landing gear components in your 3,000, 4,000,
5,000, and 6,000+ TT airframes waiting for!
Click
HERE
for More Landing
Gear Rod End Tips, Sources, Rod End Catalogs and Part Numbers
Click
HERE for a 28V
Landing Gear Motor Parts Catalog & Maintenance Manual, it is for a Lamb motor
but could be helpful in understanding the general mechanics of the design.
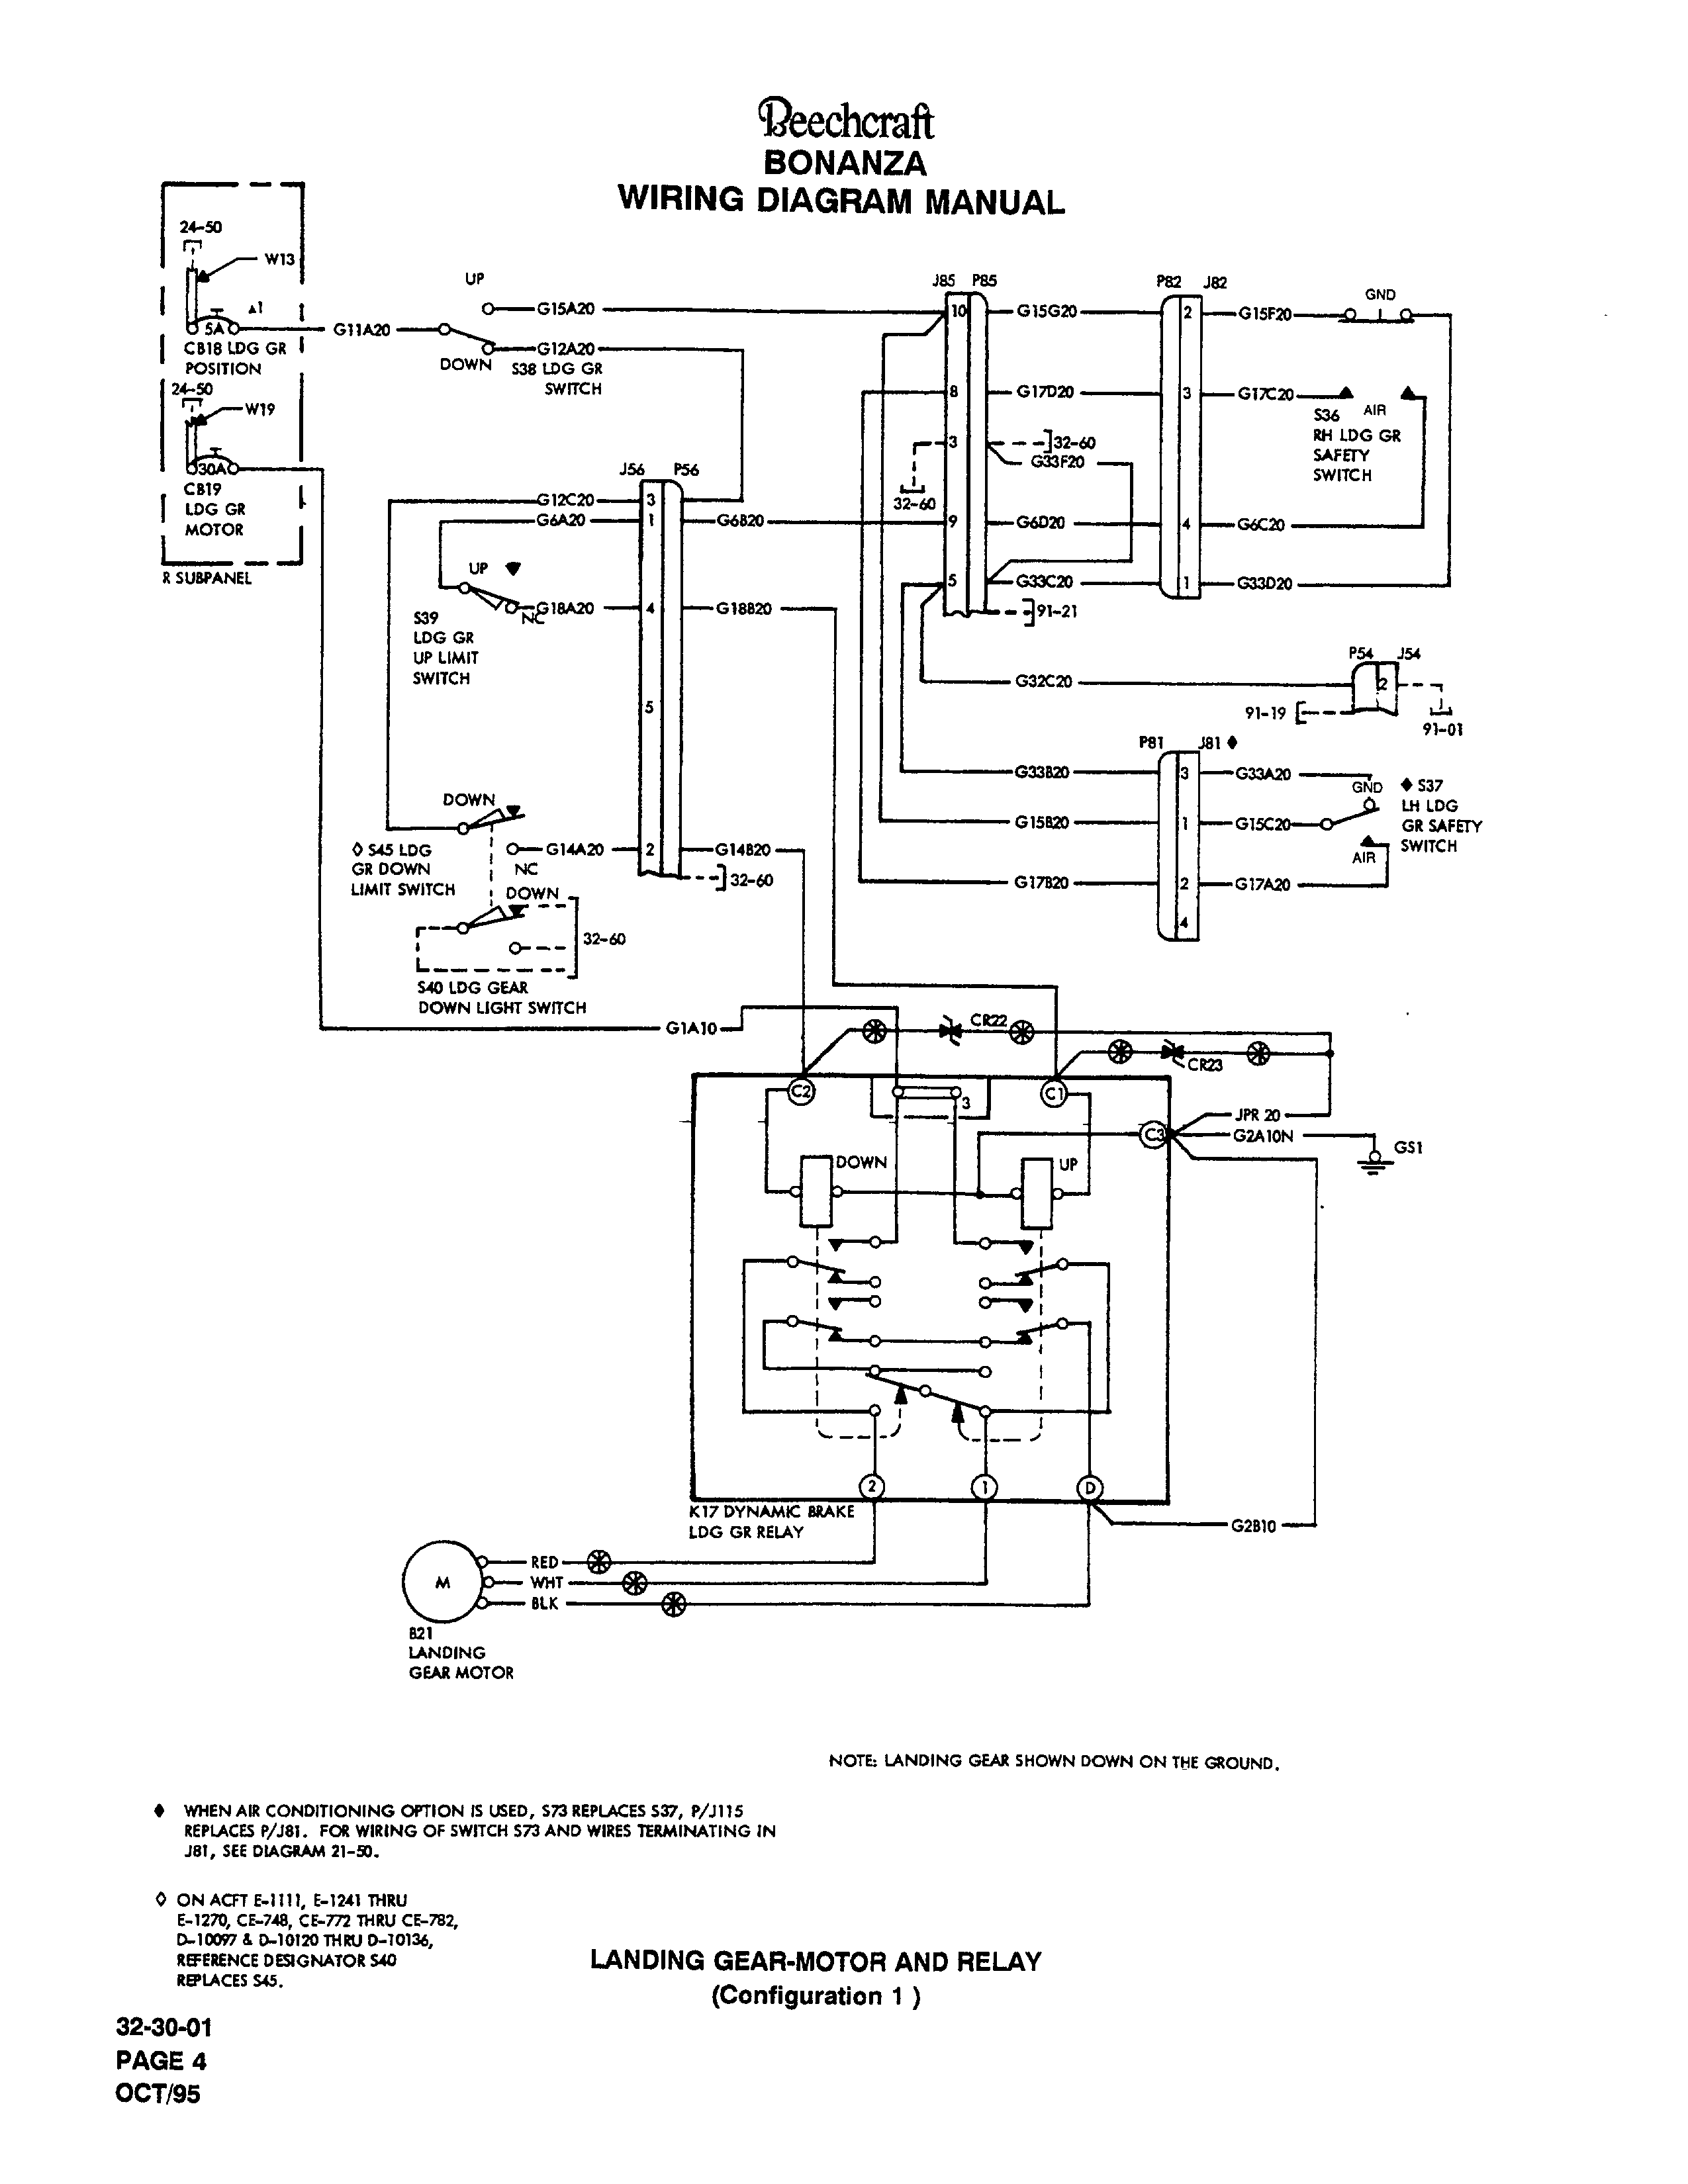
Below is a Bonanza 28V Landing
Gear Wiring Diagram. Check your specific SN catalogs for your particular
diagram. This is just shown for reference
See the ABS Landing Gear
Inspection Manual HERE . It
is a great reference for doing a thorough gear inspection and setting the
rigging to the proper specs.
See the Bonanza 33 Series Landing
Gear IPC Extract
HERE.
YOU'VE
GOT TO READ
THIS Landing Gear Tip: Is your mechanic taking the slack out of your inner gear door
mechanism by tightening the turnbuckle rods? Maybe there is a reason for that
slack in the mechanism?
Ask your mechanic to examine the play/wear of this
Bushing/Rod
End and
Bolt
combo that attaches to the top transmission swing arm before tightening up the
linkage. Part total time estimated at 4,000 hours. The bolt was worn down
0.005" and the rod end would not even hold the bushing anymore.
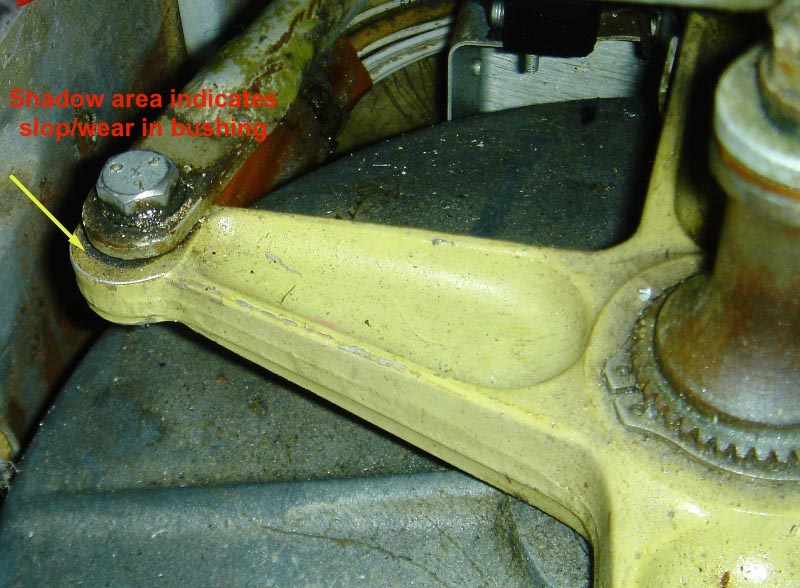
Here is my gear door arm showing a slop
"signature" (yellow arrow area) on the transmission arm, found during my annual. This is going to be
fixed with new pieces.
This tip
and many other landing gear tips are compliments of a VERY EXPERIENCED Beech
Lister who found this slop and dug further when he was installing a freshly
overhauled gear motor in his Debonair.
Here is a gear transmission highlighting the
location of cotter pins that will be a major PITA to remove and replace if/when
you replace the bearings on the push pull rods or remove the trans for
inspection/repair/overhaul. Just so you can prepare yourself with a good mirror,
your reading glasses and right angled needle nose pliers! Settle in for some
tedious fine motor skill work to get this done.
If you've found this content useful, even though you're a card-carrying
CSOB, please consider a
secure PayPal donation by clicking the "Donate" button to defray some
of my expenses.
*For more info on LGRMs (Landing Gear Related
Mishaps) visit:
Mastery Flight Training
created by Tom Turner, ABS' Executive Director.